# Asset Requirements (/docs/builderkit/asset-requirements)
---
title: Asset Requirements
description: "Required assets and file structure for chain and token logos."
---
# Asset Requirements
BuilderKit requires specific asset files for displaying chain and token logos. These assets should follow a standardized file structure and naming convention.
## Chain Logos
Chain logos are used by components like `ChainIcon`, `ChainDropdown`, and `TokenIconWithChain`.
### File Structure
Chain logos should be placed at:
```
/chains/logo/{chain_id}.png
```
### Examples
```
/chains/logo/43114.png // Avalanche C-Chain
/chains/logo/43113.png // Fuji Testnet
/chains/logo/173750.png // Echo L1
```
### Requirements
- Format: PNG with transparency
- Dimensions: 32x32px (minimum)
- Background: Transparent
- Shape: Circular or square with rounded corners
- File size: < 100KB
## Token Logos
Token logos are used by components like `TokenIcon`, `TokenChip`, and `TokenRow`.
### File Structure
Token logos should be placed at:
```
/tokens/logo/{chain_id}/{address}.png
```
### Examples
```
/tokens/logo/43114/0x1234567890123456789012345678901234567890.png // Token on C-Chain
/tokens/logo/43113/0x5678901234567890123456789012345678901234.png // Token on Fuji
```
### Requirements
- Format: PNG with transparency
- Dimensions: 32x32px (minimum)
- Background: Transparent
- Shape: Circular or square with rounded corners
- File size: < 100KB
## Directory Structure
Your public assets directory should look like this:
```
public/
├── chains/
│ └── logo/
│ ├── 43114.png
│ ├── 43113.png
│ └── 173750.png
└── tokens/
└── logo/
├── 43114/
│ ├── 0x1234....png
│ └── 0x5678....png
└── 43113/
├── 0x9012....png
└── 0xabcd....png
```
# Custom Chain Setup (/docs/builderkit/chains)
---
title: Custom Chain Setup
description: "Configure custom Avalanche L1 chains in your application."
---
# Custom Chain Setup
Learn how to configure custom Avalanche L1 chains in your BuilderKit application.
## Chain Definition
Define your custom L1 chain using `viem`'s `defineChain`:
```tsx
import { defineChain } from "viem";
export const myL1 = defineChain({
id: 173750, // Your L1 chain ID
name: 'My L1', // Display name
network: 'my-l1', // Network identifier
nativeCurrency: {
decimals: 18,
name: 'Token',
symbol: 'TKN',
},
rpcUrls: {
default: {
http: ['https://api.avax.network/ext/L1/rpc']
},
},
blockExplorers: {
default: {
name: 'Explorer',
url: 'https://explorer.avax.network/my-l1'
},
},
// Optional: Custom metadata
iconUrl: "/chains/logo/my-l1.png",
icm_registry: "0x..." // ICM registry contract
});
```
## Provider Configuration
Add your custom L1 chain to the Web3Provider:
```tsx
import { Web3Provider } from '@avalabs/builderkit';
import { avalanche } from '@wagmi/core/chains';
import { myL1 } from './chains/definitions/my-l1';
function App() {
return (
);
}
```
## Required Properties
| Property | Type | Description |
|----------|------|-------------|
| `id` | `number` | Unique L1 chain identifier |
| `name` | `string` | Human-readable chain name |
| `network` | `string` | Network identifier |
| `nativeCurrency` | `object` | Chain's native token details |
| `rpcUrls` | `object` | RPC endpoint configuration |
| `blockExplorers` | `object` | Block explorer URLs |
## Optional Properties
| Property | Type | Description |
|----------|------|-------------|
| `iconUrl` | `string` | Chain logo URL |
| `icm_registry` | `string` | ICM registry contract address |
| `testnet` | `boolean` | Whether the chain is a testnet |
## Example: Echo L1
Here's a complete example using the Echo L1:
```tsx
import { defineChain } from "viem";
export const echo = defineChain({
id: 173750,
name: 'Echo L1',
network: 'echo',
nativeCurrency: {
decimals: 18,
name: 'Ech',
symbol: 'ECH',
},
rpcUrls: {
default: {
http: ['https://subnets.avax.network/echo/testnet/rpc']
},
},
blockExplorers: {
default: {
name: 'Explorer',
url: 'https://subnets-test.avax.network/echo'
},
},
iconUrl: "/chains/logo/173750.png",
icm_registry: "0xF86Cb19Ad8405AEFa7d09C778215D2Cb6eBfB228"
});
```
# Contribute (/docs/builderkit/contribute)
---
title: Contribute
description: "Guide for contributing to BuilderKit by building hooks, components, and flows."
---
# Contributing to BuilderKit
We welcome contributions to BuilderKit! Whether you're fixing bugs, adding new features, or improving documentation, your help makes BuilderKit better for everyone.
## What You Can Contribute
### Hooks
Build reusable hooks that handle common Web3 functionality:
- Chain data management
- Token interactions
- Contract integrations
- State management
- API integrations
### Components
Create new UI components or enhance existing ones:
- Form elements
- Display components
- Interactive elements
- Layout components
- Utility components
### Flows
Design complete user journeys by combining components:
- Token swaps
- NFT minting
- Governance voting
- Staking interfaces
- Custom protocols
# Getting Started (/docs/builderkit/getting-started)
---
title: Getting Started
description: "Quick setup guide for BuilderKit in your React application."
---
Get started with BuilderKit in your React application.
## Installation
```bash
npm install @avalabs/builderkit
# or
yarn add @avalabs/builderkit
```
## Provider Setup
Wrap your application with the Web3Provider to enable wallet connections and chain management:
```tsx
import { Web3Provider } from '@avalabs/builderkit';
import { avalanche, avalancheFuji } from '@wagmi/core/chains';
import { echo } from './chains/definitions/echo';
import { dispatch } from './chains/definitions/dispatch';
// Configure chains
const chains = [avalanche, avalancheFuji, echo, dispatch];
function App() {
return (
);
}
```
## Next Steps
- Learn about [Token Configuration](/docs/builderkit/tokens)
- Explore [Core Components](/docs/builderkit/components/control)
- Check out [Pre-built Flows](/docs/builderkit/flows/ictt)
# Introduction (/docs/builderkit)
---
title: Introduction
description: "A comprehensive React component library for building Web3 applications on Avalanche."
---
BuilderKit is a powerful collection of React components and hooks designed specifically for building Web3 applications on Avalanche. It provides everything you need to create modern, user-friendly blockchain applications with minimal effort.
## Ready to Use Components
BuilderKit offers a comprehensive set of components that handle common Web3 functionalities:
- **Control Components**: Buttons, forms, and wallet connection interfaces
- **Identity Components**: Address displays and domain name resolution
- **Token Components**: Balance displays, inputs, and price conversions
- **Input Components**: Specialized form inputs for Web3 data types
- **Chain Components**: Network selection and chain information displays
- **Transaction Components**: Transaction submission and status tracking
- **Collectibles Components**: NFT displays and collection management
## Powerful Hooks
BuilderKit provides hooks for seamless integration with Avalanche's ecosystem:
### Blockchain Interaction
Access and manage blockchain data, tokens, and cross-chain operations with hooks for chains, tokens, DEX interactions, and inter-chain transfers.
### Precompile Integration
Easily integrate with Avalanche's precompiled contracts for access control, fee management, native minting, rewards, and cross-chain messaging.
## Getting Started
Get started quickly by installing BuilderKit in your React application:
```bash
npm install @avalabs/builderkit
# or
yarn add @avalabs/builderkit
```
Check out our [Getting Started](/docs/builderkit/getting-started) guide to begin building your Web3 application.
# Token Configuration (/docs/builderkit/tokens)
---
title: Token Configuration
description: "Guide for configuring tokens in BuilderKit flows."
---
# Token Configuration
BuilderKit flows require proper token configuration to function correctly. This guide explains the required fields for different token configurations.
## Basic Token Structure
All tokens in BuilderKit share a common base structure with these required fields:
```typescript
interface BaseToken {
// Contract address of the token, use "native" for native chain token
address: string;
// Human-readable name of the token
name: string;
// Token symbol/ticker
symbol: string;
// Number of decimal places the token uses
decimals: number;
// ID of the chain where this token exists
chain_id: number;
}
```
## ICTT Token Fields
ICTT tokens extend the base structure with additional fields for cross-chain functionality:
```typescript
interface ICTTToken extends BaseToken {
// Whether this token can be used with ICTT
supports_ictt: boolean;
// Address of the contract that handles transfers
transferer?: string;
// Whether this token instance is a transferer
is_transferer?: boolean;
// Information about corresponding tokens on other chains
mirrors: {
// Contract address of the mirrored token
address: string;
// Transferer contract on the mirror chain
transferer: string;
// Chain ID where the mirror exists
chain_id: number;
// Decimal places of the mirrored token
decimals: number;
// Whether this is the home/original chain
home?: boolean;
}[];
}
```
## Field Requirements
### Base Token Fields
- `address`: Must be a valid contract address or "native"
- `name`: Should be human-readable
- `symbol`: Should match the token's trading symbol
- `decimals`: Must match the token's contract configuration
- `chain_id`: Must be a valid chain ID
### ICTT-Specific Fields
- `supports_ictt`: Required for ICTT functionality
- `transferer`: Required if token supports ICTT
- `is_transferer`: Optional, indicates if token is a transferer
- `mirrors`: Required for ICTT, must contain at least one mirror configuration
### Mirror Configuration Fields
- `address`: Required, contract address on mirror chain
- `transferer`: Required, transferer contract on mirror chain
- `chain_id`: Required, must be different from token's chain_id
- `decimals`: Required, must match token contract
- `home`: Optional, indicates original/home chain
# Avalanche L1s (/docs/avalanche-l1s)
---
title: Avalanche L1s
description: Explore the multi-chain architecture of Avalanche ecosystem.
---
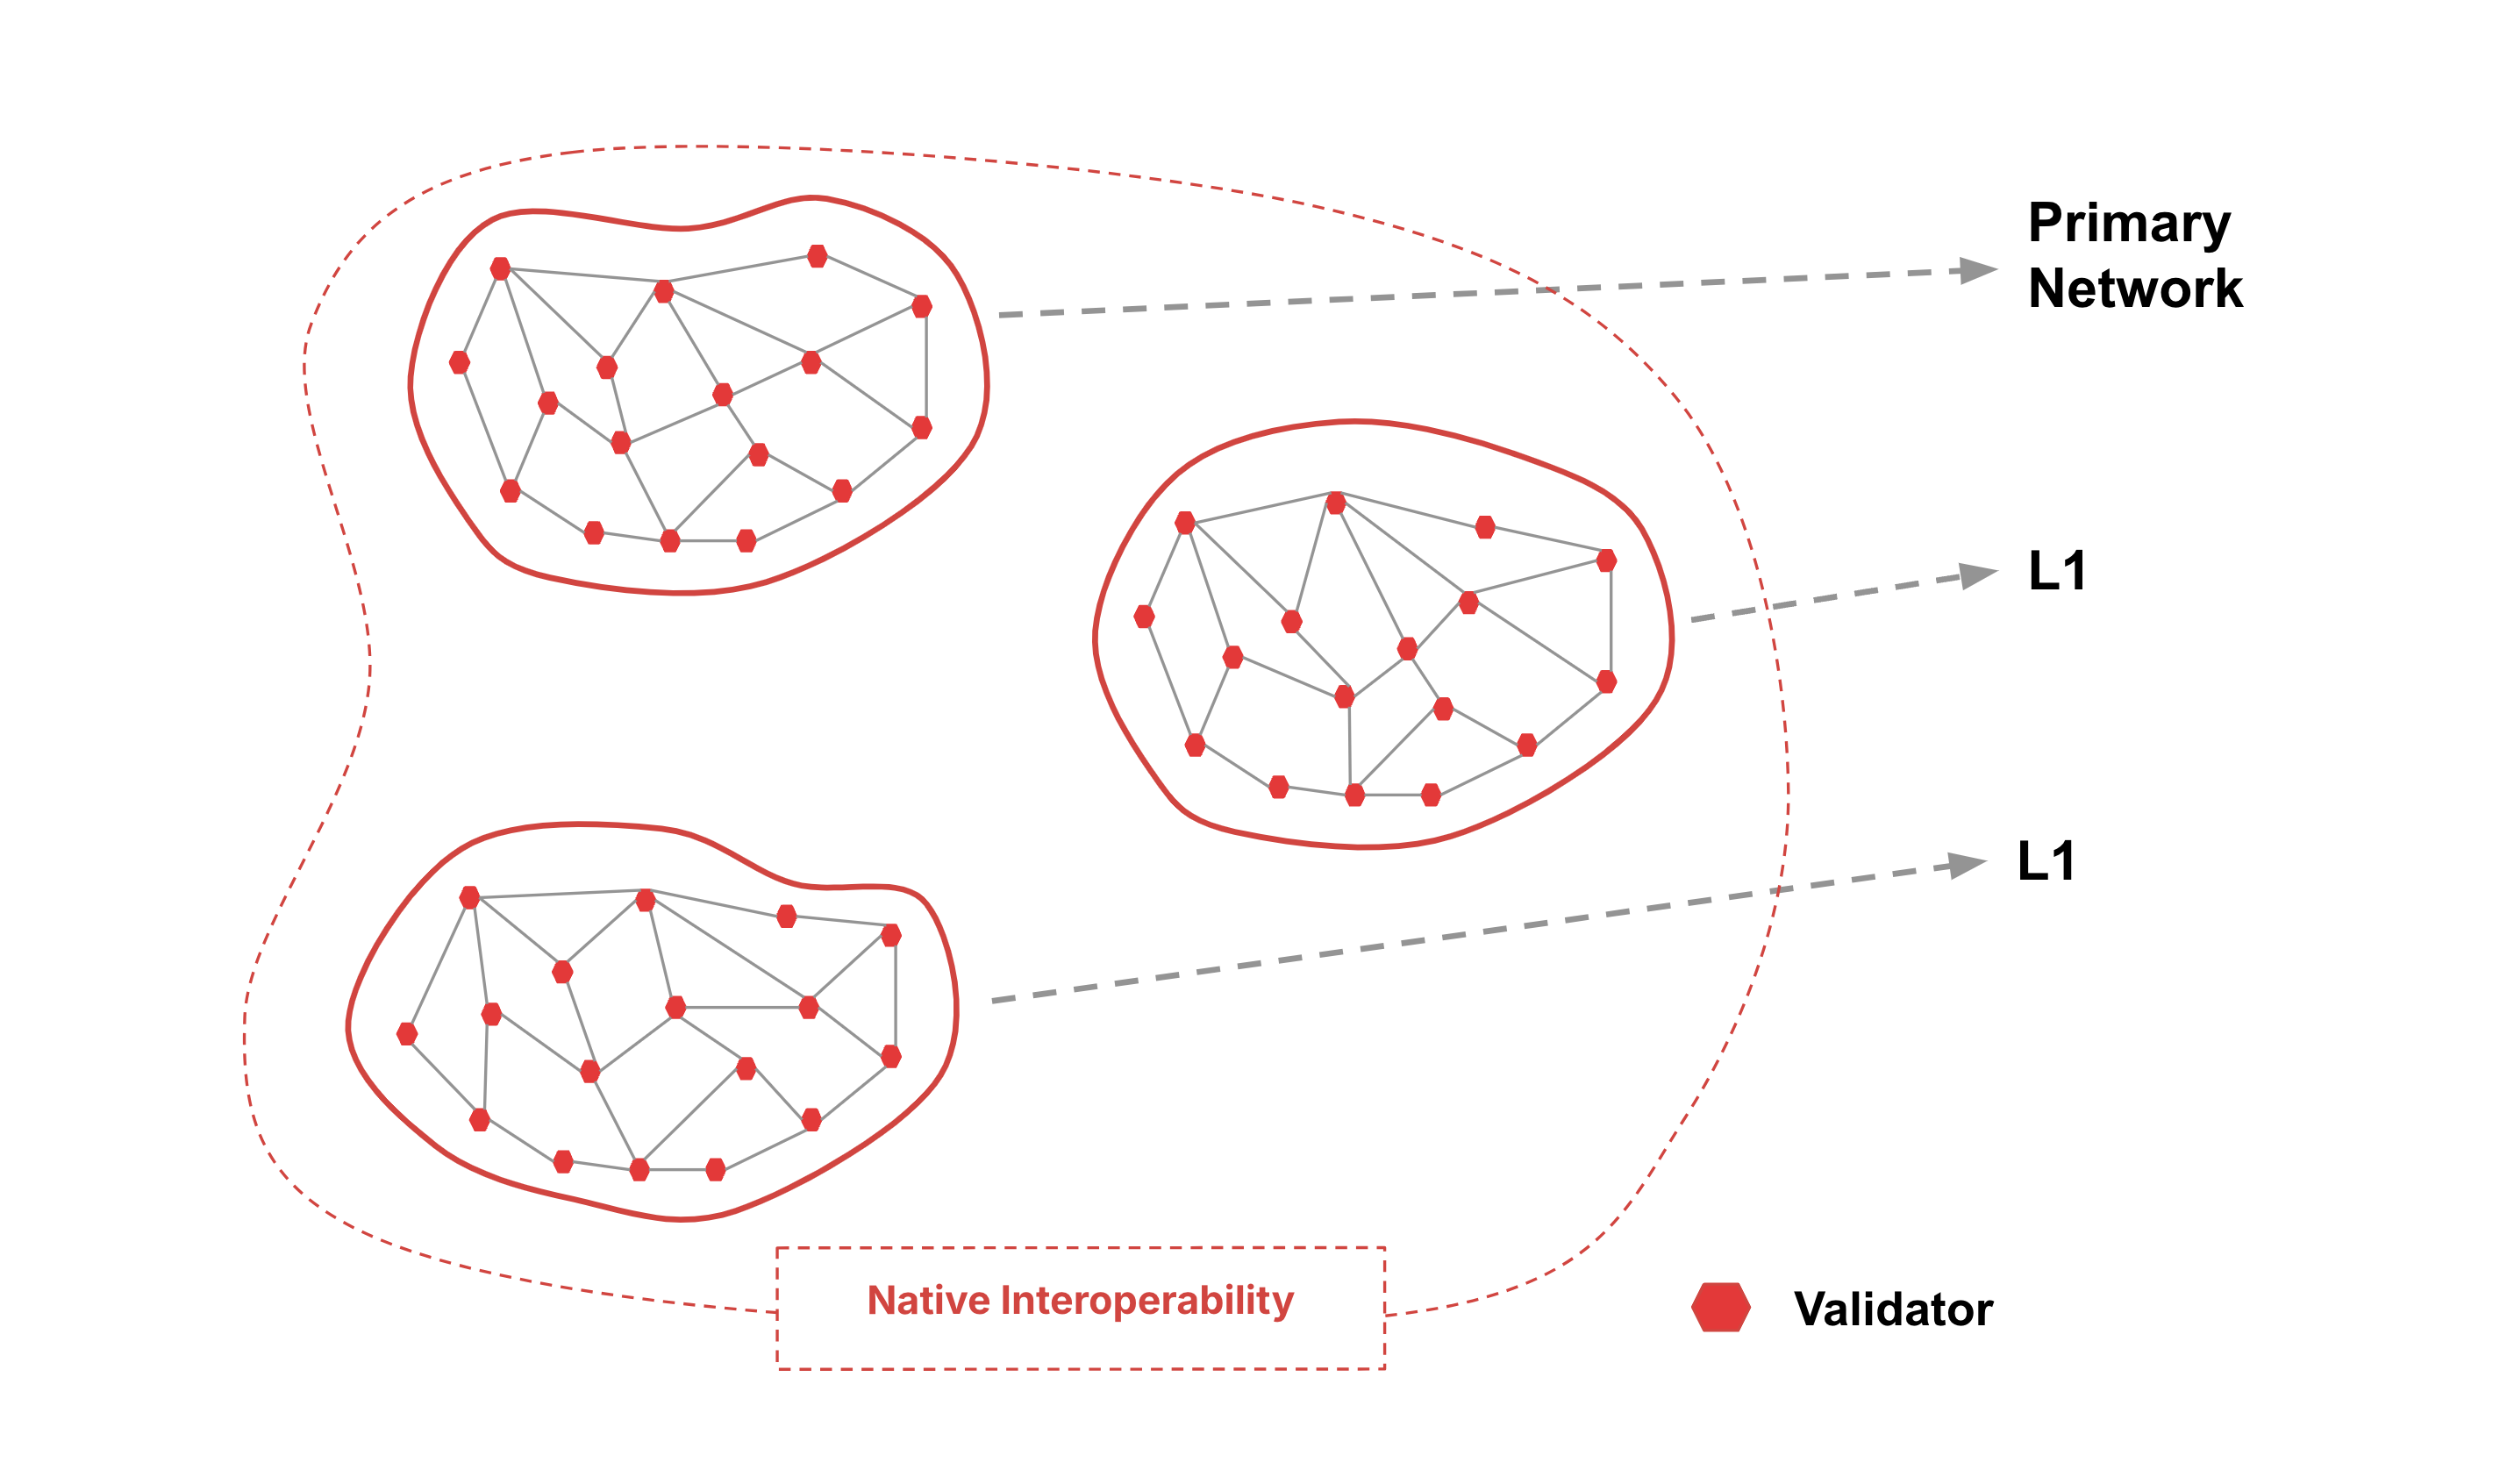
An Avalanche L1 is a sovereign network which defines its own rules regarding its membership and token economics. It is composed of a dynamic subset of Avalanche validators working together to achieve consensus on the state of one or more blockchains. Each blockchain is validated by exactly one Avalanche L1, while an Avalanche L1 can validate many blockchains.
Avalanche's [Primary Network](/docs/primary-network) is a special Avalanche L1 running three blockchains:
- The Platform Chain [(P-Chain)](/docs/primary-network#p-chain-platform-chain)
- The Contract Chain [(C-Chain)](/docs/primary-network#c-chain-contract-chain)
- The Exchange Chain [(X-Chain)](/docs/primary-network#x-chain-exchange-chain)
Every validator of an Avalanche L1 **must** sync the P-Chain of the Primary Network for interoperability.
Node operators that validate an Avalanche L1 with multiple chains do not need to run multiple machines for validation. For example, the Primary Network is an Avalanche L1 with three coexisting chains, all of which can be validated by a single node, or a single machine.
## Advantages
### Independent Networks
- Avalanche L1s use virtual machines to specify their own execution logic, determine their own fee regime, maintain their own state, facilitate their own networking, and provide their own security.
- Each Avalanche L1's performance is isolated from other Avalanche L1s in the ecosystem, so increased usage on one Avalanche L1 won't affect another.
- Avalanche L1s can have their own token economics with their own native tokens, fee markets, and incentives determined by the Avalanche L1 deployer.
- One Avalanche L1 can host multiple blockchains with customized [virtual machines](/docs/primary-network/virtual-machines).
### Native Interoperability
Avalanche Warp Messaging enables native cross-Avalanche L1 communication and allows Virtual Machine (VM) developers to implement arbitrary communication protocols between any two Avalanche L1s.
### Accommodate App-Specific Requirements
Different blockchain-based applications may require validators to have certain properties such as large amounts of RAM or CPU power.
an Avalanche L1 could require that validators meet certain [hardware requirements](/docs/nodes/system-requirements#hardware-and-operating-systems) so that the application doesn't suffer from low performance due to slow validators.
### Launch Networks Designed With Compliance
Avalanche's L1 architecture makes regulatory compliance manageable. As mentioned above, an Avalanche L1 may require validators to meet a set of requirements.
Some examples of requirements the creators of an Avalanche L1 may choose include:
- Validators must be located in a given country.
- Validators must pass KYC/AML checks.
- Validators must hold a certain license.
### Control Privacy of On-Chain Data
Avalanche L1s are ideal for organizations interested in keeping their information private.
Institutions conscious of their stakeholders' privacy can create a private Avalanche L1 where the contents of the blockchains would be visible only to a set of pre-approved validators.
Define this at creation with a [single parameter](/docs/nodes/configure/avalanche-l1-configs#private-avalanche-l1).
### Validator Sovereignty
In a heterogeneous network of blockchains, some validators will not want to validate certain blockchains because they simply have no interest in those blockchains.
The Avalanche L1 model enables validators to concern themselves only with blockchain networks they choose to participate in. This greatly reduces the computational burden on validators.
## Why Build Your Own Avalanche L1
There are many advantages to running your own Avalanche L1. If you find one or more of these a good match for your project then an Avalanche L1 might be a good solution for you.
### We Want Our Own Gas Token
C-Chain is an Ethereum Virtual Machine (EVM) chain; it requires the gas fees to be paid in its native token. That is, the application may create its own utility tokens (ERC-20) on the C-Chain, but the gas must be paid in AVAX. In the meantime, [Subnet-EVM](https://github.com/ava-labs/subnet-evm) effectively creates an application-specific EVM-chain with full control over native(gas) coins. The operator can pre-allocate the native tokens in the chain genesis, and mint more using the [Subnet-EVM](https://github.com/ava-labs/subnet-evm) precompile contract. And these fees can be either burned (as AVAX burns in C-Chain) or configured to be sent to an address which can be a smart contract.
Note that the Avalanche L1 gas token is specific to the application in the chain, thus unknown to the external parties. Moving assets to other chains requires trusted bridge contracts (or upcoming cross Avalanche L1 communication feature).
### We Want Higher Throughput
The primary goal of the gas limit on C-Chain is to restrict the block size and therefore prevent network saturation. If a block can be arbitrarily large, it takes longer to propagate, potentially degrading the network performance. The C-Chain gas limit acts as a deterrent against any system abuse but can be quite limiting for high throughput applications. Unlike C-Chain, Avalanche L1 can be single-tenant, dedicated to the specific application, and thus host its own set of validators with higher bandwidth requirements, which allows for a higher gas limit thus higher transaction throughput. Plus, [Subnet-EVM](https://github.com/ava-labs/subnet-evm) supports fee configuration upgrades that can be adaptive to the surge in application traffic.
Avalanche L1 workloads are isolated from the Primary Network; which means, the noisy neighbor effect of one workload (for example NFT mint on C-Chain) cannot destabilize the Avalanche L1 or surge its gas price. This failure isolation model in the Avalanche L1 can provide higher application reliability.
### We Want Strict Access Control
The C-Chain is open and permissionless where anyone can deploy and interact with contracts. However, for regulatory reasons, some applications may need a consistent access control mechanism for all on-chain transactions. With [Subnet-EVM](https://github.com/ava-labs/subnet-evm), an application can require that "only authorized users may deploy contracts or make transactions." Allow-lists are only updated by the administrators, and the allow list itself is implemented within the precompile contract, thus more transparent and auditable for compliance matters.
### We Need EVM Customization
If your project is deployed on the C-Chain then your execution environment is dictated by the setup of the C-Chain. Changing any of the execution parameters means that the configuration of the C-Chain would need to change, and that is expensive, complex and difficult to change. So if your project needs some other capabilities, different execution parameters or precompiles that C-Chain does not provide, then Avalanche L1s are a solution you need. You can configure the EVM in an Avalanche L1 to run however you want, adding precompiles, and setting runtime parameters to whatever your project needs.
### We Need Custom Validator Management
With the Etna upgrade, L1s can implement their own validator management logic through a _ValidatorManager_ smart contract. This gives you complete control over your validator set, allowing you to define custom staking rules, implement permissionless proof-of-stake with your own token, or create permissioned proof-of-authority networks. The validator management can be handled directly through smart contracts, giving you programmatic control over validator selection and rewards distribution.
### We Want to Build a Sovereign Network
L1s on Avalanche are truly sovereign networks that operate independently without relying on other systems. You have complete control over your network's consensus mechanisms, transaction processing, and security protocols. This independence allows you to scale horizontally without dependencies on other networks while maintaining full control over your network parameters and upgrades. This sovereignty is particularly important for projects that need complete autonomy over their blockchain's operation and evolution.
## When to Choose an Avalanche L1
Here we presented some considerations in favor of running your own Avalanche L1 vs. deploying on the C-Chain.
If an application has relatively low transaction rate and no special circumstances that would make the C-Chain a non-starter, you can begin with C-Chain deployment to leverage existing technical infrastructure, and later expand to an Avalanche L1. That way you can focus on working on the core of your project and once you have a solid product/market fit and have gained enough traction that the C-Chain is constricting you, plan a move to your own Avalanche L1.
Of course, we're happy to talk to you about your architecture and help you choose the best path forward. Feel free to reach out to us on [Discord](https://chat.avalabs.org/) or other [community channels](https://www.avax.network/community) we run.
## Develop Your Own Avalanche L1
Avalanche L1s on Avalanche are deployed by default with [Subnet-EVM](https://github.com/ava-labs/subnet-evm#subnet-evm), a fork of go-ethereum. It implements the Ethereum Virtual Machine and supports Solidity smart contracts as well as most other Ethereum client functionality.
To get started, check out our [L1 Toolbox](/tools/l1-toolbox) or the tutorials in the [Avalanche CLI](/docs/tooling/avalanche-cli) section.
# Simple VM in Any Language (/docs/avalanche-l1s/simple-vm-any-language)
---
title: Simple VM in Any Language
description: Learn how to implement a simple virtual machine in any language.
---
This is a language-agnostic high-level documentation explaining the basics of how to get started at implementing your own virtual machine from scratch.
Avalanche virtual machines are grpc servers implementing Avalanche's [Proto interfaces](https://buf.build/ava-labs/avalanche). This means that it can be done in [any language that has a grpc implementation](https://grpc.io/docs/languages/).
## Minimal Implementation
To get the process started, at the minimum, you will to implement the following interfaces:
- [`vm.Runtime`](https://buf.build/ava-labs/avalanche/docs/main:vm.runtime) (Client)
- [`vm.VM`](https://buf.build/ava-labs/avalanche/docs/main:vm) (Server)
To build a blockchain taking advantage of AvalancheGo's consensus to build blocks, you will need to implement:
- [AppSender](https://buf.build/ava-labs/avalanche/docs/main:appsender) (Client)
- [Messenger](https://buf.build/ava-labs/avalanche/docs/main:messenger) (Client)
To have a json-RPC endpoint, `/ext/bc/subnetId/rpc` exposed by AvalancheGo, you will need to implement:
- [`Http`](https://buf.build/ava-labs/avalanche/docs/main:http) (Server)
You can and should use a tool like `buf` to generate the (Client/Server) code from the interfaces as stated in the [Avalanche module](https://buf.build/ava-labs/avalanche)'s page.
There are _server_ and _client_ interfaces to implement. AvalancheGo calls the _server_ interfaces exposed by your VM and your VM calls the _client_ interfaces exposed by AvalancheGo.
## Starting Process
Your VM is started by AvalancheGo launching your binary. Your binary is started as a sub-process of AvalancheGo. While launching your binary, AvalancheGo passes an environment variable `AVALANCHE_VM_RUNTIME_ENGINE_ADDR` containing an url. We must use this url to initialize a `vm.Runtime` client.
Your VM, after having started a grpc server implementing the VM interface must call the [`vm.Runtime.InitializeRequest`](https://buf.build/ava-labs/avalanche/docs/main:vm.runtime#vm.runtime.InitializeRequest) with the following parameters.
- `protocolVersion`: It must match the `supported plugin version` of the [AvalancheGo release](https://github.com/ava-labs/AvalancheGo/releases) you are using. It is always part of the release notes.
- `addr`: It is your grpc server's address. It must be in the following format `host:port` (example `localhost:12345`)
## VM Initialization
The service methods are described in the same order as they are called. You will need to implement these methods in your server.
### Pre-Initialization Sequence
AvalancheGo starts/stops your process multiple times before launching the real initialization sequence.
1. [VM.Version](https://buf.build/ava-labs/avalanche/docs/main:vm#vm.VM.Version)
- Return: your VM's version.
2. [VM.CreateStaticHandler](https://buf.build/ava-labs/avalanche/docs/main:vm#vm.VM.CreateStaticHandlers)
- Return: an empty array - (Not absolutely required).
3. [VM.Shutdown](https://buf.build/ava-labs/avalanche/docs/main:vm#vm.VM.Shutdown)
- You should gracefully stop your process.
- Return: Empty
### Initialization Sequence
1. [VM.CreateStaticHandlers](https://buf.build/ava-labs/avalanche/docs/main:vm#vm.VM.CreateStaticHandlers)
- Return an empty array - (Not absolutely required).
2. [VM.Initialize](https://buf.build/ava-labs/avalanche/docs/main:vm#vm.VM.Initialize)
- Param: an [InitializeRequest](https://buf.build/ava-labs/avalanche/docs/main:vm#vm.InitializeRequest).
- You must use this data to initialize your VM.
- You should add the genesis block to your blockchain and set it as the last accepted block.
- Return: an [InitializeResponse](https://buf.build/ava-labs/avalanche/docs/main:vm#vm.InitializeResponse) containing data about the genesis extracted from the `genesis_bytes` that was sent in the request.
3. [VM.VerifyHeightIndex](https://buf.build/ava-labs/avalanche/docs/main:vm#vm.VM.VerifyHeightIndex)
- Return: a [VerifyHeightIndexResponse](https://buf.build/ava-labs/avalanche/docs/main:vm#vm.VerifyHeightIndexResponse) with the code `ERROR_UNSPECIFIED` to indicate that no error has occurred.
4. [VM.CreateHandlers](https://buf.build/ava-labs/avalanche/docs/main:vm#vm.VM.CreateHandlers)
- To serve json-RPC endpoint, `/ext/bc/subnetId/rpc` exposed by AvalancheGo
- See [json-RPC](#json-rpc) for more detail
- Create a [`Http`](https://buf.build/ava-labs/avalanche/docs/main:http) server and get its url.
- Return: a `CreateHandlersResponse` containing a single item with the server's url. (or an empty array if not implementing the json-RPC endpoint)
5. [VM.StateSyncEnabled](https://buf.build/ava-labs/avalanche/docs/main:vm#vm.VM.StateSyncEnabled)
- Return: `true` if you want to enable StateSync, `false` otherwise.
6. [VM.SetState](https://buf.build/ava-labs/avalanche/docs/main:vm#vm.VM.SetState) _If you had specified `true` in the `StateSyncEnabled` result_
- Param: a [SetStateRequest](https://buf.build/ava-labs/avalanche/docs/main:vm#vm.SetStateRequest) with the `StateSyncing` value
- Set your blockchain's state to `StateSyncing`
- Return: a [SetStateResponse](https://buf.build/ava-labs/avalanche/docs/main:vm#vm.SetStateResponse) built from the genesis block.
7. [VM.GetOngoingSyncStateSummary](https://buf.build/ava-labs/avalanche/docs/main:vm#vm.VM.GetOngoingSyncStateSummary) _If you had specified `true` in the `StateSyncEnabled` result_
- Return: a [GetOngoingSyncStateSummaryResponse](https://buf.build/ava-labs/avalanche/docs/main:vm#vm.GetOngoingSyncStateSummaryResponse) built from the genesis block.
8. [VM.SetState](https://buf.build/ava-labs/avalanche/docs/main:vm#vm.VM.SetState)
- Param: a [SetStateRequest](https://buf.build/ava-labs/avalanche/docs/main:vm#vm.SetStateRequest) with the `Bootstrapping` value
- Set your blockchain's state to `Bootstrapping`
- Return: a [SetStateResponse](https://buf.build/ava-labs/avalanche/docs/main:vm#vm.SetStateResponse) built from the genesis block.
9. [VM.SetPreference](https://buf.build/ava-labs/avalanche/docs/main:vm#vm.VM.SetPreference)
- Param: `SetPreferenceRequest` containing the preferred block ID
- Return: Empty
10. [VM.SetState](https://buf.build/ava-labs/avalanche/docs/main:vm#vm.VM.SetState)
- Param: a [SetStateRequest](https://buf.build/ava-labs/avalanche/docs/main:vm#vm.SetStateRequest) with the `NormalOp` value
- Set your blockchain's state to `NormalOp`
- Return: a [SetStateResponse](https://buf.build/ava-labs/avalanche/docs/main:vm#vm.SetStateResponse) built from the genesis block.
11. [VM.Connected](https://buf.build/ava-labs/avalanche/docs/main:vm#vm.VM.Connected) (for every other node validating this Avalanche L1 in the network)
- Param: a [ConnectedRequest](https://buf.build/ava-labs/avalanche/docs/main:vm#vm.ConnectedRequest) with the NodeID and the version of AvalancheGo.
- Return: Empty
12. [VM.Health](https://buf.build/ava-labs/avalanche/docs/main:vm#vm.VM.Health)
- Param: Empty
- Return: a [HealthResponse](https://buf.build/ava-labs/avalanche/docs/main:vm#vm.HealthResponse) with an empty `details` property.
13. [VM.ParseBlock](https://buf.build/ava-labs/avalanche/docs/main:vm#vm.VM.ParseBlock)
- Param: A byte array containing a Block (the genesis block in this case)
- Return: a [ParseBlockResponse](https://buf.build/ava-labs/avalanche/docs/main:vm#vm.ParseBlockResponse) built from the last accepted block.
At this point, your VM is fully started and initialized.
### Building Blocks
#### Transaction Gossiping Sequence
When your VM receives transactions (for example using the [json-RPC](#json-rpc) endpoints), it can gossip them to the other nodes by using the [AppSender](https://buf.build/ava-labs/avalanche/docs/main:appsender) service.
Supposing we have a 3 nodes network with nodeX, nodeY, nodeZ. Let's say NodeX has received a new transaction on it's json-RPC endpoint.
[`AppSender.SendAppGossip`](https://buf.build/ava-labs/avalanche/docs/main:appsender#appsender.AppSender.SendAppGossip) (_client_): You must serialize your transaction data into a byte array and call the `SendAppGossip` to propagate the transaction.
AvalancheGo then propagates this to the other nodes.
[VM.AppGossip](https://buf.build/ava-labs/avalanche/docs/main:vm#vm.VM.AppGossip): You must deserialize the transaction and store it for the next block.
- Param: A byte array containing your transaction data, and the NodeID of the node which sent the gossip message.
- Return: Empty
#### Block Building Sequence
Whenever your VM is ready to build a new block, it will initiate the block building process by using the [Messenger](https://buf.build/ava-labs/avalanche/docs/main:messenger) service. Supposing that nodeY wants to build the block. you probably will implement some kind of background worker checking every second if there are any pending transactions:
_client_ [`Messenger.Notify`](https://buf.build/ava-labs/avalanche/docs/main:messenger#messenger.Messenger.Notify): You must issue a notify request to AvalancheGo by calling the method with the `MESSAGE_BUILD_BLOCK` value.
1. [VM.BuildBlock](https://buf.build/ava-labs/avalanche/docs/main:vm#vm.VM.BuildBlock)
- Param: Empty
- You must build a block with your pending transactions. Serialize it to a byte array.
- Store this block in memory as a "pending blocks"
- Return: a [BuildBlockResponse](https://buf.build/ava-labs/avalanche/docs/main:vm#vm.BuildBlockResponse) from the newly built block and it's associated data (`id`, `parent_id`, `height`, `timestamp`).
2. [VM.BlockVerify](https://buf.build/ava-labs/avalanche/docs/main:vm#vm.VM.BlockVerify)
- Param: The byte array containing the block data
- Return: the block's timestamp
3. [VM.SetPreference](https://buf.build/ava-labs/avalanche/docs/main:vm#vm.VM.SetPreference)
- Param: The block's ID
- You must mark this block as the next preferred block.
- Return: Empty
1. [VM.ParseBlock](https://buf.build/ava-labs/avalanche/docs/main:vm#vm.VM.ParseBlock)
- Param: A byte array containing a the newly built block's data
- Store this block in memory as a "pending blocks"
- Return: a [ParseBlockResponse](https://buf.build/ava-labs/avalanche/docs/main:vm#vm.ParseBlockResponse) built from the last accepted block.
2. [VM.BlockVerify](https://buf.build/ava-labs/avalanche/docs/main:vm#vm.VM.BlockVerify)
- Param: The byte array containing the block data
- Return: the block's timestamp
3. [VM.SetPreference](https://buf.build/ava-labs/avalanche/docs/main:vm#vm.VM.SetPreference)
- Param: The block's ID
- You must mark this block as the next preferred block.
- Return: Empty
[VM.BlockAccept](https://buf.build/ava-labs/avalanche/docs/main:vm#vm.VM.BlockAccept): You must accept this block as your last final block.
- Param: The block's ID
- Return: Empty
#### Managing Conflicts
Conflicts happen when two or more nodes propose the next block at the same time. AvalancheGo takes care of this and decides which block should be considered final, and which blocks should be rejected using Snowman consensus. On the VM side, all there is to do is implement the `VM.BlockAccept` and `VM.BlockReject` methods.
_nodeX proposes block `0x123...`, nodeY proposes block `0x321...` and nodeZ proposes block `0x456`_
There are three conflicting blocks (different hashes), and if we look at our VM's log files, we can see that AvalancheGo uses Snowman to decide which block must be accepted.
```bash
... snowman/voter.go:58 filtering poll results ...
... snowman/voter.go:65 finishing poll ...
... snowman/voter.go:87 Snowman engine can't quiesce
...
... snowman/voter.go:58 filtering poll results ...
... snowman/voter.go:65 finishing poll ...
... snowman/topological.go:600 accepting block
```
Supposing that AvalancheGo accepts block `0x123...`. The following RPC methods are called on all nodes:
1. [VM.BlockAccept](https://buf.build/ava-labs/avalanche/docs/main:vm#vm.VM.BlockAccept): You must accept this block as your last final block.
- Param: The block's ID (`0x123...`)
- Return: Empty
2. [VM.BlockReject](https://buf.build/ava-labs/avalanche/docs/main:vm#vm.VM.BlockReject): You must mark this block as rejected.
- Param: The block's ID (`0x321...`)
- Return: Empty
3. [VM.BlockReject](https://buf.build/ava-labs/avalanche/docs/main:vm#vm.VM.BlockReject): You must mark this block as rejected.
- Param: The block's ID (`0x456...`)
- Return: Empty
### JSON-RPC
To enable your json-RPC endpoint, you must implement the [HandleSimple](https://buf.build/ava-labs/avalanche/docs/main:http#http.HTTP.HandleSimple) method of the [`Http`](https://buf.build/ava-labs/avalanche/docs/main:http) interface.
- Param: a [HandleSimpleHTTPRequest](https://buf.build/ava-labs/avalanche/docs/main:http#http.HandleSimpleHTTPRequest) containing the original request's method, url, headers, and body.
- Analyze, deserialize and handle the request. For example: if the request represents a transaction, we must deserialize it, check the signature, store it and gossip it to the other nodes using the [messenger client](#block-building-sequence)).
- Return the [HandleSimpleHTTPResponse](https://buf.build/ava-labs/avalanche/docs/main:http#http.HandleSimpleHTTPResponse) response that will be sent back to the original sender.
This server is registered with AvalancheGo during the [initialization process](#initialization-sequence) when the `VM.CreateHandlers` method is called. You must simply respond with the server's url in the `CreateHandlersResponse` result.
# Introduction (/docs/avalanche-l1s/virtual-machines-index)
---
title: Introduction
description: Learn about the execution layer of a blockchain network.
---
A Virtual Machine (VM) is a blueprint for a blockchain. Blockchains are instantiated from a VM, similar to how objects are instantiated from a class definition. VMs can define anything you want, but will generally define transactions that are executed and how blocks are created.
## Blocks and State
Virtual Machines deal with blocks and state. The functionality provided by VMs is to:
- Define the representation of a blockchain's state
- Represent the operations in that state
- Apply the operations in that state
Each block in the blockchain contains a set of state transitions. Each block is applied in order from the blockchain's initial genesis block to its last accepted block to reach the latest state of the blockchain.
## Blockchain
A blockchain relies on two major components: The **Consensus Engine** and the **VM**. The VM defines application specific behavior and how blocks are built and parsed to create the blockchain. All VMs run on top of the Avalanche Consensus Engine, which allows nodes in the network to agree on the state of the blockchain. Here's a quick example of how VMs interact with consensus:
1. A node wants to update the blockchain's state
2. The node's VM will notify the consensus engine that it wants to update the state
3. The consensus engine will request the block from the VM
4. The consensus engine will verify the returned block using the VM's implementation of `Verify()`
5. The consensus engine will get the network to reach consensus on whether to accept or reject the newly verified block. Every virtuous (well-behaved) node on the network will have the same preference for a particular block
6. Depending upon the consensus results, the engine will either accept or reject the block. What happens when a block is accepted or rejected is specific to the implementation of the VM
AvalancheGo provides the consensus engine for every blockchain on the Avalanche Network. The consensus engine relies on the VM interface to handle building, parsing, and storing blocks as well as verifying and executing on behalf of the consensus engine.
This decoupling between the application and consensus layer allows developers to build their applications quickly by implementing virtual machines, without having to worry about the consensus layer managed by Avalanche which deals with how nodes agree on whether or not to accept a block.
## Installing a VM
VMs are supplied as binaries to a node running `AvalancheGo`. These binaries must be named the VM's assigned **VMID**. A VMID is a 32-byte hash encoded in CB58 that is generated when you build your VM.
In order to install a VM, its binary must be installed in the `AvalancheGo` plugin path. See [here](/docs/nodes/configure/configs-flags#--plugin-dir-string) for more details. Multiple VMs can be installed in this location.
Each VM runs as a separate process from AvalancheGo and communicates with `AvalancheGo` using gRPC calls. This functionality is enabled by **RPCChainVM**, a special VM which wraps around other VM implementations and bridges the VM and AvalancheGo, establishing a standardized communication protocol between them.
During VM creation, handshake messages are exchanged via **RPCChainVM** between AvalancheGo and the VM installation. Ensure matching **RPCChainVM** protocol versions to avoid errors, by updating your VM or using a [different version of AvalancheGo](https://github.com/ava-labs/AvalancheGo/releases).
Note that some VMs may not support the latest protocol version.
### API Handlers
Users can interact with a blockchain and its VM through handlers exposed by the VM's API.
VMs expose two types of handlers to serve responses for incoming requests:
- **Blockchain Handlers**: Referred to as handlers, these expose APIs to interact with a blockchain instantiated by a VM. The API endpoint will be different for each chain. The endpoint for a handler is `/ext/bc/[chainID]`.
- **VM Handlers**: Referred to as static handlers, these expose APIs to interact with the VM directly. One example API would be to parse genesis data to instantiate a new blockchain. The endpoint for a static handler is `/ext/vm/[vmID]`.
For any readers familiar with object-oriented programming, static and non-static handlers on a VM are analogous to static and non-static methods on a class. Blockchain handlers can be thought of as methods on an object, whereas VM handlers can be thought of as static methods on a class.
### Instantiate a VM
The `vm.Factory` interface is implemented to create new VM instances from which a blockchain can be initialized. The factory's `New` method shown below provides `AvalancheGo` with an instance of the VM. It's defined in the [`factory.go`](https://github.com/ava-labs/timestampvm/blob/main/timestampvm/factory.go) file of the `timestampvm` repository.
```go
// Returning a new VM instance from VM's factory
func (f *Factory) New(*snow.Context) (interface{}, error) { return &vm.VM{}, nil }
```
### Initializing a VM to Create a Blockchain
Before a VM can run, AvalancheGo will initialize it by invoking its `Initialize` method. Here, the VM will bootstrap itself and sets up anything it requires before it starts running.
This might involve setting up its database, mempool, genesis state, or anything else the VM requires to run.
```go
if err := vm.Initialize(
ctx.Context,
vmDBManager,
genesisData,
chainConfig.Upgrade,
chainConfig.Config,
msgChan,
fxs,
sender,
);
```
You can refer to the [implementation](https://github.com/ava-labs/timestampvm/blob/main/timestampvm/vm.go#L75) of `vm.initialize` in the TimestampVM repository.
## Interfaces
Every VM should implement the following interfaces:
### `block.ChainVM`
To reach a consensus on linear blockchains, Avalanche uses the Snowman consensus engine. To be compatible with Snowman, a VM must implement the `block.ChainVM` interface.
For more information, see [here](https://github.com/ava-labs/avalanchego/blob/master/snow/engine/snowman/block/vm.go).
```go title="snow/engine/snowman/block/vm.go"
// ChainVM defines the required functionality of a Snowman VM.
//
// A Snowman VM is responsible for defining the representation of the state,
// the representation of operations in that state, the application of operations
// on that state, and the creation of the operations. Consensus will decide on
// if the operation is executed and the order operations are executed.
//
// For example, suppose we have a VM that tracks an increasing number that
// is agreed upon by the network.
// The state is a single number.
// The operation is setting the number to a new, larger value.
// Applying the operation will save to the database the new value.
// The VM can attempt to issue a new number, of larger value, at any time.
// Consensus will ensure the network agrees on the number at every block height.
type ChainVM interface {
common.VM
Getter
Parser
// Attempt to create a new block from data contained in the VM.
//
// If the VM doesn't want to issue a new block, an error should be
// returned.
BuildBlock() (snowman.Block, error)
// Notify the VM of the currently preferred block.
//
// This should always be a block that has no children known to consensus.
SetPreference(ids.ID) error
// LastAccepted returns the ID of the last accepted block.
//
// If no blocks have been accepted by consensus yet, it is assumed there is
// a definitionally accepted block, the Genesis block, that will be
// returned.
LastAccepted() (ids.ID, error)
}
// Getter defines the functionality for fetching a block by its ID.
type Getter interface {
// Attempt to load a block.
//
// If the block does not exist, an error should be returned.
//
GetBlock(ids.ID) (snowman.Block, error)
}
// Parser defines the functionality for fetching a block by its bytes.
type Parser interface {
// Attempt to create a block from a stream of bytes.
//
// The block should be represented by the full byte array, without extra
// bytes.
ParseBlock([]byte) (snowman.Block, error)
}
```
### `common.VM`
`common.VM` is a type that every `VM` must implement. For more information, you can see the full file [here](https://github.com/ava-labs/avalanchego/blob/master/snow/engine/common/vm.go).
```go title="snow/engine/common/vm.go"
// VM describes the interface that all consensus VMs must implement
type VM interface {
// Contains handlers for VM-to-VM specific messages
AppHandler
// Returns nil if the VM is healthy.
// Periodically called and reported via the node's Health API.
health.Checkable
// Connector represents a handler that is called on connection connect/disconnect
validators.Connector
// Initialize this VM.
// [ctx]: Metadata about this VM.
// [ctx.networkID]: The ID of the network this VM's chain is running on.
// [ctx.chainID]: The unique ID of the chain this VM is running on.
// [ctx.Log]: Used to log messages
// [ctx.NodeID]: The unique staker ID of this node.
// [ctx.Lock]: A Read/Write lock shared by this VM and the consensus
// engine that manages this VM. The write lock is held
// whenever code in the consensus engine calls the VM.
// [dbManager]: The manager of the database this VM will persist data to.
// [genesisBytes]: The byte-encoding of the genesis information of this
// VM. The VM uses it to initialize its state. For
// example, if this VM were an account-based payments
// system, `genesisBytes` would probably contain a genesis
// transaction that gives coins to some accounts, and this
// transaction would be in the genesis block.
// [toEngine]: The channel used to send messages to the consensus engine.
// [fxs]: Feature extensions that attach to this VM.
Initialize(
ctx *snow.Context,
dbManager manager.Manager,
genesisBytes []byte,
upgradeBytes []byte,
configBytes []byte,
toEngine chan<- Message,
fxs []*Fx,
appSender AppSender,
) error
// Bootstrapping is called when the node is starting to bootstrap this chain.
Bootstrapping() error
// Bootstrapped is called when the node is done bootstrapping this chain.
Bootstrapped() error
// Shutdown is called when the node is shutting down.
Shutdown() error
// Version returns the version of the VM this node is running.
Version() (string, error)
// Creates the HTTP handlers for custom VM network calls.
//
// This exposes handlers that the outside world can use to communicate with
// a static reference to the VM. Each handler has the path:
// [Address of node]/ext/VM/[VM ID]/[extension]
//
// Returns a mapping from [extension]s to HTTP handlers.
//
// Each extension can specify how locking is managed for convenience.
//
// For example, it might make sense to have an extension for creating
// genesis bytes this VM can interpret.
CreateStaticHandlers() (map[string]*HTTPHandler, error)
// Creates the HTTP handlers for custom chain network calls.
//
// This exposes handlers that the outside world can use to communicate with
// the chain. Each handler has the path:
// [Address of node]/ext/bc/[chain ID]/[extension]
//
// Returns a mapping from [extension]s to HTTP handlers.
//
// Each extension can specify how locking is managed for convenience.
//
// For example, if this VM implements an account-based payments system,
// it have an extension called `accounts`, where clients could get
// information about their accounts.
CreateHandlers() (map[string]*HTTPHandler, error)
}
```
### `snowman.Block`
The `snowman.Block` interface It define the functionality a block must implement to be a block in a linear Snowman chain. For more information, you can see the full file [here](https://github.com/ava-labs/avalanchego/blob/master/snow/consensus/snowman/block.go).
```go title="snow/consensus/snowman/block.go"
// Block is a possible decision that dictates the next canonical block.
//
// Blocks are guaranteed to be Verified, Accepted, and Rejected in topological
// order. Specifically, if Verify is called, then the parent has already been
// verified. If Accept is called, then the parent has already been accepted. If
// Reject is called, the parent has already been accepted or rejected.
//
// If the status of the block is Unknown, ID is assumed to be able to be called.
// If the status of the block is Accepted or Rejected; Parent, Verify, Accept,
// and Reject will never be called.
type Block interface {
choices.Decidable
// Parent returns the ID of this block's parent.
Parent() ids.ID
// Verify that the state transition this block would make if accepted is
// valid. If the state transition is invalid, a non-nil error should be
// returned.
//
// It is guaranteed that the Parent has been successfully verified.
Verify() error
// Bytes returns the binary representation of this block.
//
// This is used for sending blocks to peers. The bytes should be able to be
// parsed into the same block on another node.
Bytes() []byte
// Height returns the height of this block in the chain.
Height() uint64
}
```
### `choices.Decidable`
This interface is a superset of every decidable object, such as transactions, blocks, and vertices. For more information, you can see the full file [here](https://github.com/ava-labs/avalanchego/blob/master/snow/choices/decidable.go).
```go title="snow/choices/decidable.go"
// Decidable represents element that can be decided.
//
// Decidable objects are typically thought of as either transactions, blocks, or
// vertices.
type Decidable interface {
// ID returns a unique ID for this element.
//
// Typically, this is implemented by using a cryptographic hash of a
// binary representation of this element. An element should return the same
// IDs upon repeated calls.
ID() ids.ID
// Accept this element.
//
// This element will be accepted by every correct node in the network.
Accept() error
// Reject this element.
//
// This element will not be accepted by any correct node in the network.
Reject() error
// Status returns this element's current status.
//
// If Accept has been called on an element with this ID, Accepted should be
// returned. Similarly, if Reject has been called on an element with this
// ID, Rejected should be returned. If the contents of this element are
// unknown, then Unknown should be returned. Otherwise, Processing should be
// returned.
Status() Status
}
```
# WAGMI Avalanche L1 (/docs/avalanche-l1s/wagmi-avalanche-l1)
---
title: WAGMI Avalanche L1
description: Learn about the WAGMI Avalanche L1 in this detailed case study.
---
This is one of the first cases of using Avalanche L1s as a proving ground for changes in a production VM (Coreth). Many underestimate how useful the isolation of Avalanche L1s is for performing complex VM testing on a live network (without impacting the stability of the primary network).
We created a basic WAGMI Explorer [https://subnets-test.avax.network/wagmi](https://subnets-test.avax.network/wagmi) that surfaces aggregated usage statistics about the Avalanche L1.
- SubnetID: [28nrH5T2BMvNrWecFcV3mfccjs6axM1TVyqe79MCv2Mhs8kxiY](https://explorer-xp.avax-test.network/avalanche-l1/28nrH5T2BMvNrWecFcV3mfccjs6axM1TVyqe79MCv2Mhs8kxiY?tab=validators)
- ChainID: [2ebCneCbwthjQ1rYT41nhd7M76Hc6YmosMAQrTFhBq8qeqh6tt](https://testnet.avascan.info/blockchain/2ebCneCbwthjQ1rYT41nhd7M76Hc6YmosMAQrTFhBq8qeqh6tt)
### Network Parameters[](#network-parameters "Direct link to heading")
- NetworkID: 11111
- ChainID: 11111
- Block Gas Limit: 20,000,000 (2.5x C-Chain)
- 10s Gas Target: 100,000,000 (~6.67x C-Chain)
- Min Fee: 1 Gwei (4% of C-Chain)
- Target Block Rate: 2s (Same as C-Chain)
The genesis file of WAGMI can be found [here](https://github.com/ava-labs/public-chain-assets/blob/1951594346dcc91682bdd8929bcf8c1bf6a04c33/chains/11111/genesis.json).
### Adding WAGMI to Core[](#adding-wagmi-to-core "Direct link to heading")
- Network Name: WAGMI
- RPC URL: [https://subnets.avax.network/wagmi/wagmi-chain-testnet/rpc]
- WS URL: wss://avalanche-l1s.avax.network/wagmi/wagmi-chain-testnet/ws
- Chain ID: 11111
- Symbol: WGM
- Explorer: [https://subnets.avax.network/wagmi/wagmi-chain-testnet/explorer]
This can be used with other wallets too, such as MetaMask.
Case Study: WAGMI Upgrades[](#case-study-wagmi-upgrades "Direct link to heading")
----------------------------------------------------------------------------------
This case study uses [WAGMI](https://subnets-test.avax.network/wagmi) Avalanche L1 upgrade to show how a network upgrade on an EVM-based (Ethereum Virtual Machine) Avalanche L1 can be done simply, and how the resulting upgrade can be used to dynamically control fee structure on the Avalanche L1.
### Introduction[](#introduction "Direct link to heading")
[Subnet-EVM](https://github.com/ava-labs/subnet-evm) aims to provide an easy to use toolbox to customize the EVM for your blockchain. It is meant to run out of the box for many Avalanche L1s without any modification. But what happens when you want to add a new feature updating the rules of your EVM?
Instead of hard coding the timing of network upgrades in client code like most EVM chains, requiring coordinated deployments of new code, [Subnet-EVM v0.2.8](https://github.com/ava-labs/subnet-evm/releases/tag/v0.2.8) introduces the long awaited feature to perform network upgrades by just using a few lines of JSON in a configuration file.
### Network Upgrades: Enable/Disable Precompiles[](#network-upgrades-enabledisable-precompiles "Direct link to heading")
Detailed description of how to do this can be found in [Customize an Avalanche L1](/docs/avalanche-l1s/evm-configuration/customize-avalanche-l1#network-upgrades-enabledisable-precompiles) tutorial. Here's a summary:
1. Network Upgrade utilizes existing precompiles on the Subnet-EVM:
- ContractDeployerAllowList, for restricting smart contract deployers
- TransactionAllowList, for restricting who can submit transactions
- NativeMinter, for minting native coins
- FeeManager, for configuring dynamic fees
- RewardManager, for enabling block rewards
2. Each of these precompiles can be individually enabled or disabled at a given timestamp as a network upgrade, or any of the parameters governing its behavior changed.
3. These upgrades must be specified in a file named `upgrade.json` placed in the same directory where [`config.json`](/docs/avalanche-l1s/evm-configuration/customize-avalanche-l1#avalanchego-chain-configs) resides: `{chain-config-dir}/{blockchainID}/upgrade.json`.
### Preparation[](#preparation "Direct link to heading")
To prepare for the first WAGMI network upgrade, on August 15, 2022, we had announced on [X](https://x.com/AaronBuchwald/status/1559249414102720512) and shared on other social media such as Discord.
For the second upgrade, on February 24, 2024, we had another announcement on [X](https://x.com/jceyonur/status/1760777031858745701?s=20).
### Deploying upgrade.json[](#deploying-upgradejson "Direct link to heading")
The content of the `upgrade.json` is:
```json
{
"precompileUpgrades": [
{
"feeManagerConfig": {
"adminAddresses": ["0x6f0f6DA1852857d7789f68a28bba866671f3880D"],
"blockTimestamp": 1660658400
}
},
{
"contractNativeMinterConfig": {
"blockTimestamp": 1708696800,
"adminAddresses": ["0x6f0f6DA1852857d7789f68a28bba866671f3880D"],
"managerAddresses": ["0xadFA2910DC148674910c07d18DF966A28CD21331"]
}
}
]
}
```
With the above `upgrade.json`, we intend to perform two network upgrades:
1. The first upgrade is to activate the FeeManager precompile:
- `0x6f0f6DA1852857d7789f68a28bba866671f3880D` is named as the new Admin of the FeeManager precompile.
- `1660658400` is the [Unix timestamp](https://www.unixtimestamp.com/) for Tue Aug 16 2022 14:00:00 GMT+0000 (future time when we made the announcement) when the new FeeManager change would take effect.
2. The second upgrade is to activate the NativeMinter precompile:
- `0x6f0f6DA1852857d7789f68a28bba866671f3880D` is named as the new Admin of the NativeMinter precompile.
- `0xadFA2910DC148674910c07d18DF966A28CD21331` is named as the new Manager of the NativeMinter precompile. Manager addresses are enabled after Durango upgrades which occurred on February 13, 2024.
- `1708696800` is the [Unix timestamp](https://www.unixtimestamp.com/) for Fri Feb 23 2024 14:00:00 GMT+0000 (future time when we made the announcement) when the new NativeMinter change would take effect.
Detailed explanations of feeManagerConfig can be found in [here](/docs/avalanche-l1s/evm-configuration/customize-avalanche-l1#configuring-dynamic-fees), and for the contractNativeMinterConfig in [here](/docs/avalanche-l1s/evm-configuration/customize-avalanche-l1#minting-native-coins).
We place the `upgrade.json` file in the chain config directory, which in our case is `~/.avalanchego/configs/chains/2ebCneCbwthjQ1rYT41nhd7M76Hc6YmosMAQrTFhBq8qeqh6tt/`. After that, we restart the node so the upgrade file is loaded.
When the node restarts, AvalancheGo reads the contents of the JSON file and passes it into Subnet-EVM. We see a log of the chain configuration that includes the updated precompile upgrade. It looks like this:
```bash
INFO [02-22|18:27:06.473] <2ebCneCbwthjQ1rYT41nhd7M76Hc6YmosMAQrTFhBq8qeqh6tt Chain> github.com/ava-labs/subnet-evm/core/blockchain.go:335: Upgrade Config: {"precompileUpgrades":[{"feeManagerConfig":{"adminAddresses":["0x6f0f6da1852857d7789f68a28bba866671f3880d"],"blockTimestamp":1660658400}},{"contractNativeMinterConfig":{"adminAddresses":["0x6f0f6da1852857d7789f68a28bba866671f3880d"],"managerAddresses":["0xadfa2910dc148674910c07d18df966a28cd21331"],"blockTimestamp":1708696800}}]}
```
We note that `precompileUpgrades` correctly shows the upcoming precompile upgrades. Upgrade is locked in and ready.
### Activations[](#activations "Direct link to heading")
When the time passed 10:00 AM EDT August 16, 2022 (Unix timestamp 1660658400), the `upgrade.json` had been executed as planned and the new FeeManager admin address has been activated. From now on, we don't need to issue any new code or deploy anything on the WAGMI nodes to change the fee structure. Let's see how it works in practice!
For the second upgrade on February 23, 2024, the same process was followed. The `upgrade.json` had been executed after Durango, as planned, and the new NativeMinter admin and manager addresses have been activated.
### Using Fee Manager[](#using-fee-manager "Direct link to heading")
The owner `0x6f0f6DA1852857d7789f68a28bba866671f3880D` can now configure the fees on the Avalanche L1 as they see fit. To do that, all that's needed is access to the network, the private key for the newly set manager address and making calls on the precompiled contract.
We will use [Remix](https://remix.ethereum.org/) online Solidity IDE and the [Core Browser Extension](https://support.avax.network/en/articles/6066879-core-extension-how-do-i-add-the-core-extension). Core comes with WAGMI network built-in. MetaMask will do as well but you will need to [add WAGMI](/docs/avalanche-l1s/wagmi-avalanche-l1) yourself.
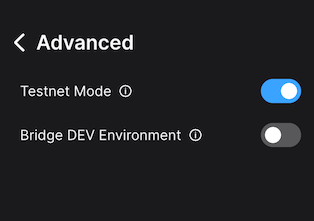
First using Core, we open the account as the owner `0x6f0f6DA1852857d7789f68a28bba866671f3880D`.
Then we connect Core to WAGMI, Switch on the `Testnet Mode` in `Advanced` page in the hamburger menu:
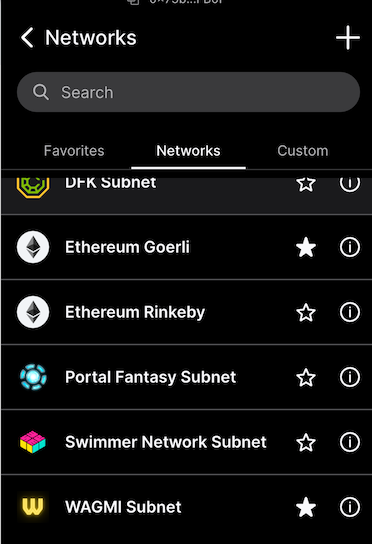
And then open the `Manage Networks` menu in the networks dropdown. Select WAGMI there by clicking the star icon:
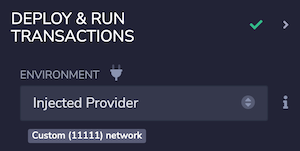
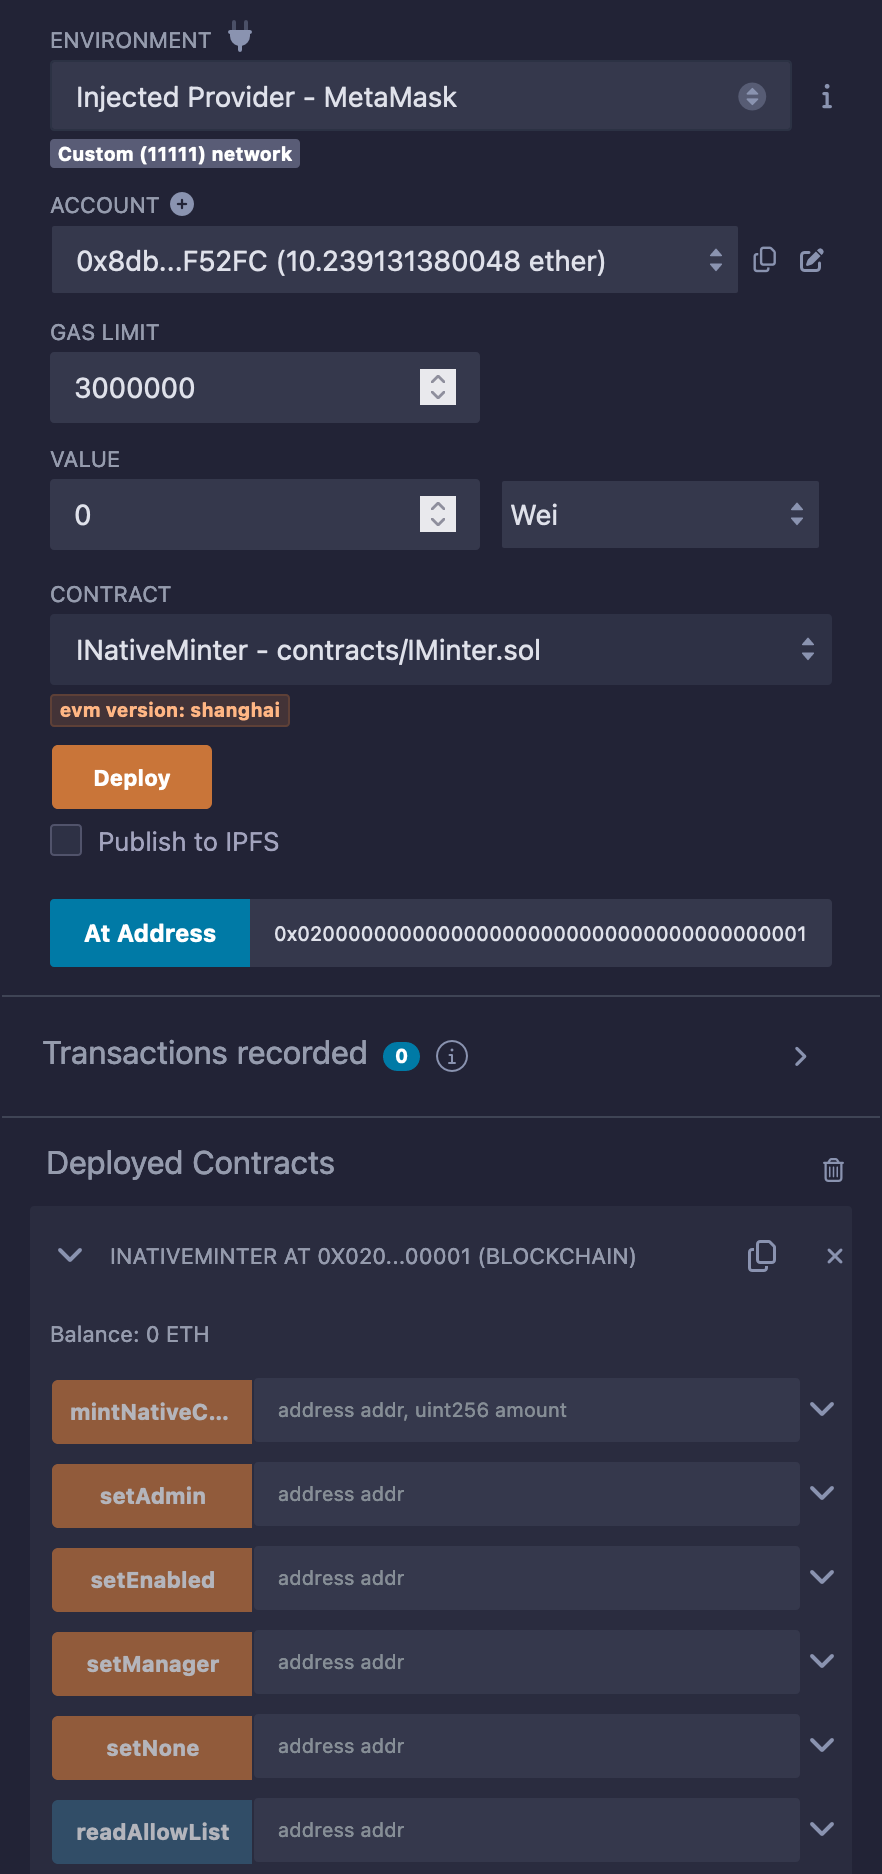
We then switch to WAGMI in the networks dropdown. We are ready to move on to Remix now, so we open it in the browser. First, we check that Remix sees the extension and correctly talks to it. We select `Deploy & run transactions` icon on the left edge, and on the Environment dropdown, select `Injected Provider`. We need to approve the Remix network access in the Core browser extension. When that is done, `Custom (11111) network` is shown:
Good, we're talking to WAGMI Avalanche L1. Next we need to load the contracts into Remix. Using 'load from GitHub' option from the Remix home screen we load two contracts:
- [IAllowList.sol](https://github.com/ava-labs/subnet-evm/blob/master/contracts/contracts/interfaces/IAllowList.sol)
- and [IFeeManager.sol](https://github.com/ava-labs/subnet-evm/blob/master/contracts/contracts/interfaces/IFeeManager.sol).
IFeeManager is our precompile, but it references the IAllowList, so we need that one as well. We compile IFeeManager.sol and use deployed contract at the precompile address `0x0200000000000000000000000000000000000003` used on the [Avalanche L1](https://github.com/ava-labs/subnet-evm/blob/master/precompile/contracts/feemanager/module.go#L21).
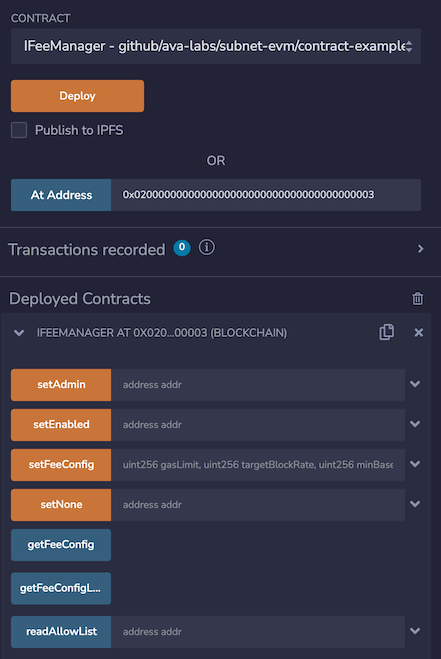
Now we can interact with the FeeManager precompile from within Remix via Core. For example, we can use the `getFeeConfig` method to check the current fee configuration. This action can be performed by anyone as it is just a read operation.
Once we have the new desired configuration for the fees on the Avalanche L1, we can use the `setFeeConfig` to change the parameters. This action can **only** be performed by the owner `0x6f0f6DA1852857d7789f68a28bba866671f3880D` as the `adminAddress` specified in the [`upgrade.json` above](#deploying-upgradejson).
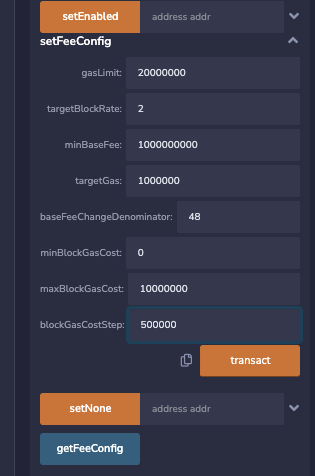
When we call that method by pressing the `transact` button, a new transaction is posted to the Avalanche L1, and we can see it on [the explorer](https://subnets-test.avax.network/wagmi/block/0xad95ccf04f6a8e018ece7912939860553363cc23151a0a31ea429ba6e60ad5a3):
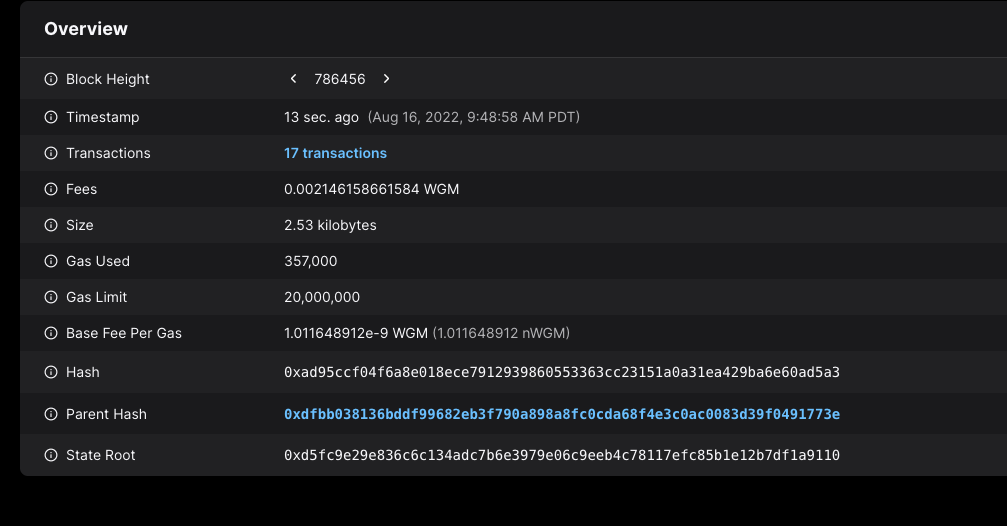
Immediately after the transaction is accepted, the new fee config takes effect. We can check with the `getFeeCofig` that the values are reflected in the active fee config (again this action can be performed by anyone):
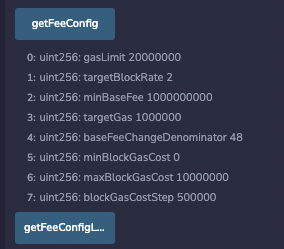
That's it, fees changed! No network upgrades, no complex and risky deployments, just making a simple contract call and the new fee configuration is in place!
### Using NativeMinter[](#using-nativeminter "Direct link to heading")
For the NativeMinter, we can use the same process to connect to the Avalanche L1 and interact with the precompile. We can load INativeMinter interface using 'load from GitHub' option from the Remix home screen with following contracts:
- [IAllowList.sol](https://github.com/ava-labs/subnet-evm/blob/master/contracts/contracts/interfaces/IAllowList.sol)
- and [INativeMinter.sol](https://github.com/ava-labs/subnet-evm/blob/master/contracts/contracts/interfaces/INativeMinter.sol).
We can compile them and interact with the deployed contract at the precompile address `0x0200000000000000000000000000000000000001` used on the [Avalanche L1](https://github.com/ava-labs/subnet-evm/blob/master/precompile/contracts/nativeminter/module.go#L22).
The native minter precompile is used to mint native coins to specified addresses. The minted coins is added to the current supply and can be used by the recipient to pay for gas fees. For more information about the native minter precompile see [here](/docs/avalanche-l1s/evm-configuration/customize-avalanche-l1#minting-native-coins).
`mintNativeCoin` method can be only called by enabled, manager and admin addresses. For this upgrade we have added both an admin and a manager address in [`upgrade.json` above](#deploying-upgradejson). The manager address was available after Durango upgrades which occurred on February 13, 2024. We will use the manager address `0xadfa2910dc148674910c07d18df966a28cd21331` to mint native coins.
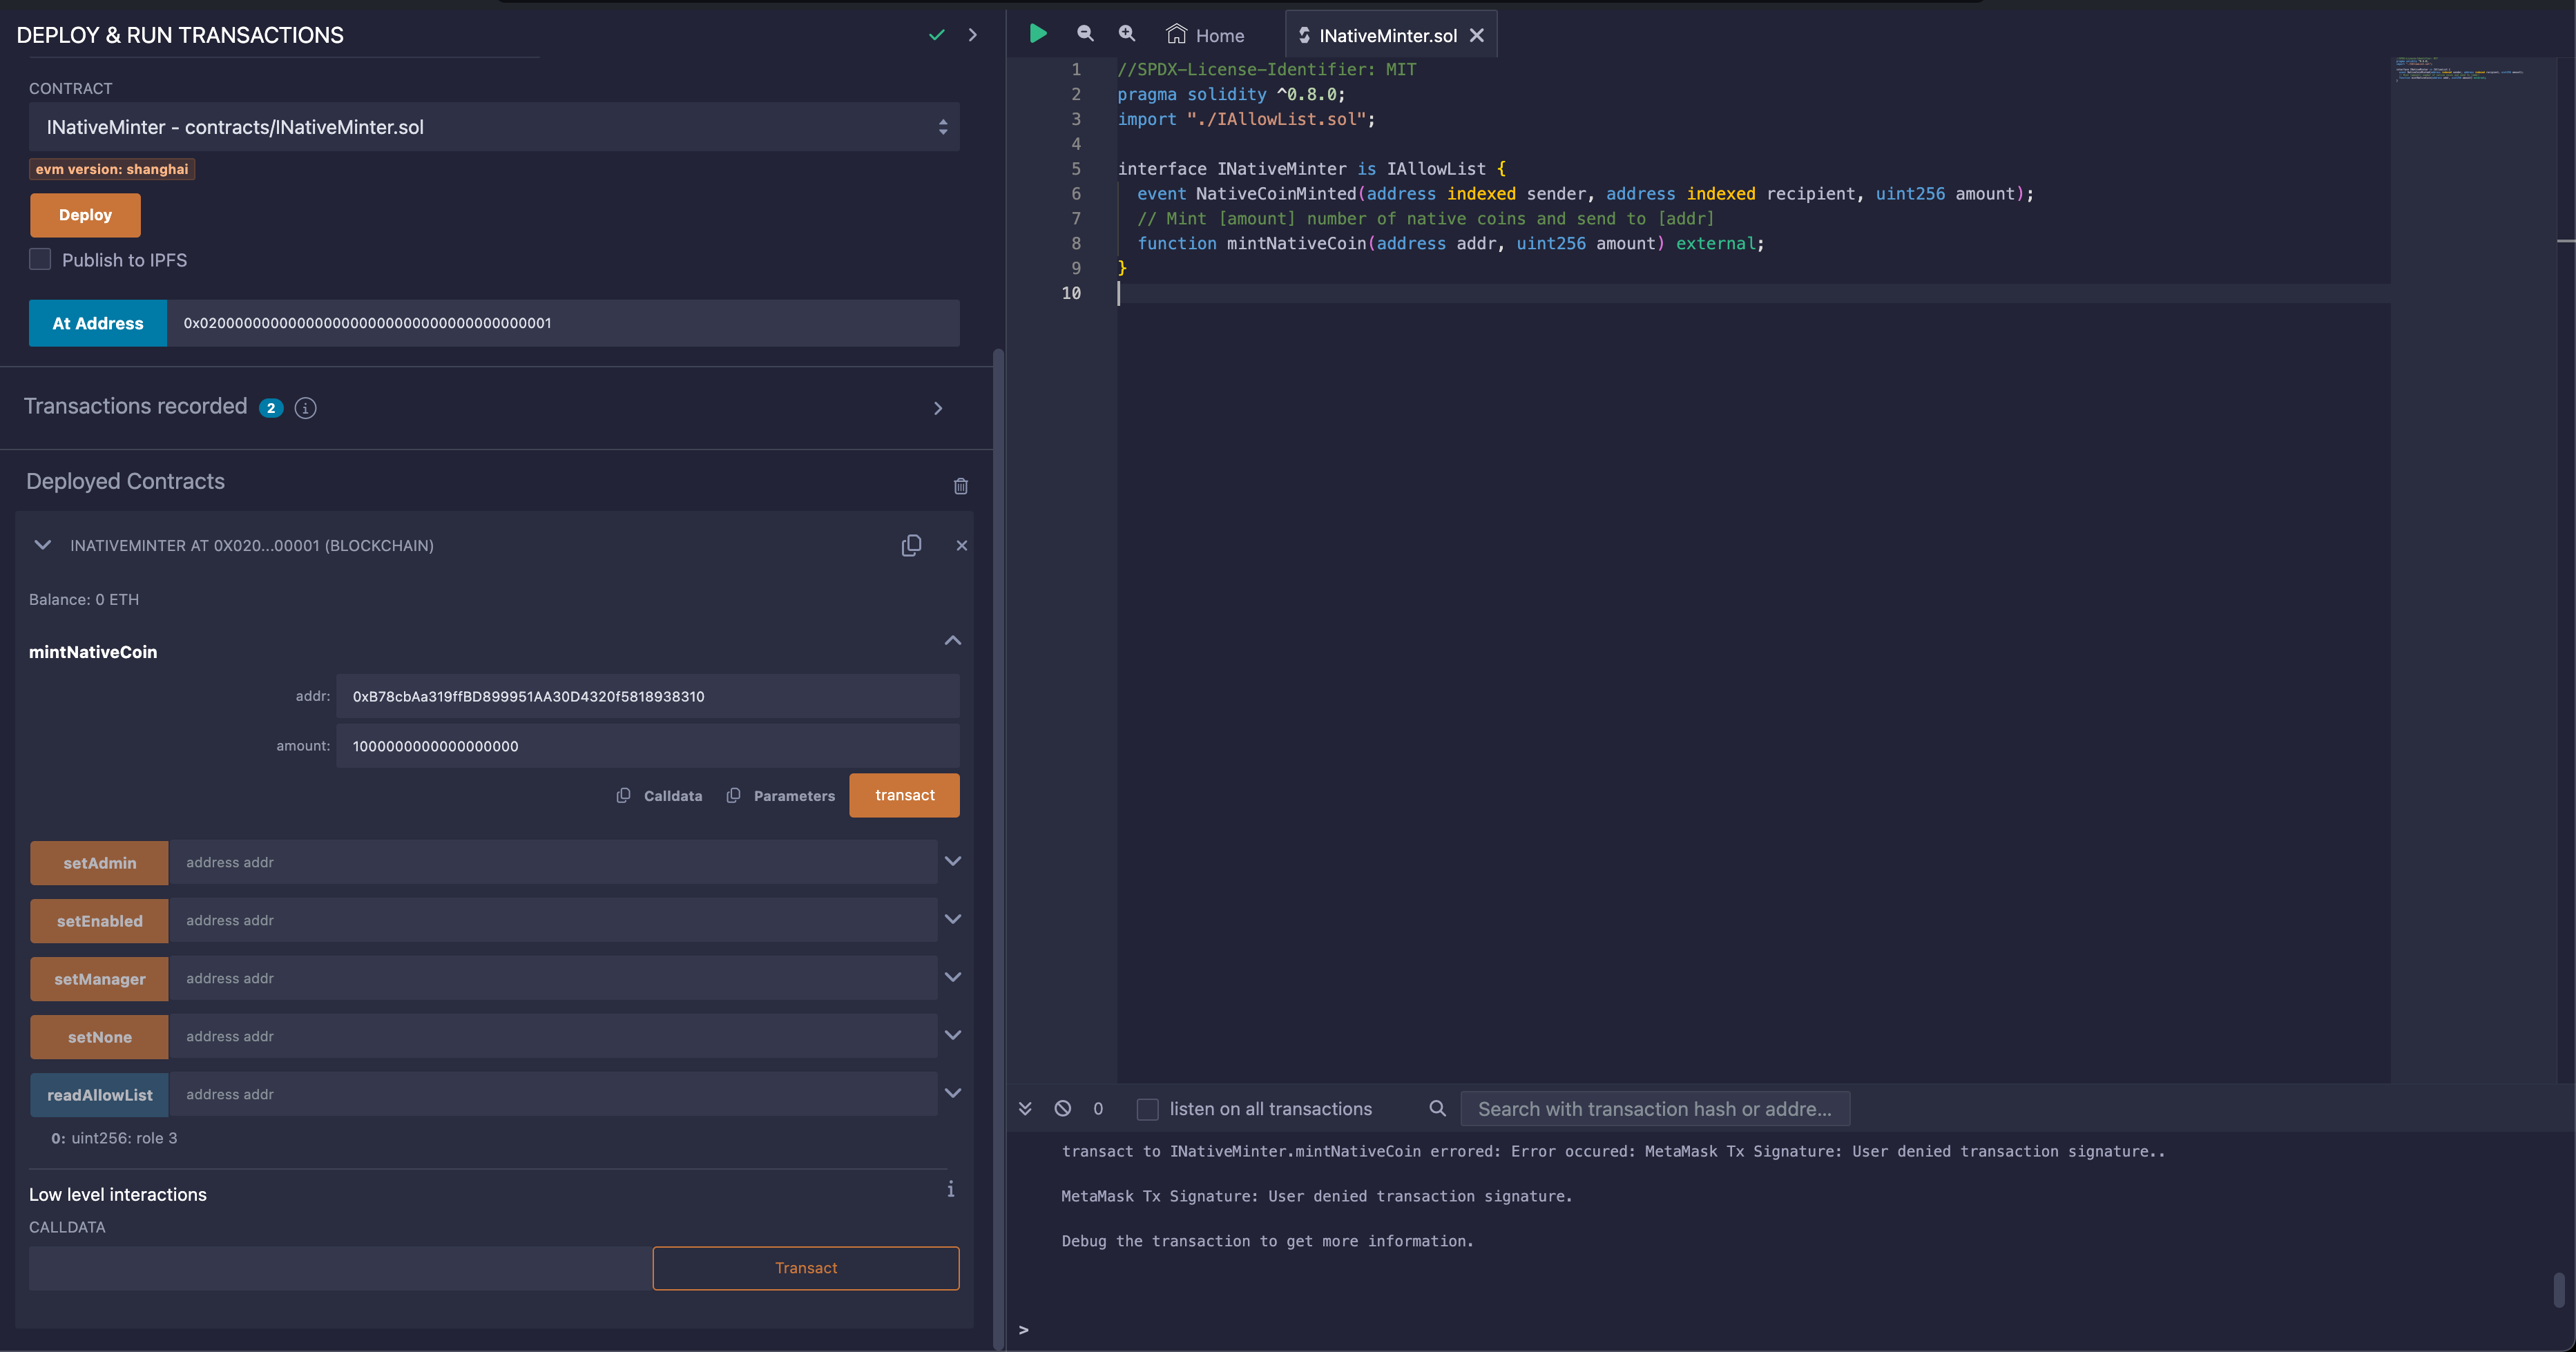
When we call that method by pressing the `transact` button, a new transaction is posted to the Avalanche L1, and we can see it on [the explorer](https://subnets-test.avax.network/wagmi/tx/0xc4aaba7b5863c1b8f6664ac1d483e2d7d392ab58d1a8feb0b6c318cbae7f1e93):
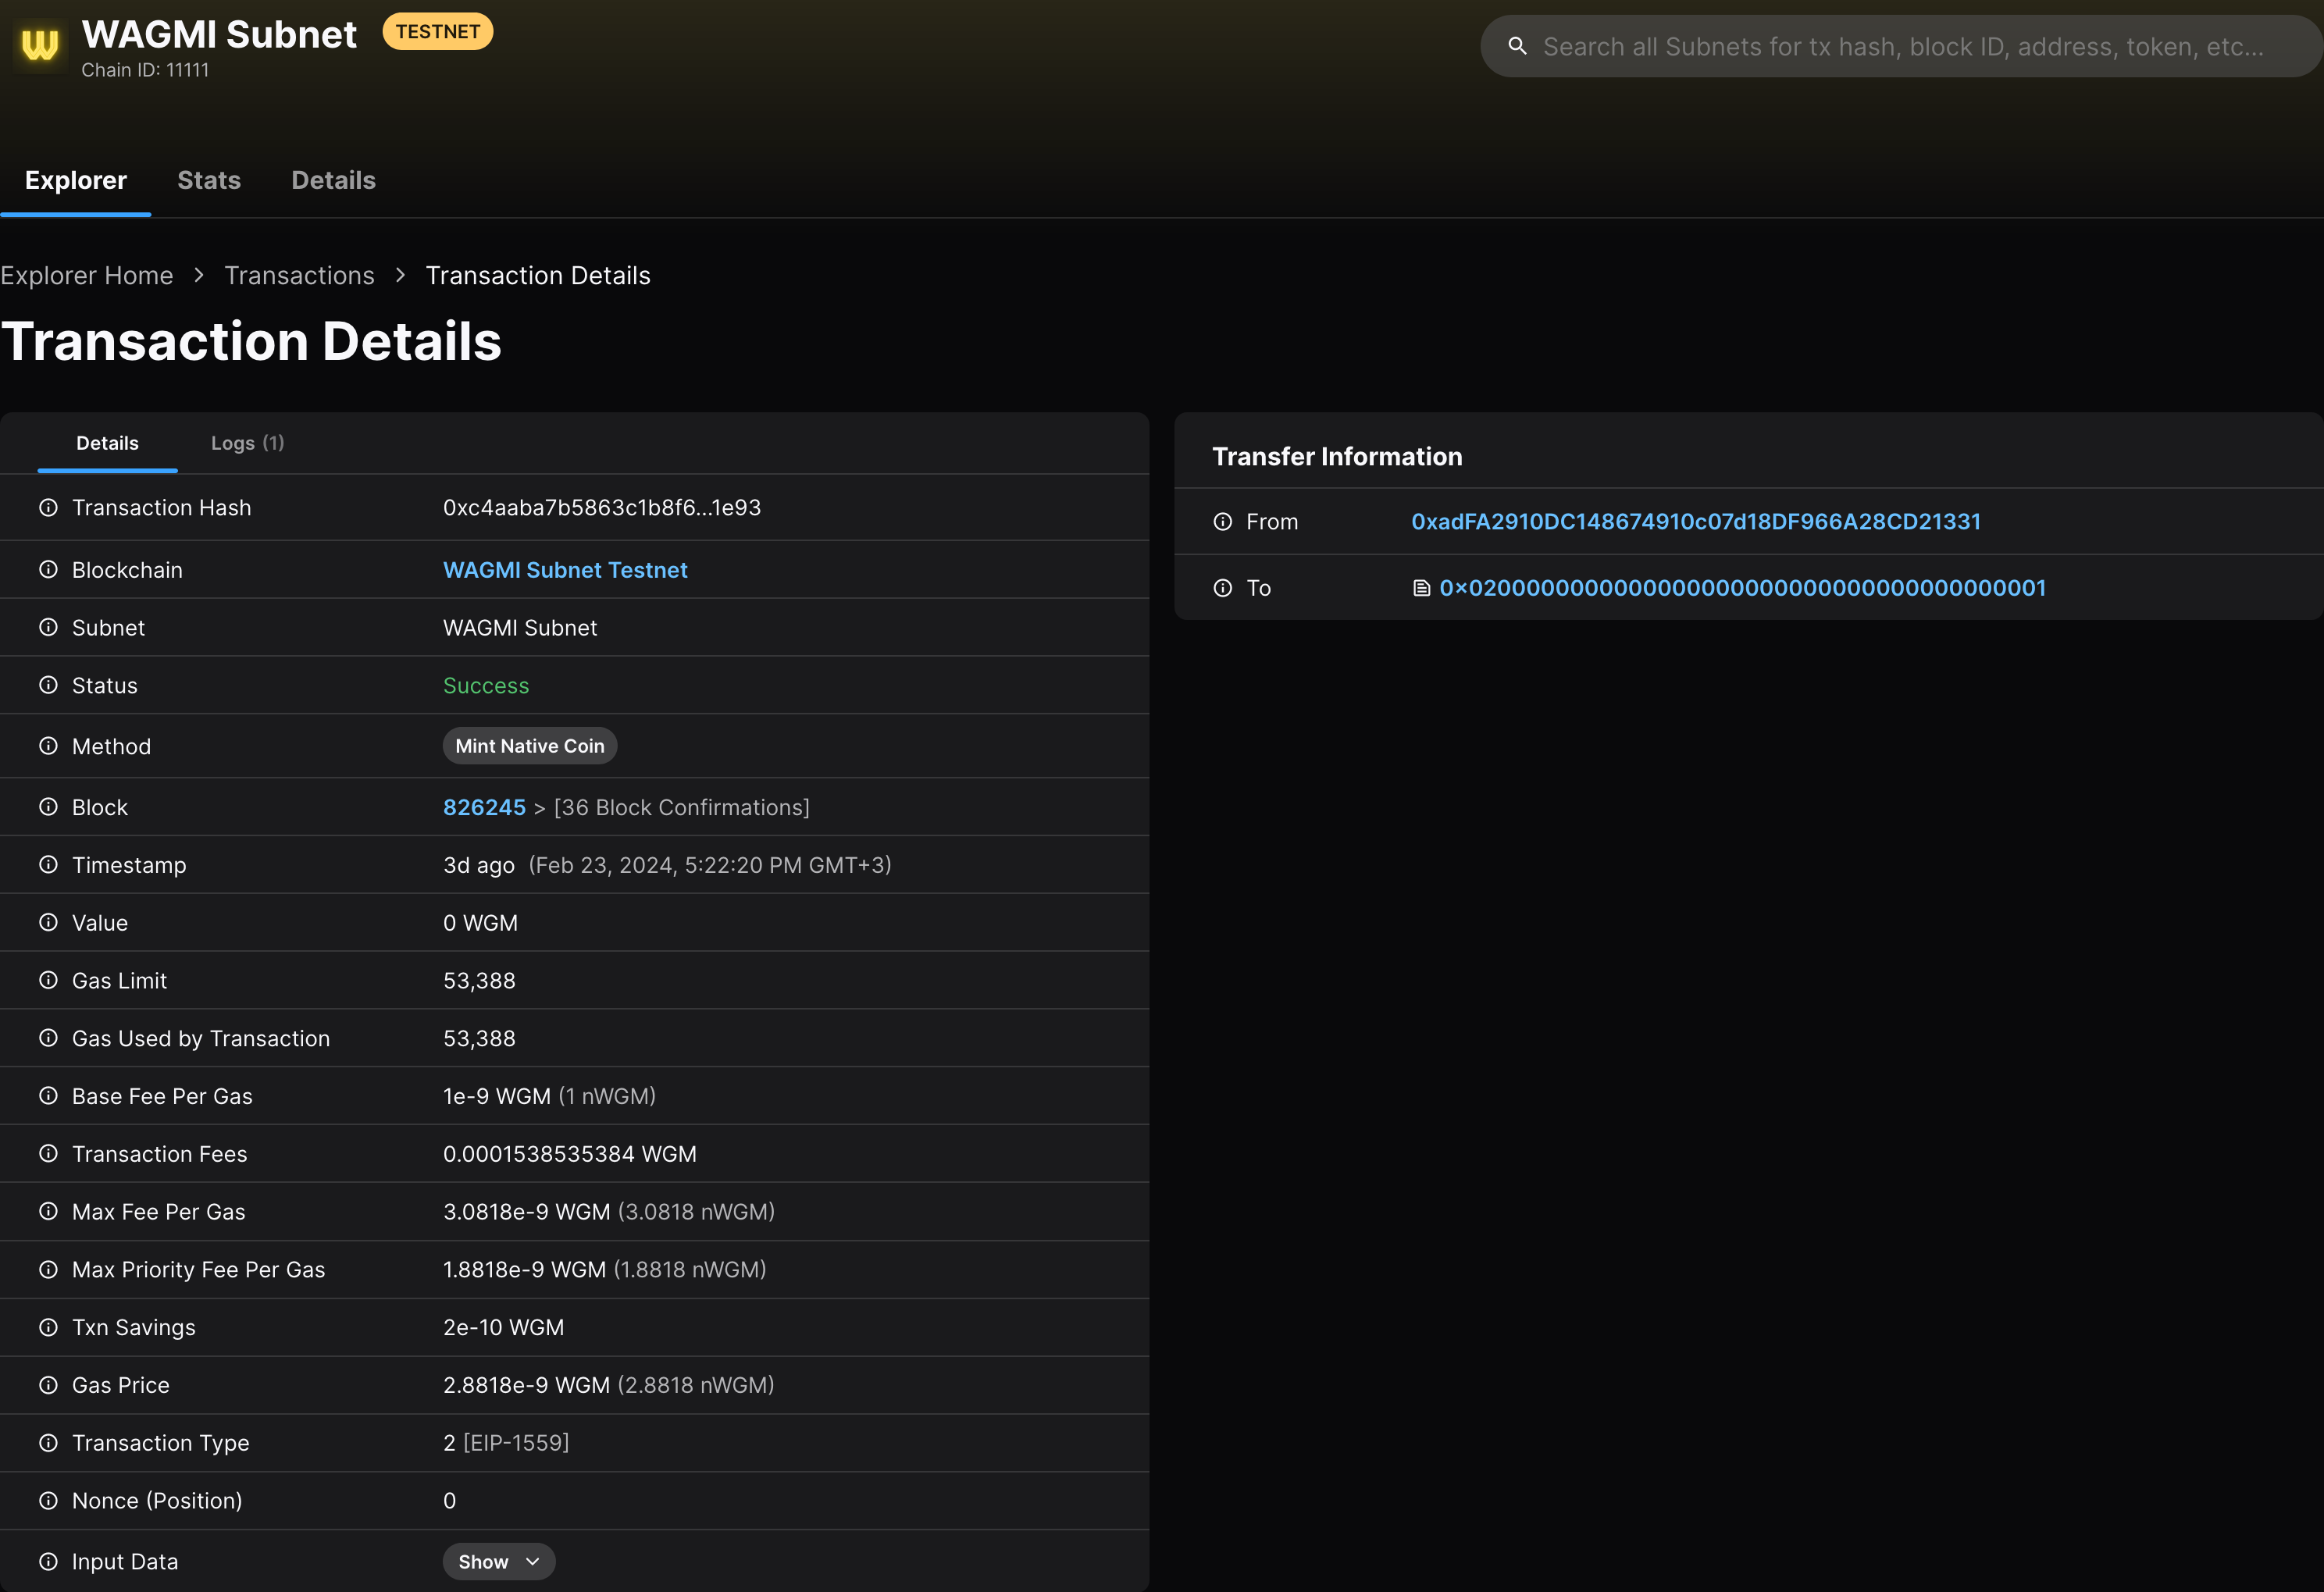
As a result of this transaction, the native minter precompile minted a new native coin (1 WGM) to the recipient address `0xB78cbAa319ffBD899951AA30D4320f5818938310`. The address page on the explorer [here](https://subnets-test.avax.network/wagmi/address/0xB78cbAa319ffBD899951AA30D4320f5818938310) shows no incoming transaction; this is because the 1 WGM was directly minted by the EVM itself, without any sender.
### Conclusion[](#conclusion "Direct link to heading")
Network upgrades can be complex and perilous procedures to carry out safely. Our continuing efforts with Avalanche L1s is to make upgrades as painless and simple as possible. With the powerful combination of stateful precompiles and network upgrades via the upgrade configuration files we have managed to greatly simplify both the network upgrades and network parameter changes. This in turn enables much safer experimentation and many new use cases that were too risky and complex to carry out with high-coordination efforts required with the traditional network upgrade mechanisms.
We hope this case study will help spark ideas for new things you may try on your own. We're looking forward to seeing what you have built and how easy upgrades help you in managing your Avalanche L1s! If you have any questions or issues, feel free to contact us on our [Discord](https://chat.avalabs.org/). Or just reach out to tell us what exciting new things you have built!
# Introduction (/docs/cross-chain)
---
title: Introduction
description: Learn about different interoperability protocols in the Avalanche ecosystem.
---
# Introduction (/docs/nodes)
---
title: Introduction
description: A brief introduction to the concepts of nodes and validators within the Avalanche ecosystem.
---
The Avalanche network is a decentralized platform designed for high throughput and low latency, enabling a wide range of applications. At the core of the network are nodes and validators, which play vital roles in maintaining the network's security, reliability, and performance.
## What is a Node?
A node in the Avalanche network is any computer that participates in the network by maintaining a copy of the blockchain, relaying information, and validating transactions. Nodes can be of different types depending on their role and level of participation in the network’s operations.
### Types of Nodes
- **Full Node**: Stores the entire blockchain data and helps propagate transactions and blocks across the network. It does not participate directly in consensus but is crucial for the network's health and decentralization. **Archival full nodes** store the entire blockchain ledger, including all transactions from the beginning to the most recent. **Pruned full nodes** download the blockchain ledger, then delete blocks starting with the oldest to save memory.
- **Validator Node**: A specialized type of full node that actively participates in the consensus process by validating transactions, producing blocks, and securing the network. Validator nodes are required to stake AVAX tokens as collateral to participate in the consensus mechanism.
- **RPC (Remote Procedure Call) Node**: These nodes act as an interface, enabling third-party applications to query and interact with the blockchain.
## More About Validator Nodes
A validator node participates in the network's consensus protocol by validating transactions and creating new blocks. Validators play a critical role in ensuring the integrity, security, and decentralization of the network.
#### Key Functions of Validators:
- **Transaction Validation**: Validators verify the legitimacy of transactions before they are added to the blockchain.
- **Block Production**: Validators produce and propose new blocks to the network. This involves reaching consensus with other validators to agree on which transactions should be included in the next block.
- **Security and Consensus**: Validators work together to secure the network and ensure that only valid transactions are confirmed. This is done through the Avalanche Consensus protocol, which allows validators to achieve agreement quickly and with high security.
### Primary Network Validators
To become a validator on the Primary Network, you must stake **2,000 AVAX**. This will grant you the ability to validate transactions across all three chains in the Primary Network: the P-Chain, C-Chain, and X-Chain.
### Avalanche L1 Validator
To become a validator on an Avalanche L1, you must meet the specific validator management criteria for that network. If the L1 operates on a Proof-of-Stake (PoS) model, you will need to stake the required amount of tokens to be eligible.
In addition to meeting these criteria, there is a monthly fee of **1.33 AVAX** per validator.
# System Requirements (/docs/nodes/system-requirements)
---
title: System Requirements
description: This document provides information about the system and networking requirements for running an AvalancheGo node.
---
## Hardware and Operating Systems
Avalanche is an incredibly lightweight protocol, so nodes can run on commodity hardware. Note that as network usage increases, hardware requirements may change.
- **CPU**: Equivalent of 8 AWS vCPU
- **RAM**: 8 GiB (16 GiB recommended)
- **Storage**: 1 TiB SSD
- **OS**: Ubuntu 22.04 or MacOS >= 12
Nodes which choose to use a HDD may get poor and random read/write latencies, therefore reducing performance and reliability. An SSD is strongly suggested.
## Networking
To run successfully, AvalancheGo needs to accept connections from the Internet on the network port `9651`. Before you proceed with the installation, you need to determine the networking environment your node will run in.
### On a Cloud Provider
If your node is running on a cloud provider computer instance, it will have a static IP. Find out what that static IP is, or set it up if you didn't already.
### On a Home Connection
If you're running a node on a computer that is on a residential internet connection, you have a dynamic IP; that is, your IP will change periodically. **For the sake of demonstration, you can ignore the following information.** Otherwise, you will need to set up inbound port forwarding of port `9651` from the internet to the computer the node is installed on.
As there are too many models and router configurations, we cannot provide instructions on what exactly to do, but there are online guides to be found (like [this](https://www.noip.com/support/knowledgebase/general-port-forwarding-guide/), or [this](https://www.howtogeek.com/66214/how-to-forward-ports-on-your-router/) ), and your service provider support might help too.
Please note that a fully connected Avalanche node maintains and communicates over a couple of thousand of live TCP connections.
For some under-powered and older home routers, that might be too much to handle. If that is the case, you may experience lagging on other computers connected to the same router, node getting benched, or failing to sync and similar issues.
# Snowman Consensus (/docs/primary-network/avalanche-consensus)
---
title: Snowman Consensus
description: Learn about the Snowman Consensus protocol.
---
Consensus is the task of getting a group of computers (a.k.a. nodes) to come to an agreement on a decision. In blockchain, this means that all the participants in a network have to agree on the changes made to the shared ledger.
This agreement is reached through a specific process, a consensus protocol, that ensures that everyone sees the same information and that the information is accurate and trustworthy.
## Snowman Consensus
Snowman Consensus is a consensus protocol that is scalable, robust, and decentralized. It combines features of both classical and Nakamoto consensus mechanisms to achieve high throughput, fast finality, and energy efficiency. For the whitepaper, see [here](https://www.avalabs.org/whitepapers).
Key Features Include:
- Speed: Snowman Consensus provides sub-second, immutable finality, ensuring that transactions are quickly confirmed and irreversible.
- Scalability: Snowman Consensus enables high network throughput while ensuring low latency.
- Energy Efficiency: Unlike other popular consensus protocols, participation in Snowman Consensus is neither computationally intensive nor expensive.
- Adaptive Security: Snowman Consensus is designed to resist various attacks, including sybil attacks, distributed denial-of-service (DDoS) attacks, and collusion attacks. Its probabilistic nature ensures that the consensus outcome converges to the desired state, even when the network is under attack.
## Conceptual Overview
Consensus protocols in the Avalanche family operate through repeated sub-sampled voting. When a node is determining whether a [transaction](http://support.avalabs.org/en/articles/4587384-what-is-a-transaction) should be accepted, it asks a small, random subset of [validator nodes](http://support.avalabs.org/en/articles/4064704-what-is-a-blockchain-validator) for their preference. Each queried validator replies with the transaction that it prefers, or thinks should be accepted.
Consensus will never include a transaction that is determined to be **invalid**. For example, if you were to submit a transaction to send 100 AVAX to a friend, but your wallet only has 2 AVAX, this transaction is considered **invalid** and will not participate in consensus.
If a sufficient majority of the validators sampled reply with the same preferred transaction, this becomes the preferred choice of the validator that inquired.
In the future, this node will reply with the transaction preferred by the majority.
The node repeats this sampling process until the validators queried reply with the same answer for a sufficient number of consecutive rounds.
- The number of validators required to be considered a "sufficient majority" is referred to as "α" (_alpha_).
- The number of consecutive rounds required to reach consensus, a.k.a. the "Confidence Threshold," is referred to as "β" (_beta_).
- Both α and β are configurable.
When a transaction has no conflicts, finalization happens very quickly. When conflicts exist, honest validators quickly cluster around conflicting transactions, entering a positive feedback loop until all correct validators prefer that transaction. This leads to the acceptance of non-conflicting transactions and the rejection of conflicting transactions.

Snowman Consensus guarantees that if any honest validator accepts a transaction, all honest validators will come to the same conclusion.
For a great visualization, check out [this demo](https://tedyin.com/archive/snow-bft-demo/#/snow).
## Deep Dive Into Snowman Consensus
### Intuition
First, let's develop some intuition about the protocol. Imagine a room full of people trying to agree on what to get for lunch. Suppose it's a binary choice between pizza and barbecue. Some people might initially prefer pizza while others initially prefer barbecue. Ultimately, though, everyone's goal is to achieve **consensus**.
Everyone asks a random subset of the people in the room what their lunch preference is. If more than half say pizza, the person thinks, "OK, looks like things are leaning toward pizza. I prefer pizza now." That is, they adopt the _preference_ of the majority. Similarly, if a majority say barbecue, the person adopts barbecue as their preference.
Everyone repeats this process. Each round, more and more people have the same preference. This is because the more people that prefer an option, the more likely someone is to receive a majority reply and adopt that option as their preference. After enough rounds, they reach consensus and decide on one option, which everyone prefers.
### Snowball
The intuition above outlines the Snowball Algorithm, which is a building block of Snowman Consensus. Let's review the Snowball algorithm.
#### Parameters
- _n_: number of participants
- _k_ (sample size): between 1 and _n_
- α (quorum size): between 1 and _k_
- β (decision threshold): >= 1
#### Algorithm
```
preference := pizza
consecutiveSuccesses := 0
while not decided:
ask k random people their preference
if >= α give the same response:
preference := response with >= α
if preference == old preference:
consecutiveSuccesses++
else:
consecutiveSuccesses = 1
else:
consecutiveSuccesses = 0
if consecutiveSuccesses > β:
decide(preference)
```
#### Algorithm Explained
Everyone has an initial preference for pizza or barbecue. Until someone has _decided_, they query _k_ people (the sample size) and ask them what they prefer. If α or more people give the same response, that response is adopted as the new preference. α is called the _quorum size_. If the new preference is the same as the old preference, the `consecutiveSuccesses` counter is incremented. If the new preference is different then the old preference, the `consecutiveSuccesses` counter is set to `1`. If no response gets a quorum (an α majority of the same response) then the `consecutiveSuccesses` counter is set to `0`.
Everyone repeats this until they get a quorum for the same response β times in a row. If one person decides pizza, then every other person following the protocol will eventually also decide on pizza.
Random changes in preference, caused by random sampling, cause a network preference for one choice, which begets more network preference for that choice until it becomes irreversible and then the nodes can decide.
In our example, there is a binary choice between pizza or barbecue, but Snowball can be adapted to achieve consensus on decisions with many possible choices.
The liveness and safety thresholds are parameterizable. As the quorum size, α, increases, the safety threshold increases, and the liveness threshold decreases. This means the network can tolerate more byzantine (deliberately incorrect, malicious) nodes and remain safe, meaning all nodes will eventually agree whether something is accepted or rejected. The liveness threshold is the number of malicious participants that can be tolerated before the protocol is unable to make progress.
These values, which are constants, are quite small on the Avalanche Network. The sample size, _k_, is `20`. So when a node asks a group of nodes their opinion, it only queries `20` nodes out of the whole network. The quorum size, α, is `14`. So if `14` or more nodes give the same response, that response is adopted as the querying node's preference. The decision threshold, β, is `20`. A node decides on choice after receiving `20` consecutive quorum (α majority) responses.
Snowball is very scalable as the number of nodes on the network, _n_, increases. Regardless of the number of participants in the network, the number of consensus messages sent remains the same because in a given query, a node only queries `20` nodes, even if there are thousands of nodes in the network.
Everything discussed to this point is how Avalanche is described in [the Avalanche white-paper](https://assets-global.website-files.com/5d80307810123f5ffbb34d6e/6009805681b416f34dcae012_Avalanche%20Consensus%20Whitepaper.pdf). The implementation of the Snowman Consensus protocol by Ava Labs (namely in AvalancheGo) has some optimizations for latency and throughput.
### Blocks
A block is a fundamental component that forms the structure of a blockchain. It serves as a container or data structure that holds a collection of transactions or other relevant information. Each block is cryptographically linked to the previous block, creating a chain of blocks, hence the term "blockchain."
In addition to storing a reference of its parent, a block contains a set of transactions. These transactions can represent various types of information, such as financial transactions, smart contract operations, or data storage requests.
If a node receives a vote for a block, it also counts as a vote for all of the block's ancestors (its parent, the parents' parent, etc.).
### Finality
Snowman Consensus is probabilistically safe up to a safety threshold. That is, the probability that a correct node accepts a transaction that another correct node rejects can be made arbitrarily low by adjusting system parameters. In Nakamoto consensus protocol (as used in Bitcoin and Ethereum, for example), a block may be included in the chain but then be removed and not end up in the canonical chain. This means waiting an hour for transaction settlement. In Avalanche, acceptance/rejection are **final and irreversible** and only take a few seconds.
### Optimizations
It's not safe for nodes to just ask, "Do you prefer this block?" when they query validators. In Ava Labs' implementation, during a query a node asks, "Given that this block exists, which block do you prefer?" Instead of getting back a binary yes/no, the node receives the other node's preferred block.
Nodes don't only query upon hearing of a new block; they repeatedly query other nodes until there are no blocks processing.
Nodes may not need to wait until they get all _k_ query responses before registering the outcome of a poll. If a block has already received _alpha_ votes, then there's no need to wait for the rest of the responses.
### Validators
If it were free to become a validator on the Avalanche network, that would be problematic because a malicious actor could start many, many nodes which would get queried very frequently. The malicious actor could make the node act badly and cause a safety or liveness failure. The validators, the nodes which are queried as part of consensus, have influence over the network. They have to pay for that influence with real-world value in order to prevent this kind of ballot stuffing. This idea of using real-world value to buy influence over the network is called Proof of Stake.
To become a validator, a node must **bond** (stake) something valuable (**AVAX**). The more AVAX a node bonds, the more often that node is queried by other nodes. When a node samples the network it's not uniformly random. Rather, it's weighted by stake amount. Nodes are incentivized to be validators because they get a reward if, while they validate, they're sufficiently correct and responsive.
Avalanche doesn't have slashing. If a node doesn't behave well while validating, such as giving incorrect responses or perhaps not responding at all, its stake is still returned in whole, but with no reward. As long as a sufficient portion of the bonded AVAX is held by correct nodes, then the network is safe, and is live for virtuous transactions.
### Big Ideas
Two big ideas in Avalanche are **subsampling** and **transitive voting**.
Subsampling has low message overhead. It doesn't matter if there are twenty validators or two thousand validators; the number of consensus messages a node sends during a query remains constant.
Transitive voting, where a vote for a block is a vote for all its ancestors, helps with transaction throughput. Each vote is actually many votes in one.
### Loose Ends
Transactions are created by users which call an API on an [AvalancheGo](https://github.com/ava-labs/avalanchego) full node or create them using a library such as [AvalancheJS](https://github.com/ava-labs/avalanchejs).
### Other Observations
Conflicting transactions are not guaranteed to be live. That's not really a problem because if you want your transaction to be live then you should not issue a conflicting transaction.
Snowman is the name of Ava Labs' implementation of the Snowman Consensus protocol for linear chains.
If there are no undecided transactions, the Snowman Consensus protocol _quiesces_. That is, it does nothing if there is no work to be done. This makes Avalanche more sustainable than Proof-of-work where nodes need to constantly do work.
Avalanche has no leader. Any node can propose a transaction and any node that has staked AVAX can vote on every transaction, which makes the network more robust and decentralized.
## Why Do We Care?
Avalanche is a general consensus engine. It doesn't matter what type of application is put on top of it. The protocol allows the decoupling of the application layer from the consensus layer. If you're building a dapp on Avalanche then you just need to define a few things, like how conflicts are defined and what is in a transaction. You don't need to worry about how nodes come to an agreement. The consensus protocol is a black box that put something into it and it comes back as accepted or rejected.
Avalanche can be used for all kinds of applications, not just P2P payment networks. Avalanche's Primary Network has an instance of the Ethereum Virtual Machine, which is backward compatible with existing Ethereum Dapps and dev tooling. The Ethereum consensus protocol has been replaced with Snowman Consensus to enable lower block latency and higher throughput.
Avalanche is very performant. It can process thousands of transactions per second with one to two second acceptance latency.
## Summary
Snowman Consensus is a radical breakthrough in distributed systems. It represents as large a leap forward as the classical and Nakamoto consensus protocols that came before it. Now that you have a better understanding of how it works, check out other documentations for building game-changing Dapps and financial instruments on Avalanche.
# AVAX Token (/docs/primary-network/avax-token)
---
title: AVAX Token
description: Learn about the native token of Avalanche Primary Network.
---
AVAX is the native utility token of Avalanche. It's a hard-capped, scarce asset that is used to pay for fees, secure the platform through staking, and provide a basic unit of account between the multiple Avalanche L1s created on Avalanche.
`1 nAVAX` is equal to `0.000000001 AVAX`. Use the [AVAX Unit Converter](/console/primary-network/unit-converter) to convert between different AVAX denominations.
## Utility
AVAX is a capped-supply (up to 720M) resource in the Avalanche ecosystem that's used to power the
network. AVAX is used to secure the ecosystem through staking and for day-to-day operations like
issuing transactions.
AVAX represents the weight that each node has in network decisions. No single actor owns
the Avalanche Network, so each validator in the network is given a proportional weight in the
network's decisions corresponding to the proportion of total stake that they own through proof
of stake (PoS).
Any entity trying to execute a transaction on Avalanche Primary Network pays a corresponding fee (commonly known as
"gas") to run it on the network. The fees used to execute a transaction on Avalanche is burned,
or permanently removed from circulating supply.
## Tokenomics
A fixed amount of 360M AVAX was minted at genesis, but a small amount of AVAX is constantly minted
as a reward to validators. The protocol rewards validators for good behavior by minting them AVAX
rewards at the end of their staking period. The minting process offsets the AVAX burned by
transactions fees. While AVAX is still far away from its supply cap, it will almost always remain an
inflationary asset.
Avalanche does not take away any portion of a validator's already staked tokens (commonly known as
"slashing") for negligent/malicious staking periods, however this behavior is disincentivized as
validators who attempt to do harm to the network would expend their node's computing resources
for no reward.
AVAX is minted according to the following formula, where $R_j$ is the total number of tokens at
year $j$, with $R_1 = 360M$, and $R_l$ representing the last year that the values of
$\gamma,\lambda \in \R$ were changed; $c_j$ is the yet un-minted supply of coins to reach $720M$ at
year $j$ such that $c_j \leq 360M$; $u$ represents a staker, with $u.s_{amount}$ representing the
total amount of stake that $u$ possesses, and $u.s_{time}$ the length of staking for $u$.
AVAX is minted according to the following formula, where $R_j$ is the total number of tokens at:
$$
R_j = R_l + \sum_{\forall u} \rho(u.s_{amount}, u.s_{time}) \times \frac{c_j}{L} \times \left( \sum_{i=0}^{j}\frac{1}{\left(\gamma + \frac{1}{1 + i^\lambda}\right)^i} \right)
$$
where,
$$
L = \left(\sum_{i=0}^{\infty} \frac{1}{\left(\gamma + \frac{1}{1 + i^\lambda} \right)^i} \right)
$$
At genesis, $c_1 = 360M$. The values of $\gamma$ and $\lambda$ are governable, and if changed,
the function is recomputed with the new value of $c_*$. We have that $\sum_{*}\rho(*) \le 1$.
$\rho(*)$ is a linear function that can be computed as follows ($u.s_{time}$ is measured in weeks,
and $u.s_{amount}$ is measured in AVAX tokens):
$$
\rho(u.s_{amount}, u.s_{time}) = (0.002 \times u.s_{time} + 0.896) \times \frac{u.s_{amount}}{R_j}
$$
If the entire supply of tokens at year $j$ is staked for the maximum amount of staking time (one
year, or 52 weeks), then $\sum_{\forall u}\rho(u.s_{amount}, u.s_{time}) = 1$. If, instead,
every token is staked continuously for the minimal stake duration of two weeks, then
$\sum_{\forall u}\rho(u.s_{amount}, u.s_{time}) = 0.9$. Therefore, staking for the maximum
amount of time incurs an additional 11.11% of tokens minted, incentivizing stakers to stake
for longer periods.
Due to the capped-supply, the above function guarantees that
AVAX will never exceed a total of $720M$ tokens, or $\lim_{j \to \infty} R(j) = 720M$.
# Exchange Integration (/docs/primary-network/exchange-integration)
---
title: Exchange Integration
description: Learn how to integrate your exchange with the EVM-Compatible Avalanche C-Chain.
---
## Overview
The objective of this document is to provide a brief overview of how to
integrate with the EVM-Compatible Avalanche C-Chain.
For teams that already
support ETH, supporting the C-Chain is as straightforward as spinning up an
Avalanche node (which has the [same API](https://ethereum.org/en/developers/docs/apis/json-rpc/) as
[`go-ethereum`](https://geth.ethereum.org/docs/rpc/server)) and populating
Avalanche's ChainID (43114) when constructing transactions.
Additionally, Ava Labs maintains an implementation of the [Rosetta
API](https://docs.cdp.coinbase.com/mesh/docs/welcome) for the C-Chain called
[avalanche-rosetta](https://github.com/ava-labs/avalanche-rosetta). You can
learn more about this standardized integration path on the attached Rosetta API
website.
## Integration Using EVM Endpoints
### Running an Avalanche Node
If you want to build your node form source or include it in a docker image,
reference the [AvalancheGo GitHub
repository](https://github.com/ava-labs/avalanchego). To quickly get up and
running, you can use the [node installation script](/docs/nodes/run-a-node/using-install-script/installing-avalanche-go) that automates installing
and updating AvalancheGo node as a `systemd` service on Linux, using prebuilt
binaries.
### Configuring an Avalanche Node
All configuration options and their default values are described [here](/docs/nodes/configure/configs-flags).
You can supply configuration options on the command line, or use a config file,
which can be easier to work with when supplying many options. You can specify
the config file location with `—config-file=config.json`, where `config.json` is
a JSON file whose keys and values are option names and values.
Individual chains, including the C-Chain, have their own configuration options
which are separate from the node-level options. These can also be specified in a
config file. For more details, see
[here](/docs/nodes/chain-configs/primary-network/c-chain).
The C-Chain config file should be at
`$HOME/.avalanchego/configs/chains/C/config.json`. You can also tell AvalancheGo
to look somewhere else for the C-Chain config file with option
`--chain-config-dir`. An example C-Chain config file:
If you need Ethereum's [Archive
Node](https://ethereum.org/en/developers/docs/nodes-and-clients/#archive-node)
functionality, you need to disable C-Chain pruning, which has been enabled by
default since AvalancheGo v1.4.10. To disable pruning, include
`"pruning-enabled": false` in the C-Chain config file as shown below.
```json
{
"snowman-api-enabled": false,
"coreth-admin-api-enabled": false,
"local-txs-enabled": true,
"pruning-enabled": false,
"eth-apis": [
"internal-eth",
"internal-blockchain",
"internal-transaction",
"internal-tx-pool",
"internal-account",
"internal-personal",
"debug-tracer",
"web3",
"eth",
"eth-filter",
"admin",
"net"
]
}
```
### Interacting with the C-Chain
Interacting with the C-Chain is identical to interacting with
[`go-ethereum`](https://geth.ethereum.org/). You can find the reference material
for C-Chain API [here](/docs/rpcs/c-chain).
Please note that `personal_` namespace is turned off by default. To turn it on,
you need to pass the appropriate command line switch to your node, like in the
above config example.
## Integration Using Rosetta
[Rosetta](https://docs.cdp.coinbase.com/mesh/docs/welcome) is an open-source specification and set
of tools that makes integrating with different blockchain networks easier by
presenting the same set of APIs for every network. The Rosetta API is made up of
2 core components, the [Data
API](https://docs.cdp.coinbase.com/mesh/docs/api-data) and the
[Construction
API](https://docs.cdp.coinbase.com/mesh/docs/api-construction).
Together, these APIs allow for anyone to read and write to blockchains in a
standard format over a standard communication protocol. The specifications for
these APIs can be found in the
[rosetta-specifications](https://github.com/coinbase/rosetta-specifications)
repository.
You can find the Rosetta server implementation for Avalanche C-Chain
[here](https://github.com/ava-labs/avalanche-rosetta), all you need to do is
install and run the server with proper configuration. It comes with a `Dockerfile`
that packages both the server and the Avalanche client. Detailed instructions
can be found in the linked repository.
## Constructing Transactions
Avalanche C-Chain transactions are identical to standard EVM transactions with 2 exceptions:
- They must be signed with Avalanche's ChainID (43114).
- The detailed dynamic gas fee can be found [here](/docs/rpcs/other/guides/txn-fees#c-chain-fees).
For development purposes, Avalanche supports all the popular tooling for
Ethereum, so developers familiar with Ethereum and Solidity can feel right at
home. Popular development environments include:
- [Remix IDE](https://remix.ethereum.org/)
- [thirdweb](https://thirdweb.com/)
- [Hardhat](https://hardhat.org/)
## Ingesting On-Chain Data
You can use any standard way of ingesting on-chain data you use for Ethereum network.
### Determining Finality
Avalanche consensus provides fast and irreversible finality with 1-2 seconds. To
query the most up-to-date finalized block, query any value (that is block, balance,
state, etc) with the `latest` parameter. If you query above the last finalized
block (that is eth_blockNumber returns 10 and you query 11), an error will be
thrown indicating that unfinalized data cannot be queried (as of
`avalanchego@v1.3.2`).
### (Optional) Custom Golang SDK
If you plan on extracting data from the C-Chain into your own systems using
Golang, we recommend using our custom
[`ethclient`](https://github.com/ava-labs/avalanchego/tree/master/graft/coreth/ethclient). The
standard `go-ethereum` Ethereum client does not compute block hashes correctly
(when you call `block.Hash()`) because it doesn't take into account the added
[ExtDataHash](https://github.com/ava-labs/avalanchego/blob/master/graft/coreth/core/types/block.go#L98)
header field in Avalanche C-Chain blocks, which is used move AVAX between chains
(X-Chain and P-Chain). You can read more about our multi-chain abstraction
[here](/docs/primary-network) (out of scope for a
normal C-Chain integration).
If you plan on reading JSON responses directly or use web3.js (doesn't recompute
hash received over the wire) to extract on-chain transaction data/logs/receipts,
you shouldn't have any issues!
## Support
If you have any problems or questions, reach out either directly to our
developers, or on our public [Discord](https://chat.avalabs.org/) server.
# Primary Network (/docs/primary-network)
---
title: Primary Network
description: Learn about the Avalanche Primary Network and its three blockchains.
---
import { Network, Layers, Terminal, ArrowRight, Database, Package } from 'lucide-react';
Avalanche is a heterogeneous network of blockchains. As opposed to homogeneous networks, where all applications reside in the same chain, heterogeneous networks allow separate chains to be created for different applications.
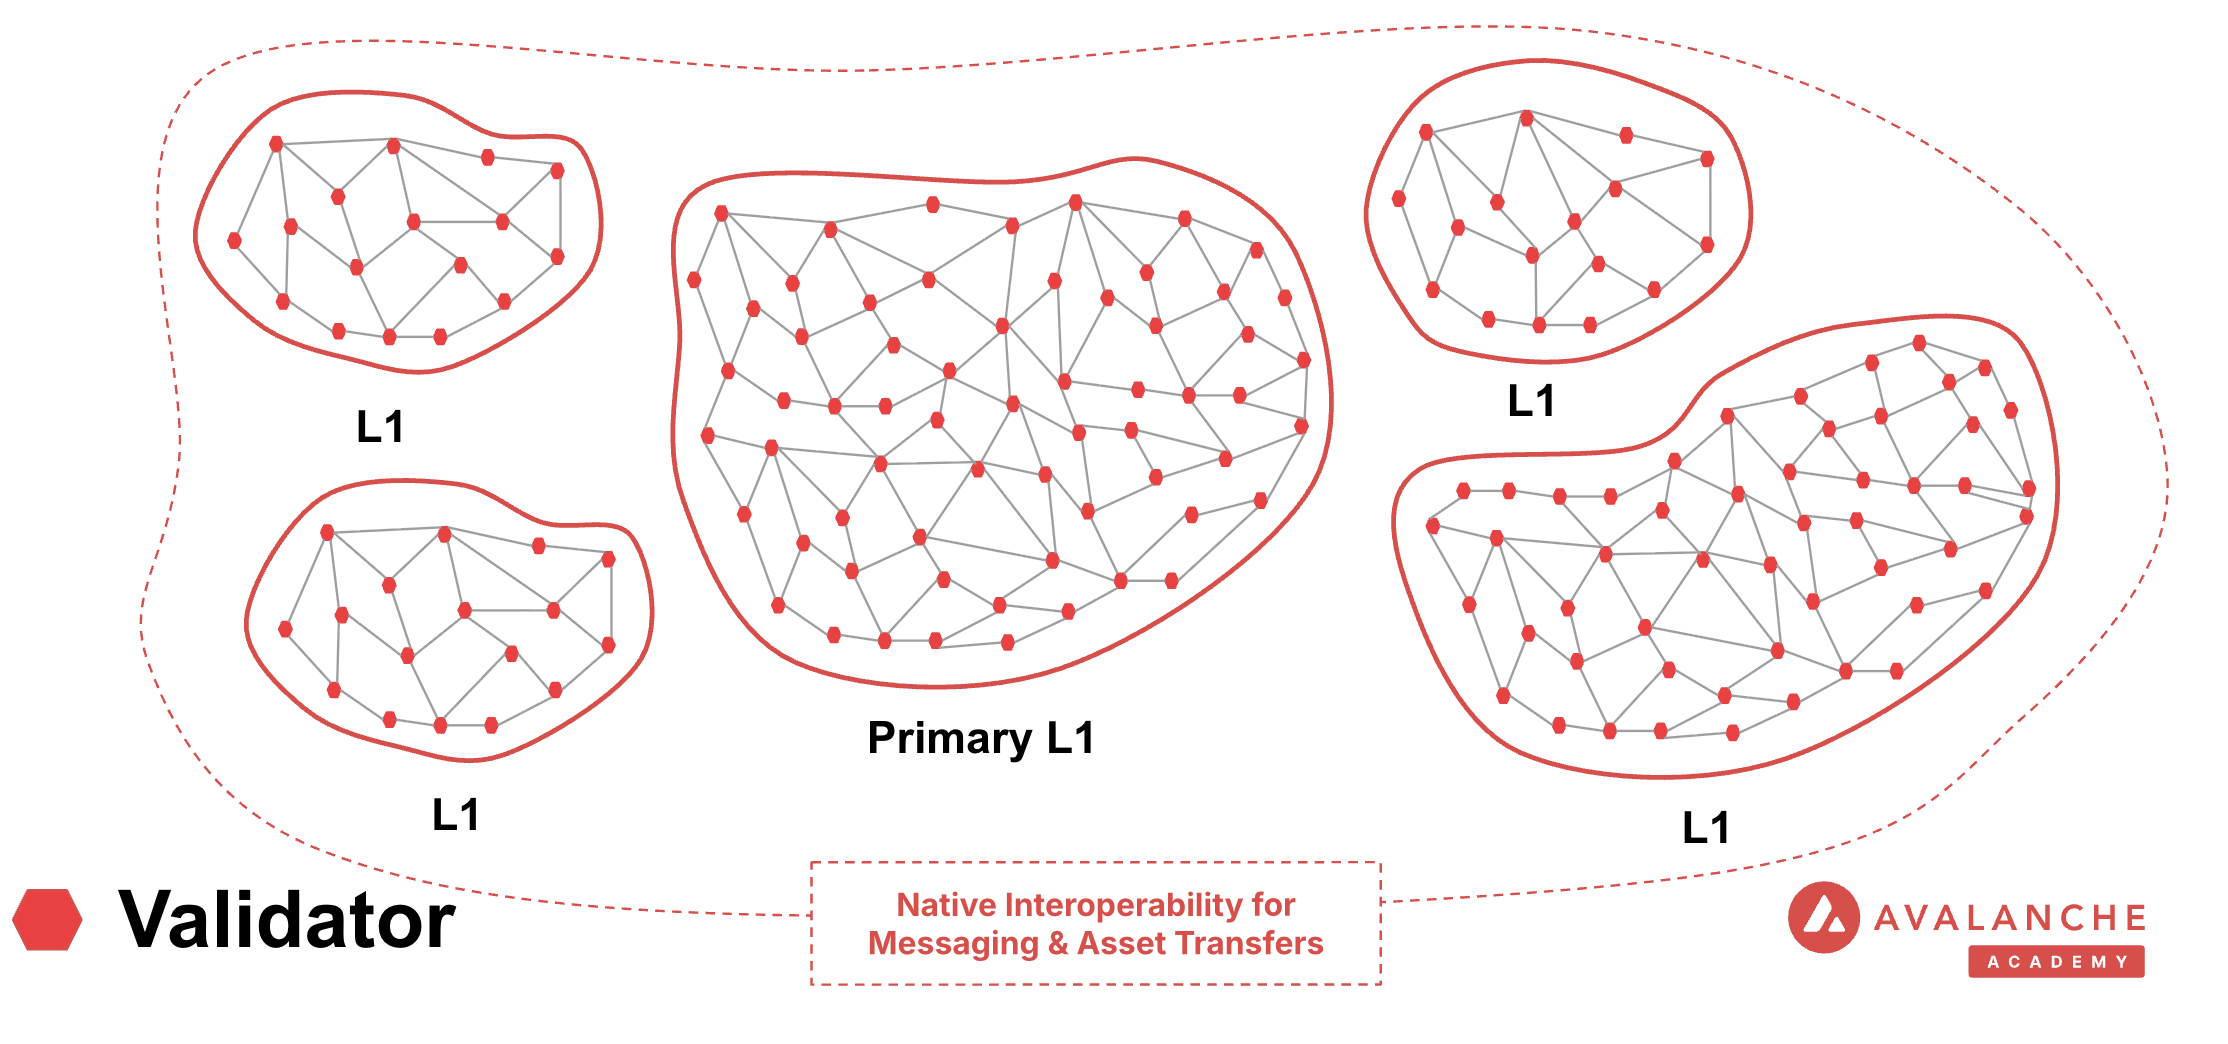
The Primary Network is a special [Avalanche L1](/docs/avalanche-l1s) that runs three blockchains:
- The Contract Chain [(C-Chain)](/docs/primary-network#c-chain-contract-chain)
- The Platform Chain [(P-Chain)](/docs/primary-network#p-chain-platform-chain)
- The Exchange Chain [(X-Chain)](/docs/primary-network#x-chain-exchange-chain)
Primary Network"]
PN ==> XC["Exchange (X) Chain ━━━━━━━━━━━━━━━ Snowman Consensus Protocol"]
PN ==> PC["Platform (P) Chain ━━━━━━━━━━━━━━━ Snowman Consensus Protocol"]
PN ==> CC["Contract (C) Chain ━━━━━━━━━━━━━━━ Snowman Consensus Protocol"]
XC --> XF1["Creates Assets"]
XC --> XF2["Exchanges Assets"]
PC --> PF1["Validator Registry"]
PC --> PF2["Creates Subnets / Layer 1s"]
CC --> CF1["Executes EVM Contracts"]
CC --> CF2["Smart Contracts"]
XF1 -.-> A1["Asset 1"]
XF1 -.-> A2["Asset 2"]
XF2 -.-> AV["AVAX"]
PF2 -.-> C1["Custom Chain 1"]
PF2 -.-> C2["Custom Chain 2"]
CF2 -.-> N1["NFT"]
CF2 -.-> E1["ERC20"]
CF2 -.-> D1["DAPP"]
style PN fill:#e74c3c,stroke:#c0392b,stroke-width:4px,color:#fff,rx:15,ry:15
style XC fill:#3498db,stroke:#2980b9,stroke-width:3px,color:#fff,rx:10,ry:10
style PC fill:#9b59b6,stroke:#8e44ad,stroke-width:3px,color:#fff,rx:10,ry:10
style CC fill:#16a085,stroke:#138d75,stroke-width:3px,color:#fff,rx:10,ry:10
style XF1 fill:#5dade2,stroke:#3498db,stroke-width:2px,color:#fff,rx:8,ry:8
style XF2 fill:#5dade2,stroke:#3498db,stroke-width:2px,color:#fff,rx:8,ry:8
style PF1 fill:#bb8fce,stroke:#9b59b6,stroke-width:2px,color:#fff,rx:8,ry:8
style PF2 fill:#bb8fce,stroke:#9b59b6,stroke-width:2px,color:#fff,rx:8,ry:8
style CF1 fill:#52be80,stroke:#16a085,stroke-width:2px,color:#fff,rx:8,ry:8
style CF2 fill:#52be80,stroke:#16a085,stroke-width:2px,color:#fff,rx:8,ry:8
style A1 fill:#85c1e9,stroke:#5dade2,stroke-width:1px,color:#2c3e50,rx:5,ry:5
style A2 fill:#85c1e9,stroke:#5dade2,stroke-width:1px,color:#2c3e50,rx:5,ry:5
style AV fill:#85c1e9,stroke:#5dade2,stroke-width:1px,color:#2c3e50,rx:5,ry:5
style C1 fill:#d7bde2,stroke:#bb8fce,stroke-width:1px,color:#2c3e50,rx:5,ry:5
style C2 fill:#d7bde2,stroke:#bb8fce,stroke-width:1px,color:#2c3e50,rx:5,ry:5
style N1 fill:#a3e4d7,stroke:#52be80,stroke-width:1px,color:#2c3e50,rx:5,ry:5
style E1 fill:#a3e4d7,stroke:#52be80,stroke-width:1px,color:#2c3e50,rx:5,ry:5
style D1 fill:#a3e4d7,stroke:#52be80,stroke-width:1px,color:#2c3e50,rx:5,ry:5
`} />
Avalanche Mainnet is comprised of the Primary Network and all deployed Avalanche L1s.
A node can become a validator for the Primary Network by staking at least **2,000 AVAX**.
### C-Chain (Contract Chain)
The **C-Chain** is an implementation of the Ethereum Virtual Machine (EVM). The [C-Chain's API](/docs/rpcs/c-chain) supports Geth's API and supports the deployment and execution of smart contracts written in Solidity.
The C-Chain is an instance of the [Coreth](https://github.com/ava-labs/avalanchego/tree/master/graft/coreth) Virtual Machine.
| Property | Mainnet | Fuji Testnet |
|----------|---------|--------------|
| **Network Name** | Avalanche C-Chain | Avalanche Fuji C-Chain |
| **Chain ID** | 43114 (0xA86A) | 43113 (0xA869) |
| **Currency** | AVAX | AVAX |
| **RPC URL** | https://api.avax.network/ext/bc/C/rpc | https://api.avax-test.network/ext/bc/C/rpc |
| **Explorer** | https://subnets.avax.network/c-chain | https://subnets-test.avax.network/c-chain |
| **Faucet** | - | [Get Test AVAX](/console/primary-network/faucet) |
| **Add to Wallet** | | |
### P-Chain (Platform Chain)
The **P-Chain** is responsible for all validator and Avalanche L1-level operations. The [P-Chain API](/docs/rpcs/p-chain) supports the creation of new blockchains and Avalanche L1s, the addition of validators to Avalanche L1s, staking operations, and other platform-level operations.
The P-Chain is an instance of the [Platform Virtual Machine](https://github.com/ava-labs/avalanchego/tree/master/vms/platformvm).
| Property | Mainnet | Fuji Testnet |
|----------|---------|--------------|
| **RPC URL** | https://api.avax.network/ext/bc/P | https://api.avax-test.network/ext/bc/P |
| **Currency** | AVAX | AVAX |
| **Explorer** | https://subnets.avax.network/p-chain | https://subnets-test.avax.network/p-chain |
### X-Chain (Exchange Chain)
The **X-Chain** is responsible for operations on digital smart assets known as **Avalanche Native Tokens**. A smart asset is a representation of a real-world resource (for example, equity, or a bond) with sets of rules that govern its behavior, like "can't be traded until tomorrow." The [X-Chain API](/docs/rpcs/x-chain) supports the creation and trade of Avalanche Native Tokens.
One asset traded on the X-Chain is AVAX. When you issue a transaction to a blockchain on Avalanche, you pay a fee denominated in AVAX.
The X-Chain is an instance of the Avalanche Virtual Machine (AVM).
| Property | Mainnet | Fuji Testnet |
|----------|---------|--------------|
| **RPC URL** | https://api.avax.network/ext/bc/X | https://api.avax-test.network/ext/bc/X |
| **Currency** | AVAX | AVAX |
| **Explorer** | https://subnets.avax.network/x-chain | https://subnets-test.avax.network/x-chain |
## Explore More
# Virtual Machines (/docs/primary-network/virtual-machines)
---
title: Virtual Machines
description: Learn about blockchain VMs and how you can build a custom VM-enabled blockchain in Avalanche.
---
A **Virtual Machine** (VM) is the blueprint for a blockchain, meaning it defines a blockchain's complete application logic by specifying the blockchain's state, state transitions, transaction rules, and API interface.
Developers can use the same VM to create multiple blockchains, each of which follows identical rules but is independent of all others.
All Avalanche validators of the **Avalanche Primary Network** are required to run three VMs:
- **Coreth**: Defines the Contract Chain (C-Chain); supports smart contract functionality and is EVM-compatible.
- **Platform VM**: Defines the Platform Chain (P-Chain); supports operations on staking and Avalanche L1s.
- **Avalanche VM**: Defines the Exchange Chain (X-Chain); supports operations on Avalanche Native Tokens.
All three can easily be run on any computer with [AvalancheGo](/docs/nodes).
## Custom VMs on Avalanche
Developers with advanced use-cases for utilizing distributed ledger technology are often forced to build everything from scratch - networking, consensus, and core infrastructure - before even starting on the actual application.
Avalanche eliminates this complexity by:
- Providing VMs as simple blueprints for defining blockchain behavior
- Supporting development in any programming language with familiar tools
- Handling all low-level infrastructure automatically
This lets developers focus purely on building their dApps, ecosystems, and communities, rather than wrestling with blockchain fundamentals.
### How Custom VMs Work
Customized VMs can communicate with Avalanche over a language agnostic request-response protocol known as [RPC](https://en.wikipedia.org/wiki/Remote_procedure_call). This allows the VM framework to open a world of endless possibilities, as developers can implement their dApps using the languages, frameworks, and libraries of their choice.
Validators can install additional VMs on their node to validate additional [Avalanche L1s](/docs/avalanche-l1s) in the Avalanche ecosystem. In exchange, validators receive staking rewards in the form of a reward token determined by the Avalanche L1s.
## Building a Custom VM
You can start building your first custom virtual machine in two ways:
1. Use the ready-to-deploy Subnet-EVM for Solidity-based development
2. Create a custom VM in Golang, Rust, or your preferred language
The choice depends on your needs. Subnet-EVM provides a quick start with Ethereum compatibility, while custom VMs offer maximum flexibility.
### Golang Examples
See here for a tutorial on [How to Build a Simple Golang VM](/docs/avalanche-l1s/golang-vms/simple-golang-vm).
### Rust Examples
See here for a tutorial on [How to Build a Simple Rust VM](/docs/avalanche-l1s/rust-vms/setting-up-environment).
# RPC APIs (/docs/rpcs)
---
title: RPC APIs
description: AvalancheGo RPC API References for interacting with Avalanche nodes
---
# RPC APIs
This section contains comprehensive documentation for all RPC (Remote Procedure Call) APIs available in the Avalanche ecosystem.
## Chain-Specific APIs
### C-Chain (Contract Chain)
The C-Chain is an instance of the Ethereum Virtual Machine (EVM). Documentation for C-Chain RPC methods and transaction formats.
### P-Chain (Platform Chain)
The P-Chain manages validators, staking, and subnets. Documentation for P-Chain RPC methods and transaction formats.
### X-Chain (Exchange Chain)
The X-Chain is responsible for asset creation and trading. Documentation for X-Chain RPC methods and transaction formats.
### Subnet-EVM
The Subnet-EVM is an instance of the EVM for Subnet / Layer 1 chains. Documentation for Subnet-EVM RPC methods and transaction formats.
## Other APIs
Additional RPC APIs for node administration, health monitoring, indexing, metrics, and more.
# Data API vs RPC (/docs/api-reference/data-api/data-vs-rpc)
---
title: Data API vs RPC
description: Comparison of the Data API and RPC methods
icon: Server
---
In the rapidly evolving world of Web3 development, efficiently retrieving token balances for a user's address is a fundamental requirement. Whether you're building DeFi platforms, wallets, analytics tools, or exchanges, displaying accurate token balances is crucial for user engagement and trust. A typical use case involves showing a user's token portfolio in a wallet application, in this case, we have sAvax and USDC.
Developers generally have two options to fetch this data:
1. **Using RPC methods to index blockchain data on their own**
2. **Leveraging an indexer provider like the Data API**
While both methods aim to achieve the same goal, the Data API offers a more efficient, scalable, and developer-friendly solution. This article delves into why using the Data API is better than relying on traditional RPC (Remote Procedure Call) methods.
### What Are RPC methods and their challenges?
Remote Procedure Call (RPC) methods allow developers to interact directly with blockchain nodes. One of their key advantages is that they are standardized and universally understood by blockchain developers across different platforms. With RPC, you can perform tasks such as querying data, submitting transactions, and interacting with smart contracts. These methods are typically low-level and synchronous, meaning they require a deep understanding of the blockchain’s architecture and specific command structures.
You can refer to the [official documentation](https://ethereum.org/en/developers/docs/apis/json-rpc/) to gain a more comprehensive understanding of the JSON-RPC API.
Here’s an example using the `eth_getBalance` method to retrieve the native balance of a wallet:
```bash
curl --location 'https://api.avax.network/ext/bc/C/rpc' \
--header 'Content-Type: application/json' \
--data '{"method":"eth_getBalance","params":["0x8ae323046633A07FB162043f28Cea39FFc23B50A", "latest"],"id":1,"jsonrpc":"2.0"}'
```
This call returns the following response:
```json
{
"jsonrpc": "2.0",
"id": 1,
"result": "0x284476254bc5d594"
}
```
The balance in this wallet is 2.9016 AVAX. However, despite the wallet holding multiple tokens such as USDC, the `eth_getBalance` method only returns the AVAX amount and it does so in Wei and in hexadecimal format. This is not particularly human-readable, adding to the challenge for developers who need to manually convert the balance to a more understandable format.
#### No direct RPC methods to retrieve token balances
Despite their utility, RPC methods come with significant limitations when it comes to retrieving detailed token and transaction data. Currently, RPC methods do not provide direct solutions for the following:
* **Listing all tokens held by a wallet**: There is no RPC method that provides a complete list of ERC-20 tokens owned by a wallet.
* **Retrieving all transactions for a wallet**: : There is no direct method for fetching all transactions associated with a wallet.
* **Getting ERC-20/721/1155 token balances**: The `eth_getBalance` method only returns the balance of the wallet’s native token (such as AVAX on Avalanche) and cannot be used to retrieve ERC-20/721/1155 token balances.
To achieve these tasks using RPC methods alone, you would need to:
* **Query every block for transaction logs**: Scan the entire blockchain, which is resource-intensive and impractical.
* **Parse transaction logs**: Identify and extract ERC-20 token transfer events from each transaction.
* **Aggregate data**: Collect and process this data to compute balances and transaction histories.
#### Manual blockchain indexing is difficult and costly
Using RPC methods to fetch token balances involves an arduous process:
1. You must connect to a node and subscribe to new block events.
2. For each block, parse every transaction to identify ERC-20 token transfers involving the user's address.
3. Extract contract addresses and other relevant data from the parsed transactions.
4. Compute balances by processing transfer events.
5. Store the processed data in a database for quick retrieval and aggregation.
#### Why this is difficult:
* **Resource-Intensive**: Requires significant computational power and storage to process and store blockchain data.
* **Time-consuming**: Processing millions of blocks and transactions can take an enormous amount of time.
* **Complexity**: Handling edge cases like contract upgrades, proxy contracts, and non-standard implementations adds layers of complexity.
* **Maintenance**: Keeping the indexed data up-to-date necessitates continuous synchronization with new blocks being added to the blockchain.
* **High Costs**: Associated with servers, databases, and network bandwidth.
### The Data API Advantage
The Data API provides a streamlined, efficient, and scalable solution for fetching token balances. Here's why it's the best choice:
With a single API call, you can retrieve all ERC-20 token balances for a user's address:
```javascript
avalancheSDK.data.evm.balances.listErc20Balances({
address: "0xYourAddress",
});
```
Sample Response:
```json
{
"erc20TokenBalances": [
{
"ercType": "ERC-20",
"chainId": "43114",
"address": "0xB97EF9Ef8734C71904D8002F8b6Bc66Dd9c48a6E",
"name": "USD Coin",
"symbol": "USDC",
"decimals": 6,
"price": {
"value": 1.0,
"currencyCode": "usd"
},
"balance": "15000000",
"balanceValue": {
"currencyCode": "usd",
"value": 9.6
},
"logoUri": "https://images.ctfassets.net/gcj8jwzm6086/e50058c1-2296-4e7e-91ea-83eb03db95ee/8db2a492ce64564c96de87c05a3756fd/43114-0xB97EF9Ef8734C71904D8002F8b6Bc66Dd9c48a6E.png"
}
// Additional tokens...
]
}
```
As you can see with a single call the API returns an array of token balances for all the wallet tokens, including:
* **Token metadata**: Contract address, name, symbol, decimals.
* **Balance information**: Token balance in both hexadecimal and decimal formats, Also retrieves balances of native assets like ETH or AVAX.
* **Price data**: Current value in USD or other supported currencies, saving you the effort of integrating another API.
* **Visual assets**: Token logo URI for better user interface integration.
If you’re building a wallet, DeFi app, or any application that requires displaying balances, transaction history, or smart contract interactions, relying solely on RPC methods can be challenging. Just as there’s no direct RPC method to retrieve token balances, there’s also no simple way to fetch all transactions associated with a wallet, especially for ERC-20, ERC-721, or ERC-1155 token transfers.
However, by using the Data API, you can retrieve all token transfers for a given wallet **with a single API call**, making the process much more efficient. This approach simplifies tracking and displaying wallet activity without the need to manually scan the entire blockchain.
Below are two examples that demonstrate the power of the Data API: in the first, it returns all ERC transfers, including ERC-20, ERC-721, and ERC-1155 tokens, and in the second, it shows all internal transactions, such as when one contract interacts with another.
[Lists ERC transfers](/data-api/evm-transactions/list-erc-transfers) for an ERC-20, ERC-721, or ERC-1155 contract address.
```javascript theme={null}
import { Avalanche } from "@avalanche-sdk/chainkit";
const avalancheSDK = new Avalanche({
apiKey: "",
chainId: "43114",
network: "mainnet",
});
async function run() {
const result = await avalancheSDK.data.evm.transactions.listTransfers({
startBlock: 6479329,
endBlock: 6479330,
pageSize: 10,
address: "0x71C7656EC7ab88b098defB751B7401B5f6d8976F",
});
for await (const page of result) {
// Handle the page
console.log(page);
}
}
run();
```
Example response
```json theme={null}
{
"nextPageToken": "",
"transfers": [
{
"blockNumber": "339",
"blockTimestamp": 1648672486,
"blockHash": "0x17533aeb5193378b9ff441d61728e7a2ebaf10f61fd5310759451627dfca2e7c",
"txHash": "0x3e9303f81be00b4af28515dab7b914bf3dbff209ea10e7071fa24d4af0a112d4",
"from": {
"name": "Wrapped AVAX",
"symbol": "WAVAX",
"decimals": 18,
"logoUri": "https://images.ctfassets.net/gcj8jwzm6086/5VHupNKwnDYJvqMENeV7iJ/fdd6326b7a82c8388e4ee9d4be7062d4/avalanche-avax-logo.svg",
"address": "0x71C7656EC7ab88b098defB751B7401B5f6d8976F"
},
"to": {
"name": "Wrapped AVAX",
"symbol": "WAVAX",
"decimals": 18,
"logoUri": "https://images.ctfassets.net/gcj8jwzm6086/5VHupNKwnDYJvqMENeV7iJ/fdd6326b7a82c8388e4ee9d4be7062d4/avalanche-avax-logo.svg",
"address": "0x71C7656EC7ab88b098defB751B7401B5f6d8976F"
},
"logIndex": 123,
"value": "10000000000000000000",
"erc20Token": {
"address": "0x71C7656EC7ab88b098defB751B7401B5f6d8976F",
"name": "Wrapped AVAX",
"symbol": "WAVAX",
"decimals": 18,
"logoUri": "https://images.ctfassets.net/gcj8jwzm6086/5VHupNKwnDYJvqMENeV7iJ/fdd6326b7a82c8388e4ee9d4be7062d4/avalanche-avax-logo.svg",
"ercType": "ERC-20",
"price": {
"currencyCode": "usd",
"value": "42.42"
}
}
}
]
}
```
[Returns a list of internal transactions](/data-api/evm-transactions/list-internal-transactions) for an address and chain. Filterable by block range.
```javascript theme={null}
import { Avalanche } from "@avalanche-sdk/chainkit";
const avalancheSDK = new Avalanche({
apiKey: "",
chainId: "43114",
network: "mainnet",
});
async function run() {
const result = await avalancheSDK.data.evm.transactions.listInternalTransactions({
startBlock: 6479329,
endBlock: 6479330,
pageSize: 10,
address: "0x71C7656EC7ab88b098defB751B7401B5f6d8976F",
});
for await (const page of result) {
// Handle the page
console.log(page);
}
}
run();
```
Example response
```json theme={null}
{
"nextPageToken": "",
"transactions": [
{
"blockNumber": "339",
"blockTimestamp": 1648672486,
"blockHash": "0x17533aeb5193378b9ff441d61728e7a2ebaf10f61fd5310759451627dfca2e7c",
"txHash": "0x3e9303f81be00b4af28515dab7b914bf3dbff209ea10e7071fa24d4af0a112d4",
"from": {
"name": "Wrapped AVAX",
"symbol": "WAVAX",
"decimals": 18,
"logoUri": "https://images.ctfassets.net/gcj8jwzm6086/5VHupNKwnDYJvqMENeV7iJ/fdd6326b7a82c8388e4ee9d4be7062d4/avalanche-avax-logo.svg",
"address": "0x71C7656EC7ab88b098defB751B7401B5f6d8976F"
},
"to": {
"name": "Wrapped AVAX",
"symbol": "WAVAX",
"decimals": 18,
"logoUri": "https://images.ctfassets.net/gcj8jwzm6086/5VHupNKwnDYJvqMENeV7iJ/fdd6326b7a82c8388e4ee9d4be7062d4/avalanche-avax-logo.svg",
"address": "0x71C7656EC7ab88b098defB751B7401B5f6d8976F"
},
"internalTxType": "UNKNOWN",
"value": "10000000000000000000",
"isReverted": true,
"gasUsed": "",
"gasLimit": ""
}
]
}
```
### Conclusion
Using the Data API over traditional RPC methods for fetching token balances offers significant advantages:
* **Efficiency**: Retrieve all necessary information in a single API call.
* **Simplicity**: Eliminates complex data processing and reduces development time.
* **Scalability**: Handles large volumes of data efficiently, suitable for real-time applications.
* **Comprehensive Data**: Provides enriched information, including token prices and logos.
* **Reliability**: Ensures data accuracy and consistency without the need for extensive error handling.
For developers building Web3 applications, leveraging the Data API is the smarter choice. It not only simplifies your codebase but also enhances the user experience by providing accurate and timely data.
If you’re building cutting-edge Web3 applications, this API is the key to improving your workflow and performance. Whether you’re developing DeFi solutions, wallets, or analytics platforms, take your project to the next level. [Start today with the Data API](/data-api/getting-started) and experience the difference!
# Getting Started (/docs/api-reference/data-api/getting-started)
---
title: Getting Started
description: Getting Started with the Data API
icon: Book
---
To begin, create your free account by visiting [Builder Hub Console](https://build.avax.network/login?callbackUrl=%2Fconsole%2Futilities%2Fdata-api-keys).
Once the account is created:
1. Navigating to [**Data API Keys**](https://build.avax.network/console/utilities/data-api-keys)
2. Click on **Create API Key**
3. Set an alias and click on **create**
4. Copy the the value
Always keep your API keys in a secure environment. Never expose them in public repositories, such as GitHub, or share them with unauthorized individuals. Compromised API keys can lead to unauthorized access and potential misuse of your account.
With your API Key you can start making queries, for example to get the latest block on the C-chain(43114):
```bash theme={null}
curl --location 'https://data-api.avax.network/v1/chains/43114/blocks' \
--header 'accept: application/json' \
--header 'x-glacier-api-key: ' \
```
And you should see something like this:
```json theme={null}
{
"blocks": [
{
"blockNumber": "49889407",
"blockTimestamp": 1724990250,
"blockHash": "0xd34becc82943e3e49048cdd3f75b80a87e44eb3aed6b87cc06867a7c3b9ee213",
"txCount": 1,
"baseFee": "25000000000",
"gasUsed": "53608",
"gasLimit": "15000000",
"gasCost": "0",
"parentHash": "0xf4917efb4628a1d8f4d101b3d15bce9826e62ef2c93c3e16ee898d27cf02f3d4",
"feesSpent": "1435117553916960",
"cumulativeTransactions": "500325352"
},
{
"blockNumber": "49889406",
"blockTimestamp": 1724990248,
"blockHash": "0xf4917efb4628a1d8f4d101b3d15bce9826e62ef2c93c3e16ee898d27cf02f3d4",
"txCount": 2,
"baseFee": "25000000000",
"gasUsed": "169050",
"gasLimit": "15000000",
"gasCost": "0",
"parentHash": "0x2a54f142fa3acee92a839b071bb6c7cca7abc2a797cf4aac68b07f79406ac0cb",
"feesSpent": "4226250000000000",
"cumulativeTransactions": "500325351"
},
{
"blockNumber": "49889405",
"blockTimestamp": 1724990246,
"blockHash": "0x2a54f142fa3acee92a839b071bb6c7cca7abc2a797cf4aac68b07f79406ac0cb",
"txCount": 4,
"baseFee": "25000000000",
"gasUsed": "618638",
"gasLimit": "15000000",
"gasCost": "0",
"parentHash": "0x0cda1bb5c86e790976c9330c9fc26e241a705afbad11a4caa44df1c81058451d",
"feesSpent": "16763932426044724",
"cumulativeTransactions": "500325349"
},
{
"blockNumber": "49889404",
"blockTimestamp": 1724990244,
"blockHash": "0x0cda1bb5c86e790976c9330c9fc26e241a705afbad11a4caa44df1c81058451d",
"txCount": 3,
"baseFee": "25000000000",
"gasUsed": "254544",
"gasLimit": "15000000",
"gasCost": "0",
"parentHash": "0x60e55dd9eacc095c07f50a73e02d81341c406584f7abbf5d10d938776a4c893c",
"feesSpent": "6984642298020000",
"cumulativeTransactions": "500325345"
},
{
"blockNumber": "49889403",
"blockTimestamp": 1724990242,
"blockHash": "0x60e55dd9eacc095c07f50a73e02d81341c406584f7abbf5d10d938776a4c893c",
"txCount": 2,
"baseFee": "25000000000",
"gasUsed": "65050",
"gasLimit": "15000000",
"gasCost": "0",
"parentHash": "0xa3e9f91f45a85ed00b8ebe8e5e976ed1a1f52612143eddd3de9d2588d05398b8",
"feesSpent": "1846500000000000",
"cumulativeTransactions": "500325342"
},
{
"blockNumber": "49889402",
"blockTimestamp": 1724990240,
"blockHash": "0xa3e9f91f45a85ed00b8ebe8e5e976ed1a1f52612143eddd3de9d2588d05398b8",
"txCount": 2,
"baseFee": "25000000000",
"gasUsed": "74608",
"gasLimit": "15000000",
"gasCost": "0",
"parentHash": "0x670db772edfc2fdae322d55473ba0670690aed6358a067a718492c819d63356a",
"feesSpent": "1997299851936960",
"cumulativeTransactions": "500325340"
},
{
"blockNumber": "49889401",
"blockTimestamp": 1724990238,
"blockHash": "0x670db772edfc2fdae322d55473ba0670690aed6358a067a718492c819d63356a",
"txCount": 1,
"baseFee": "25000000000",
"gasUsed": "273992",
"gasLimit": "15000000",
"gasCost": "0",
"parentHash": "0x75742cf45383ce54823690b9dd2e85a743be819281468163d276f145d077902a",
"feesSpent": "7334926295195040",
"cumulativeTransactions": "500325338"
},
{
"blockNumber": "49889400",
"blockTimestamp": 1724990236,
"blockHash": "0x75742cf45383ce54823690b9dd2e85a743be819281468163d276f145d077902a",
"txCount": 1,
"baseFee": "25000000000",
"gasUsed": "291509",
"gasLimit": "15000000",
"gasCost": "0",
"parentHash": "0xe5055eae3e1fd2df24b61e9c691f756c97e5619cfc66b69cbcb6025117d1bde7",
"feesSpent": "7724988500000000",
"cumulativeTransactions": "500325337"
},
{
"blockNumber": "49889399",
"blockTimestamp": 1724990234,
"blockHash": "0xe5055eae3e1fd2df24b61e9c691f756c97e5619cfc66b69cbcb6025117d1bde7",
"txCount": 8,
"baseFee": "25000000000",
"gasUsed": "824335",
"gasLimit": "15000000",
"gasCost": "0",
"parentHash": "0xbcacff928f7dd20cc1522155e7c9b9716997914b53ab94034b813c3f207174ef",
"feesSpent": "21983004380692400",
"cumulativeTransactions": "500325336"
},
{
"blockNumber": "49889398",
"blockTimestamp": 1724990229,
"blockHash": "0xbcacff928f7dd20cc1522155e7c9b9716997914b53ab94034b813c3f207174ef",
"txCount": 1,
"baseFee": "25000000000",
"gasUsed": "21000",
"gasLimit": "15000000",
"gasCost": "0",
"parentHash": "0x0b686812078429d33e4224d2b48bd26b920db8dbb464e7f135d980759ca7e947",
"feesSpent": "562182298020000",
"cumulativeTransactions": "500325328"
}
],
"nextPageToken": "9f9e1d25-14a9-49f4-8742-fd4bf12f7cd8"
}
```
Congratulations! You’ve successfully set up your account and made your first query to the Data API 🚀🚀🚀
# Data API (/docs/api-reference/data-api)
---
title: Data API
description: Access comprehensive blockchain data for Avalanche networks
icon: Database
---
### What is the Data API?
The Data API provides web3 application developers with multi-chain data related to Avalanche's primary network, Avalanche L1s, and Ethereum. With the Data API, you can easily build products that leverage real-time and historical transaction and transfer history, native and token balances, and various types of token metadata.
The [Data API](/docs/api-reference/data-api), along with the [Metrics API](/docs/api-reference/metrics-api), are the engines behind the [Avalanche Explorer](https://subnets.avax.network/stats/) and the [Core wallet](https://core.app/en/). They are used to display transactions, logs, balances, NFTs, and more. The data and visualizations presented are all powered by these APIs, offering real-time and historical insights that are essential for building sophisticated, data-driven blockchain products.
### Features
* **Extensive L1 Support**: Gain access to data from over 100+ L1s across both mainnet and testnet. If an L1 is listed on the [Avalanche Explorer](https://subnets.avax.network/), you can query its data using the Data API.
* **Transactions and UTXOs**: easily retrieve details related to transactions, UTXOs, and token transfers from Avalanche EVMs, Ethereum, and Avalanche's Primary Network - the P-Chain, X-Chain and C-Chain.
* **Blocks**: retrieve latest blocks and block details
* **Balances**: fetch balances of native, ERC-20, ERC-721, and ERC-1155 tokens along with relevant metadata.
* **Tokens**: augment your user experience with asset details.
* **Staking**: get staking related data for active and historical validations.
### Supported Chains
Avalanche’s architecture supports a diverse ecosystem of interconnected L1 blockchains, each operating independently while retaining the ability to seamlessly communicate with other L1s within the network. Central to this architecture is the Primary Network—Avalanche’s foundational network layer, which all validators are required to validate prior to [ACP-77](/docs/acps/77-reinventing-subnets). The Primary Network runs three essential blockchains:
* The Contract Chain (C-Chain)
* The Platform Chain (P-Chain)
* The Exchange Chain (X-Chain)
However, with the implementation of [ACP-77](/docs/acps/77-reinventing-subnets), this requirement will change. Subnet Validators will be able to operate independently of the Primary Network, allowing for more flexible and affordable Subnet creation and management.
The **Data API** supports a wide range of L1 blockchains (**over 100**) across both **mainnet** and **testnet**, including popular ones like Beam, DFK, Lamina1, Dexalot, Shrapnel, and Pulsar. In fact, every L1 you see on the [Avalanche Explorer](https://explorer.avax.network/) can be queried through the Data API. This list is continually expanding as we keep adding more L1s. For a full list of supported chains, visit [List chains](/docs/api-reference/data-api/evm-chains/supportedChains).
#### The Contract Chain (C-Chain)
The C-Chain is an implementation of the Ethereum Virtual Machine (EVM). The primary network endpoints only provide information related to C-Chain atomic memory balances and import/export transactions. For additional data, please reference the [EVM APIs](/docs/rpcs/c-chain/rpc).
#### The Platform Chain (P-Chain)
The P-Chain is responsible for all validator and L1-level operations. The P-Chain supports the creation of new blockchains and L1s, the addition of validators to L1s, staking operations, and other platform-level operations.
#### The Exchange Chain (X-Chain)
The X-Chain is responsible for operations on digital smart assets known as Avalanche Native Tokens. A smart asset is a representation of a real-world resource (for example, equity, or a bond) with sets of rules that govern its behavior, like "can’t be traded until tomorrow." The X-Chain supports the creation and trade of Avalanche Native Tokens.
| Feature | Description |
| :--------------- | :--------------------------------------------------------------------------------------------------------------------------------------------------------------------------------------------------------------------------------------------------------------------------------------------------------------------------------------------------------------------------------------- |
| **Chains** | Utilize this endpoint to retrieve the Primary Network chains that an address has transaction history associated with. |
| **Blocks** | Blocks are the container for transactions executed on the Primary Network. Retrieve the latest blocks, a specific block by height or hash, or a list of blocks proposed by a specified NodeID on Primary Network chains. |
| **Vertices** | Prior to Avalanche Cortina (v1.10.0), the X-Chain functioned as a DAG with vertices rather than blocks. These endpoints allow developers to retrieve historical data related to that period of chain history. Retrieve the latest vertices, a specific vertex, or a list of vertices at a specific height from the X-Chain. |
| **Transactions** | Transactions are a user's primary form of interaction with a chain and provide details around their on-chain activity, including staking-related behavior. Retrieve a list of the latest transactions, a specific transaction, a list of active staking transactions for a specified address, or a list of transactions associated with a provided asset id from Primary Network chains. |
| **UTXOs** | UTXOs are fundamental elements that denote the funds a user has available. Get a list of UTXOs for provided addresses from the Primary Network chains. |
| **Balances** | User balances are an essential function of the blockchain. Retrieve balances related to the X and P-Chains, as well as atomic memory balances for the C-Chain. |
| **Rewards** | Staking is the process where users lock up their tokens to support a blockchain network and, in return, receive rewards. It is an essential part of proof-of-stake (PoS) consensus mechanisms used by many blockchain networks, including Avalanche. Using the Data API, you can easily access pending and historical rewards associated with a set of addresses. |
| **Assets** | Get asset details corresponding to the given asset id on the X-Chain. |
#### EVM
The C-Chain is an instance of the Coreth Virtual Machine, and many Avalanche L1s are instances of the *Subnet-EVM*, which is a Virtual Machine (VM) that defines the L1 Contract Chains. *Subnet-EVM* is a simplified version of *Coreth VM* (C-Chain).
| Feature | Description |
| :--------------- | :------------------------------------------------------------------------------------------------------------------------------------------------------------------------------------------------------------------------------------------------------------------------------------------------------------ |
| **Chains** | There are a number of chains supported by the Data API. These endpoints can be used to understand which chains are included/indexed as part of the API and retrieve information related to a specific chain. |
| **Blocks** | Blocks are the container for transactions executed within the EVM. Retrieve the latest blocks or a specific block by height or hash. |
| **Transactions** | Transactions are a user's primary form of interaction with a chain and provide details around their on-chain activity. These endpoints can be used to retrieve information related to specific transaction details, internal transactions, contract deployments, specific token standard transfers, and more! |
| **Balances** | User balances are an essential function of the blockchain. Easily retrieve native token, collectible, and fungible token balances related to an EVM chain with these endpoints. |
#### Operations
The Operations API allows users to easily access their on-chain history by creating transaction exports returned in a CSV format. This API supports EVMs as well as non-EVM Primary Network chains.
# Rate Limits (/docs/api-reference/data-api/rate-limits)
---
title: Rate Limits
description: Rate Limits for the Data API
icon: Clock
---
Rate limiting is managed through a weighted scoring system, known as Compute Units (CUs). Each API request consumes a specified number of CUs, determined by the complexity of the request. This system is designed to accommodate basic requests while efficiently handling more computationally intensive operations.
## Rate Limit Tiers
The maximum CUs (rate-limiting score) for a user depends on their subscription level and is delineated in the following table:
| Subscription Level | Per Minute Limit (CUs) | Per Day Limit (CUs) |
| :----------------- | :--------------------- | :------------------ |
| Unauthenticated | 6,000 | 1,200,000 |
| Free | 8,000 | 2,000,000 |
| Base | 10,000 | 3,750,000 |
| Growth | 14,000 | 11,200,000 |
| Pro | 20,000 | 25,000,000 |
To update your subscription level use the [AvaCloud Portal](https://app.avacloud.io/)
Note: Rate limits apply collectively across both Webhooks and Data APIs, with usage from each counting toward your total CU limit.
## Rate Limit Categories
The CUs for each category are defined in the following table:
| Weight | CU Value |
| :----- | :------- |
| Free | 1 |
| Small | 10 |
| Medium | 20 |
| Large | 50 |
| XL | 100 |
| XXL | 200 |
## Rate Limits for Data API Endpoints
The CUs for each route are defined in the table below:
| Endpoint | Method | Weight | CU Value |
| :-------------------------------------------------------------------------------- | :----- | :----- | :------- |
| `/v1/health-check` | GET | Medium | 20 |
| `/v1/address/{address}/chains` | GET | Medium | 20 |
| `/v1/transactions` | GET | Medium | 20 |
| `/v1/blocks` | GET | Medium | 20 |
| `/v1/chains/{chainId}/nfts/collections/{address}/tokens/{tokenId}:reindex` | POST | Small | 10 |
| `/v1/chains/{chainId}/nfts/collections/{address}/tokens` | GET | Medium | 20 |
| `/v1/chains/{chainId}/nfts/collections/{address}/tokens/{tokenId}` | GET | Medium | 20 |
| `/v1/operations/{operationId}` | GET | Small | 10 |
| `/v1/operations/transactions:export` | POST | Medium | 20 |
| `/v1/networks/{network}/blockchains/{blockchainId}/transactions/{txHash}` | GET | Medium | 20 |
| `/v1/networks/{network}/blockchains/{blockchainId}/transactions` | GET | XL | 100 |
| `/v1/networks/{network}/blockchains/{blockchainId}/transactions:listStaking` | GET | XL | 100 |
| `/v1/networks/{network}/rewards:listPending` | GET | XL | 100 |
| `/v1/networks/{network}/rewards` | GET | XL | 100 |
| `/v1/networks/{network}/blockchains/{blockchainId}/utxos` | GET | XL | 100 |
| `/v1/networks/{network}/blockchains/{blockchainId}/balances` | GET | XL | 100 |
| `/v1/networks/{network}/blockchains/{blockchainId}/blocks/{blockId}` | GET | XL | 100 |
| `/v1/networks/{network}/blockchains/{blockchainId}/nodes/{nodeId}/blocks` | GET | Medium | 20 |
| `/v1/networks/{network}/blockchains/{blockchainId}/blocks` | GET | Medium | 20 |
| `/v1/networks/{network}/blockchains/{blockchainId}/vertices` | GET | Medium | 20 |
| `/v1/networks/{network}/blockchains/{blockchainId}/vertices/{vertexHash}` | GET | Medium | 20 |
| `/v1/networks/{network}/blockchains/{blockchainId}/vertices:listByHeight` | GET | Medium | 20 |
| `/v1/networks/{network}/blockchains/{blockchainId}/assets/{assetId}` | GET | XL | 100 |
| `/v1/networks/{network}/blockchains/{blockchainId}/assets/{assetId}/transactions` | GET | XL | 100 |
| `/v1/networks/{network}/addresses:listChainIds` | GET | XL | 100 |
| `/v1/networks/{network}` | GET | XL | 100 |
| `/v1/networks/{network}/blockchains` | GET | Medium | 20 |
| `/v1/networks/{network}/subnets` | GET | Medium | 20 |
| `/v1/networks/{network}/subnets/{subnetId}` | GET | Medium | 20 |
| `/v1/networks/{network}/validators` | GET | Medium | 20 |
| `/v1/networks/{network}/validators/{nodeId}` | GET | Medium | 20 |
| `/v1/networks/{network}/delegators` | GET | Medium | 20 |
| `/v1/networks/{network}/l1Validators` | GET | Medium | 20 |
| `/v1/teleporter/messages/{messageId}` | GET | Medium | 20 |
| `/v1/teleporter/messages` | GET | Medium | 20 |
| `/v1/teleporter/addresses/{address}/messages` | GET | Medium | 20 |
| `/v1/icm/messages/{messageId}` | GET | Medium | 20 |
| `/v1/icm/messages` | GET | Medium | 20 |
| `/v1/icm/addresses/{address}/messages` | GET | Medium | 20 |
| `/v1/apiUsageMetrics` | GET | XXL | 200 |
| `/v1/apiLogs` | GET | XXL | 200 |
| `/v1/subnetRpcUsageMetrics` | GET | XXL | 200 |
| `/v1/rpcUsageMetrics` | GET | XXL | 200 |
| `/v1/primaryNetworkRpcUsageMetrics` | GET | XXL | 200 |
| `/v1/signatureAggregator/{network}/aggregateSignatures` | POST | Medium | 20 |
| `/v1/signatureAggregator/{network}/aggregateSignatures/{txHash}` | GET | Medium | 20 |
| `/v1/chains/{chainId}/addresses/{address}/balances:getNative` | GET | Medium | 20 |
| `/v1/chains/{chainId}/addresses/{address}/balances:listErc20` | GET | Medium | 20 |
| `/v1/chains/{chainId}/addresses/{address}/balances:listErc721` | GET | Medium | 20 |
| `/v1/chains/{chainId}/addresses/{address}/balances:listErc1155` | GET | Medium | 20 |
| `/v1/chains/{chainId}/addresses/{address}/balances:listCollectibles` | GET | Medium | 20 |
| `/v1/chains/{chainId}/blocks` | GET | Small | 10 |
| `/v1/chains/{chainId}/blocks/{blockId}` | GET | Small | 10 |
| `/v1/chains/{chainId}/contracts/{address}/transactions:getDeployment` | GET | Medium | 20 |
| `/v1/chains/{chainId}/contracts/{address}/deployments` | GET | Medium | 20 |
| `/v1/chains/{chainId}/addresses/{address}` | GET | Medium | 20 |
| `/v1/chains` | GET | Free | 1 |
| `/v1/chains/{chainId}` | GET | Free | 1 |
| `/v1/chains/address/{address}` | GET | Free | 1 |
| `/v1/chains/allTransactions` | GET | Free | 1 |
| `/v1/chains/allBlocks` | GET | Free | 1 |
| `/v1/chains/{chainId}/tokens/{address}/transfers` | GET | Medium | 20 |
| `/v1/chains/{chainId}/addresses/{address}/transactions` | GET | Medium | 20 |
| `/v1/chains/{chainId}/addresses/{address}/transactions:listNative` | GET | Medium | 20 |
| `/v1/chains/{chainId}/addresses/{address}/transactions:listErc20` | GET | Medium | 20 |
| `/v1/chains/{chainId}/addresses/{address}/transactions:listErc721` | GET | Medium | 20 |
| `/v1/chains/{chainId}/addresses/{address}/transactions:listErc1155` | GET | Medium | 20 |
| `/v1/chains/{chainId}/addresses/{address}/transactions:listInternals` | GET | Medium | 20 |
| `/v1/chains/{chainId}/transactions/{txHash}` | GET | Medium | 20 |
| `/v1/chains/{chainId}/blocks/{blockId}/transactions` | GET | Medium | 20 |
| `/v1/chains/{chainId}/transactions` | GET | Medium | 20 |
## Rate Limits for RPC endpoints
The CUs for RPC calls are calculated based on the RPC method(s) within the request. The CUs assigned to each method are defined in the table below:
| Method | Weight | CU Value |
| :---------------------------------------- | :----- | :------- |
| `eth_accounts` | Free | 1 |
| `eth_blockNumber` | Small | 10 |
| `eth_call` | Small | 10 |
| `eth_coinbase` | Small | 10 |
| `eth_chainId` | Free | 1 |
| `eth_gasPrice` | Small | 10 |
| `eth_getBalance` | Small | 10 |
| `eth_getBlockByHash` | Small | 10 |
| `eth_getBlockByNumber` | Small | 10 |
| `eth_getBlockTransactionCountByNumber` | Medium | 20 |
| `eth_getCode` | Medium | 20 |
| `eth_getLogs` | XXL | 200 |
| `eth_getStorageAt` | Medium | 20 |
| `eth_getTransactionByBlockNumberAndIndex` | Medium | 20 |
| `eth_getTransactionByHash` | Small | 10 |
| `eth_getTransactionCount` | Small | 10 |
| `eth_getTransactionReceipt` | Small | 10 |
| `eth_signTransaction` | Medium | 20 |
| `eth_sendTransaction` | Medium | 20 |
| `eth_sign` | Medium | 20 |
| `eth_sendRawTransaction` | Small | 10 |
| `eth_syncing` | Free | 1 |
| `net_listening` | Free | 1 |
| `net_peerCount` | Medium | 20 |
| `net_version` | Free | 1 |
| `web3_clientVersion` | Small | 10 |
| `web3_sha3` | Small | 10 |
| `eth_newPendingTransactionFilter` | Medium | 20 |
| `eth_maxPriorityFeePerGas` | Small | 10 |
| `eth_baseFee` | Small | 10 |
| `rpc_modules` | Free | 1 |
| `eth_getChainConfig` | Small | 10 |
| `eth_feeConfig` | Small | 10 |
| `eth_getActivePrecompilesAt` | Small | 10 |
All rate limits, weights, and CU values are subject to change.
# Snowflake Datashare (/docs/api-reference/data-api/snowflake)
---
title: Snowflake Datashare
description: Snowflake Datashare for Avalanche blockchain data
icon: Snowflake
---
Avalanche Primary Network data (C-chain, P-chain, and X-chain blockchains) can be accessed in a sql-based table format via the [Snowflake Data Marketplace.](https://app.snowflake.com/marketplace)
Explore the blockchain state since the Genesis Block. These tables provide insights on transaction gas fees, DeFi activity, the historical stake of validators on the primary network, AVAX emissions rewarded to past validators/delegators, and fees paid by Avalanche L1 Validators to the primary network.
## Available Blockchain Data
#### Primary Network
* **C-chain:**
* Blocks
* Transactions
* Logs
* Internal Transactions
* Receipts
* Messages
* **P-chain:**
* Blocks
* Transactions
* UTXOs
* **X-chain:**
* Blocks
* Transactions
* Vertices before the [X-chain Linearization](https://www.avax.network/blog/cortina-x-chain-linearization) in the Cortina Upgrade
* **Dictionary:** A data dictionary is provided with the listing with column and table descriptions. Example columns include:
* `c_blocks.blockchash`
* `c_transactions.transactionfrom`
* `c_logs.topichex_0`
* `p_blocks.block_hash`
* `p_blocks.block_index`
* `p_blocks.type`
* `p_transactions.timestamp`
* `p_transactions.transaction_hash`
* `utxos.utxo_id`
* `utxos.address`
* `vertices.vertex_hash`
* `vertices.parent_hash`
* `x_blocks.timestamp`
* `x_blocks.proposer_id`
* `x_transactions.transaction_hash`
* `x_transactions.type`
#### Available Avalanche L1s
* **Gunzilla**
* **Dexalot**
* **DeFi Kingdoms (DFK)**
* **Henesys (MapleStory Universe)**
#### L1 Data
* Blocks
* Transactions
* Logs
* Internal Transactions (currently unavailable for DFK)
* Receipts
* Messages
## Access
Search for "Ava Labs" on the [Snowflake Data Marketplace](https://app.snowflake.com/marketplace).
# Usage Guide (/docs/api-reference/data-api/usage)
---
title: Usage Guide
description: Usage Guide for the Data API
icon: Code
---
### Setup and Authentication
In order to utilize your accounts rate limits, you will need to make API requests with an API key. You can generate API Keys from the AvaCloud portal. Once you've created and retrieved that, you will be able to make authenticated queries by passing in your API key in the `x-glacier-api-key` header of your HTTP request.
An example curl request can be found below:
```bash
curl -H "Content-Type: Application/json" -H "x-glacier-api-key: your_api_key" \
"https://glacier-api.avax.network/v1/chains"
```
### Rate Limits
The Data API has rate limits in place to maintain it's stability and protect from bursts of incoming traffic. The rate limits associated with various plans can be found within AvaCloud.
When you hit your rate limit, the server will respond with a 429 http response code, and response headers to help you determine when you should start to make additional requests. The response headers follow the standards set in the RateLimit header fields for HTTP draft from the Internet Engineering Task Force.
With every response with a valid api key, the server will include the following headers:
* `ratelimit-policy` - The rate limit policy tied to your api key.
* `ratelimit-limit` - The number of requests you can send according to your policy.
* `ratelimit-remaining` - How many request remaining you can send in the period for your policy
For any request after the rate limit has been reached, the server will also respond with these headers:
* `ratelimit-reset`
* `retry-after`
Both of these headers are set to the number of seconds until your period is over and requests will start succeeding again.
If you start receiving rate limit errors with the 429 response code, we recommend you discontinue sending requests to the server. You should wait to retry requests for the duration specified in the response headers. Alternatively, you can implement an exponential backoff algorithm to prevent continuous errors. Failure to discontinue requests may result in being temporarily blocked from accessing the API.
Error Types
The Data API generates standard error responses along with error codes based on provided requests and parameters.
Typically, response codes within the `2XX` range signifies successful requests, while those within the `4XX` range points to errors originating from the client's side. Meanwhile, response codes within the `5XX` range indicates problems on the server's side.
### Error Types
The Glacier API generates standard error responses along with error codes based on provided requests and parameters.
Typically, response codes within the `2XX` range signifies successful requests, while those within the `4XX` range points to errors originating from the client's side. Meanwhile, response codes within the `5XX` range indicates problems on the server's side.
The error response body is formatted like this:
```json
{
"message": ["Invalid address format"], // route specific error message
"error": "Bad Request", // error type
"statusCode": 400 // http response code
}
```
Let's go through every error code that we can respond with:
| Error Code | Error Type | Description |
| :--------- | :-------------------- | :---------------------------------------------------------------------------------------------------------------------------------------------------------------------------------------------------------------------------- |
| **400** | Bad Request | Bad requests generally mean the client has passed invalid or malformed parameters. Error messages in the response could help in evaluating the error. |
| **401** | Unauthorized | When a client attempts to access resources that require authorization credentials but the client lacks proper authentication in the request, the server responds with 401. |
| **403** | Forbidden | When a client attempts to access resources with valid credentials but doesn't have the privilege to perform that action, the server responds with 403. |
| **404** | Not Found | The 404 error is mostly returned when the client requests with either mistyped URL, or the passed resource is moved or deleted, or the resource doesn't exist. |
| **500** | Internal Server Error | The 500 error is a generic server-side error that is returned for any uncaught and unexpected issues on the server side. This should be very rare, and you may reach out to us if the problem persists for a longer duration. |
| **502** | Bad Gateway | This is an internal error indicating invalid response received by the client-facing proxy or gateway from the upstream server. |
| **503** | Service Unavailable | The 503 error is returned for certain routes on a particular Subnet. This indicates an internal problem with our Subnet node, and may not necessarily mean the Subnet is down or affected. |
The above list is not exhaustive of all the errors that you'll receive, but is categorized on the basis of error codes. You may see route-specific errors along with detailed error messages for better evaluating the response.
Reach out to our team when you see an error in the `5XX` range for a longer duration. These errors should be very rare, but we try to fix them as soon as possible once detected.
### Pagination
When utilizing pagination for endpoints that return lists of data such as transactions, UTXOs, or blocks, our API uses a straightforward mechanism to manage the navigation through large datasets. We divide data into pages and each page is limited with a `pageSize` number of elements as passed in the request. Users can navigate to subsequent pages using the page token received in the `nextPageToken` field. This method ensures efficient retrieval.
Routes with pagination have a following common response format:
```json
{
"blocks": [""], // This field name will vary by route
"nextPageToken": "3d22deea-ea64-4d30-8a1e-c2a353b67e90"
}
```
### Page Token Structure
* If there's more data in the dataset for the request, the API will include a UUID-based page token in the response. This token acts as a pointer to the next page of data.
* The UUID page token is generated randomly and uniquely for each pagination scenario, enhancing security and minimizing predictability.
* It's important to note that the page token is only returned when a next page is present. If there's no further data to retrieve, a page token will not be included in the response.
* The generated page token has an expiration window of 24 hours. Beyond this timeframe, the token will no longer be valid for accessing subsequent pages.
### Integration and Usage:
To make use of the pagination system, simply examine the API response. If a UUID page token is present, it indicates the availability of additional data on the next page. You can extract this token and include it in the subsequent request to access the subsequent page of results.
Please note that you must ensure that the subsequent request is made within the 24-hour timeframe after the original token's generation. Beyond this duration, the token will expire, and you will need to initiate a fresh request from the initial page.
By incorporating UUID page tokens, our API offers a secure, efficient, and user-friendly approach to navigating large datasets, streamlining your data retrieval proces
### Swagger API Reference
You can explore the full API definitions and interact with the endpoints in the Swagger documentation at:
[https://glacier-api.avax.network/api](https://glacier-api.avax.network/api)
# Getting Started (/docs/api-reference/metrics-api/getting-started)
---
title: Getting Started
description: Getting Started with the Metrics API
icon: Rocket
---
The Metrics API is designed to be simple and accessible, requiring no authentication to get started. Just choose your endpoint, make your query, and instantly access on-chain data and analytics to power your applications.
The following query retrieves the daily count of active addresses on the Avalanche C-Chain(43114) over the course of one month (from August 1, 2024 12:00:00 AM to August 31, 2024 12:00:00 AM), providing insights into user activity on the chain for each day during that period. With this data you can use JavaScript visualization tools like Chart.js, D3.js, Highcharts, Plotly.js, or Recharts to create interactive and insightful visual representations.
```bash
curl --request GET \
--url 'https://metrics.avax.network/v2/chains/43114/metrics/activeAddresses?startTimestamp=1722470400&endTimestamp=1725062400&timeInterval=day&pageSize=31'
```
Response:
```json
{
"results": [
{
"value": 37738,
"timestamp": 1724976000
},
{
"value": 53934,
"timestamp": 1724889600
},
{
"value": 58992,
"timestamp": 1724803200
},
{
"value": 73792,
"timestamp": 1724716800
},
{
"value": 70057,
"timestamp": 1724630400
},
{
"value": 46452,
"timestamp": 1724544000
},
{
"value": 46323,
"timestamp": 1724457600
},
{
"value": 73399,
"timestamp": 1724371200
},
{
"value": 52661,
"timestamp": 1724284800
},
{
"value": 52497,
"timestamp": 1724198400
},
{
"value": 50574,
"timestamp": 1724112000
},
{
"value": 46999,
"timestamp": 1724025600
},
{
"value": 45320,
"timestamp": 1723939200
},
{
"value": 54964,
"timestamp": 1723852800
},
{
"value": 60251,
"timestamp": 1723766400
},
{
"value": 48493,
"timestamp": 1723680000
},
{
"value": 71091,
"timestamp": 1723593600
},
{
"value": 50456,
"timestamp": 1723507200
},
{
"value": 46989,
"timestamp": 1723420800
},
{
"value": 50984,
"timestamp": 1723334400
},
{
"value": 46988,
"timestamp": 1723248000
},
{
"value": 66943,
"timestamp": 1723161600
},
{
"value": 64209,
"timestamp": 1723075200
},
{
"value": 57478,
"timestamp": 1722988800
},
{
"value": 80553,
"timestamp": 1722902400
},
{
"value": 70472,
"timestamp": 1722816000
},
{
"value": 53678,
"timestamp": 1722729600
},
{
"value": 70818,
"timestamp": 1722643200
},
{
"value": 99842,
"timestamp": 1722556800
},
{
"value": 76515,
"timestamp": 1722470400
}
]
}
```
Congratulations! You’ve successfully made your first query to the Metrics API. 🚀🚀🚀
# Metrics API (/docs/api-reference/metrics-api)
---
title: Metrics API
description: Access real-time and historical metrics for Avalanche networks
icon: ChartLine
---
### What is the Metrics API?
The Metrics API equips web3 developers with a robust suite of tools to access and analyze on-chain activity across Avalanche’s primary network, Avalanche L1s, and other supported EVM chains. This API delivers comprehensive metrics and analytics, enabling you to seamlessly integrate historical data on transactions, gas consumption, throughput, staking, and more into your applications.
The Metrics API, along with the [Data API](/docs/api-reference/data-api) are the driving force behind every graph you see on the [Avalanche Explorer](https://explorer.avax.network/). From transaction trends to staking insights, the visualizations and data presented are all powered by these APIs, offering real-time and historical insights that are essential for building sophisticated, data-driven blockchain products..
### Features
* **Chain Throughput:** Retrieve detailed metrics on gas consumption, Transactions Per Second (TPS), and gas prices, including rolling windows of data for granular analysis.
* **Cumulative Metrics:** Access cumulative data on addresses, contracts, deployers, and transaction counts, providing insights into network growth over time.
* **Staking Information:** Obtain staking-related data, including the number of validators and delegators, along with their respective weights, across different subnets.
* **Blockchains and Subnets:** Get information about supported blockchains, including EVM Chain IDs, blockchain IDs, and subnet associations, facilitating multi-chain analytics.
* **Composite Queries:** Perform advanced queries by combining different metric types and conditions, enabling detailed and customizable data retrieval.
The Metrics API is designed to provide developers with powerful tools to analyze and monitor on-chain activity across Avalanche’s primary network, Avalanche L1s, and other supported EVM chains. Below is an overview of the key features available:
### Chain Throughput Metrics
* **Gas Consumption**
Track the average and maximum gas consumption per second, helping to understand network performance and efficiency.
* **Transactions Per Second (TPS)**
Monitor the average and peak TPS to assess the network’s capacity and utilization.
* **Gas Prices**
Analyze average and maximum gas prices over time to optimize transaction costs and predict fee trends.
Monitor the average and peak TPS to assess the network’s capacity and utilization.
### Cumulative Metrics
* **Address Growth**
Access the cumulative number of active addresses on a chain, providing insights into network adoption and user activity.
* **Contract Deployment**
Monitor the cumulative number of smart contracts deployed, helping to gauge developer engagement and platform usage.
* **Transaction Count**
Track the cumulative number of transactions, offering a clear view of network activity and transaction volume.
### Staking Information
* **Validator and Delegator Counts**
Retrieve the number of active validators and delegators for a given L1, crucial for understanding network security and decentralization.
* **Staking Weights**
Access the total stake weight of validators and delegators, helping to assess the distribution of staked assets across the network.
### Rolling Window Analytics
* **Short-Term and Long-Term Metrics:** Perform rolling window analysis on various metrics like gas used, TPS, and gas prices, allowing for both short-term and long-term trend analysis.
* **Customizable Time Frames:** Choose from different time intervals (hourly, daily, monthly) to suit your specific analytical needs.
### Blockchain and L1 Information
* **Chain and L1 Mapping:** Get detailed information about EVM chains and their associated L1s, including chain IDs, blockchain IDs, and subnet IDs, facilitating cross-chain analytics.
### Advanced Composite Queries
* **Custom Metrics Combinations**: Combine multiple metrics and apply logical operators to perform sophisticated queries, enabling deep insights and tailored analytics.
* **Paginated Results:** Handle large datasets efficiently with paginated responses, ensuring seamless data retrieval in your applications.
The Metrics API equips developers with the tools needed to build robust analytics, monitoring, and reporting solutions, leveraging the full power of multi-chain data across the Avalanche ecosystem and beyond.
# Rate Limits (/docs/api-reference/metrics-api/rate-limits)
---
title: Rate Limits
description: Rate Limits for the Metrics API
icon: Clock
---
# Rate Limits
Rate limiting is managed through a weighted scoring system, known as Compute Units (CUs). Each API request consumes a specified number of CUs, determined by the complexity of the request. This system is designed to accommodate basic requests while efficiently handling more computationally intensive operations.
## Rate Limit Tiers
The maximum CUs (rate-limiting score) for a user depends on their subscription level and is delineated in the following table:
| Subscription Level | Per Minute Limit (CUs) | Per Day Limit (CUs) |
| :----------------- | :--------------------- | :------------------ |
| Free | 8,000 | 1,200,000 |
> We are working on new subscription tiers with higher rate limits to support even greater request volumes.
## Rate Limit Categories
The CUs for each category are defined in the following table:
| Weight | CU Value |
| :----- | :------- |
| Free | 1 |
| Small | 20 |
| Medium | 100 |
| Large | 500 |
| XL | 1000 |
| XXL | 3000 |
## Rate Limits for Metrics Endpoints
The CUs for each route are defined in the table below:
| Endpoint | Method | Weight | CU Value |
| :---------------------------------------------------------- | :----- | :----- | :------- |
| `/v2/health-check` | GET | Free | 1 |
| `/v2/chains` | GET | Free | 1 |
| `/v2/chains/{chainId}` | GET | Free | 1 |
| `/v2/chains/{chainId}/metrics/{metric}` | GET | Medium | 100 |
| `/v2/chains/{chainId}/teleporterMetrics/{metric}` | GET | Medium | 100 |
| `/v2/chains/{chainId}/rollingWindowMetrics/{metric}` | GET | Medium | 100 |
| `/v2/networks/{network}/metrics/{metric}` | GET | Medium | 100 |
| `/v2/chains/{chainId}/contracts/{address}/nfts:listHolders` | GET | Large | 500 |
| `/v2/chains/{chainId}/contracts/{address}/balances` | GET | XL | 1000 |
| `/v2/chains/43114/btcb/bridged:getAddresses` | GET | Large | 500 |
| `/v2/subnets/{subnetId}/validators:getAddresses` | GET | Large | 500 |
| `/v2/lookingGlass/compositeQuery` | POST | XXL | 3000 |
All rate limits, weights, and CU values are subject to change.
# Usage Guide (/docs/api-reference/metrics-api/usage-guide)
---
title: Usage Guide
description: Usage Guide for the Metrics API
icon: Code
---
The Metrics API does not require authentication, making it straightforward to integrate into your applications. You can start making API requests without the need for an API key or any authentication headers.
#### Making Requests
You can interact with the Metrics API by sending HTTP GET requests to the provided endpoints. Below is an example of a simple `curl` request.
```bash
curl -H "Content-Type: Application/json" "https://metrics.avax.network/v1/avg_tps/{chainId}"
```
In the above request Replace `chainId` with the specific chain ID you want to query. For example, to retrieve the average transactions per second (TPS) for a specific chain (in this case, chain ID 43114), you can use the following endpoint:
```bash
curl "https://metrics.avax.network/v1/avg_tps/43114"
```
The API will return a JSON response containing the average TPS for the specified chain over a series of timestamps and `lastRun` is a timestamp indicating when the last data point was updated:
```json
{
"results": [
{"timestamp": 1724716800, "value": 1.98},
{"timestamp": 1724630400, "value": 2.17},
{"timestamp": 1724544000, "value": 1.57},
{"timestamp": 1724457600, "value": 1.82},
// Additional data points...
],
"status": 200,
"lastRun": 1724780812
}
```
### Rate Limits
Even though the Metrics API does not require authentication, it still enforces rate limits to ensure stability and performance. If you exceed these limits, the server will respond with a 429 Too Many Requests HTTP response code.
### Error Types
The API generates standard error responses along with error codes based on provided requests and parameters.
Typically, response codes within the `2XX` range signifies successful requests, while those within the `4XX` range points to errors originating from the client's side. Meanwhile, response codes within the `5XX` range indicates problems on the server's side.
The error response body is formatted like this:
```json
{
"message": ["Invalid address format"], // route specific error message
"error": "Bad Request", // error type
"statusCode": 400 // http response code
}
```
Let's go through every error code that we can respond with:
| Error Code | Error Type | Description |
| ---------- | --------------------- | ----------------------------------------------------------------------------------------------------------------------------------------------------------------------------------------------------------------------------- |
| **400** | Bad Request | Bad requests generally mean the client has passed invalid or malformed parameters. Error messages in the response could help in evaluating the error. |
| **401** | Unauthorized | When a client attempts to access resources that require authorization credentials but the client lacks proper authentication in the request, the server responds with 401. |
| **403** | Forbidden | When a client attempts to access resources with valid credentials but doesn't have the privilege to perform that action, the server responds with 403. |
| **404** | Not Found | The 404 error is mostly returned when the client requests with either mistyped URL, or the passed resource is moved or deleted, or the resource doesn't exist. |
| **500** | Internal Server Error | The 500 error is a generic server-side error that is returned for any uncaught and unexpected issues on the server side. This should be very rare, and you may reach out to us if the problem persists for a longer duration. |
| **502** | Bad Gateway | This is an internal error indicating invalid response received by the client-facing proxy or gateway from the upstream server. |
| **503** | Service Unavailable | The 503 error is returned for certain routes on a particular Subnet. This indicates an internal problem with our Subnet node, and may not necessarily mean the Subnet is down or affected. |
### Pagination
For endpoints that return large datasets, the Metrics API employs pagination to manage the results. When querying for lists of data, you may receive a nextPageToken in the response, which can be used to request the next page of data.
Example response with pagination:
```json
{
"results": [...],
"nextPageToken": "3d22deea-ea64-4d30-8a1e-c2a353b67e90"
}
```
To retrieve the next set of results, include the nextPageToken in your subsequent request:
```bash
curl -H "Content-Type: Application/json" \
"https://metrics.avax.network/v1/avg_tps/{chainId}?pageToken=3d22deea-ea64-4d30-8a1e-c2a353b67e90"
```
### Pagination Details
#### Page Token Structure
The `nextPageToken` is a UUID-based token provided in the response when additional pages of data are available. This token serves as a pointer to the next set of data.
* **UUID Generation**: The `nextPageToken` is generated uniquely for each pagination scenario, ensuring security and ensuring predictability.
* **Expiration**: The token is valid for 24 hours from the time it is generated. After this period, the token will expire, and a new request starting from the initial page will be required.
* **Presence**: The token is only included in the response when there is additional data available. If no more data exists, the token will not be present.
#### Integration and Usage
To use the pagination system effectively:
* Check if the `nextPageToken` is present in the response.
* If present, include this token in the subsequent request to fetch the next page of results.
* Ensure that the follow-up request is made within the 24-hour window after the token was generated to avoid token expiration.
By utilizing the pagination mechanism, you can efficiently manage and navigate through large datasets, ensuring a smooth data retrieval process.
### Swagger API Reference
You can explore the full API definitions and interact with the endpoints in the Swagger documentation at:
[https://metrics.avax.network/api](https://metrics.avax.network/api)
# Webhooks API (/docs/api-reference/webhook-api)
---
title: Webhooks API
description: Real-time notifications for blockchain events on Avalanche networks
icon: Webhook
---
### What is the Webhooks API?
The Webhooks API lets you monitor real-time events on the Avalanche ecosystem, including the C-chain, L1s, and the Platform Chain (P/X chains). By subscribing to specific events, you can receive instant notifications for on-chain occurrences without continuously polling the network.
### Key Features:
* **Real-time notifications:** Receive immediate updates on specified on-chain activities without polling.
* **Customizable:** Specify the desired event type to listen for, customizing notifications based on your individual requirements.
* **Secure:** Employ shared secrets and signature-based verification to ensure that notifications originate from a trusted source.
* **Broad Coverage:**
* **C-chain:** Mainnet and testnet, covering smart contract events, NFT transfers, and wallet-to-wallet transactions.
* **Platform Chain (P and X chains):** Address and validator events, staking activities, and other platform-level transactions.
By supporting both the C-chain and the Platform Chain, you can monitor an even wider range of Avalanche activities.
### Use cases
* **NFT marketplace transactions**: Get alerts for NFT minting, transfers, auctions, bids, sales, and other interactions within NFT marketplaces.
* **Wallet notifications**: Receive alerts when an address performs actions such as sending, receiving, swapping, or burning assets.
* **DeFi activities**: Receive notifications for various DeFi activities such as liquidity provisioning, yield farming, borrowing, lending, and liquidations.
* **Staking rewards:** Get real-time notifications when a validator stakes, receives delegation, or earns staking rewards on the P-Chain, enabling seamless monitoring of validator earnings and participation.
## APIs for continuous polling vs. Webhooks for events data
The following example uses the address activity webhook topic to illustrate the difference between polling an API for wallet event data versus subscribing to a webhook topic to receive wallet events.
### Continous polling
Continuous polling is a method where your application repeatedly sends requests to an API at fixed intervals to check for new data or events. Think of it like checking your mailbox every five minutes to see if new mail has arrived, whether or not anything is there.
* You want to track new transactions for a specific wallet.
* Your application calls an API every few seconds (e.g., every 5 seconds) with a query like, “Are there any new transactions for this wallet since my last check?”
* The API responds with either new transaction data or a confirmation that nothing has changed.
**Downsides of continuous polling**
* **Inefficiency:** Your app makes requests even when no new transactions occur, wasting computational resources, bandwidth, and potentially incurring higher API costs.
For example, if no transactions happen for an hour, your app still sends hundreds of unnecessary requests.
* **Delayed updates:**
Since polling happens at set intervals, there’s a potential delay in detecting events. If a transaction occurs just after a poll, your app won’t know until the next check—up to 5 seconds later in our example.
This lag can be critical for time-sensitive applications, like trading or notifications.
* **Scalability challenges:** Monitoring one wallet might be manageable, but if you’re tracking dozens or hundreds of wallets, the number of requests multiplies quickly.
### Webhook subscription
Webhooks are an event-driven alternative where your application subscribes to specific events, and the Avalanche service notifies you instantly when those events occur. It’s like signing up for a delivery alert—when the package (event) arrives, you get a text message right away, instead of checking the tracking site repeatedly.
* Your app registers a webhook specifying an endpoint (e.g., `https://your-app.com/webhooks/transactions`) and the event type (e.g., `address_activity`).
* When a new transaction occurs we send a POST request to your endpoint with the transaction details.
* Your app receives the data only when something happens, with no need to ask repeatedly.
**Benefits of Avalanche webhooks**
* **Real-Time updates:** Notifications arrive the moment a transaction is processed, eliminating delays inherent in polling. This is ideal for applications needing immediate responses, like alerting users or triggering automated actions.
* **Efficiency:** Your app doesn’t waste resources making requests when there’s no new data. Data flows only when events occur. This reduces server load, bandwidth usage, and API call quotas.
* **Scalability:** You can subscribe to events for multiple wallets or event types (e.g., transactions, smart contract calls) without increasing the number of requests your app makes. We handle the event detection and delivery, so your app scales effortlessly as monitoring needs grow.
## Event payload structure
The Event structure always begins with the following parameters:
```json theme={null}
{
"webhookId": "6d1bd383-aa8d-47b5-b793-da6d8a115fde",
"eventType": "address_activity",
"messageId": "8e4e7284-852a-478b-b425-27631c8d22d2",
"event": {
}
}
```
**Parameters:**
* `webhookId`: Unique identifier for the webhook in your account.
* `eventType`: The event that caused the webhook to be triggered. In the future, there will be multiple types of events, for the time being only the address\_activity event is supported. The address\_activity event gets triggered whenever the specified addresses participate in a token or AVAX transaction.
* `messageId`: Unique identifier per event sent.
* `event`: Event payload. It contains details about the transaction, logs, and traces. By default logs and internal transactions are not included, if you want to include them use `"includeLogs": true`, and `"includeInternalTxs": true`.
### Address Activity webhook
The address activity webhook allows you to track any interaction with an address (any address). Here is an example of this type of event:
```json theme={null}
{
"webhookId": "263942d1-74a4-4416-aeb4-948b9b9bb7cc",
"eventType": "address_activity",
"messageId": "94df1881-5d93-49d1-a1bd-607830608de2",
"event": {
"transaction": {
"blockHash": "0xbd093536009f7dd785e9a5151d80069a93cc322f8b2df63d373865af4f6ee5be",
"blockNumber": "44568834",
"from": "0xf73166f0c75a3DF444fAbdFDC7e5EE4a73fA51C7",
"gas": "651108",
"gasPrice": "31466275484",
"maxFeePerGas": "31466275484",
"maxPriorityFeePerGas": "31466275484",
"txHash": "0xf6a791920652e87ccc91d2f1b20c1505a94452b88f359acdeb5a6fa8205638c4",
"txStatus": "1",
"input": "0xb80c2f090000000000000000000000000000000000000000000000000000000000000000000000000000000000000000eeeeeeeeeeeeeeeeeeeeeeeeeeeeeeeeeeeeeeee000000000000000000000000b97ef9ef8734c71904d8002f8b6bc66dd9c48a6e000000000000000000000000000000000000000000000000006ca0c737b131f2000000000000000000000000000000000000000000000000000000000011554e000000000000000000000000000000000000000000000000000000006627dadc0000000000000000000000000000000000000000000000000000000000000120000000000000000000000000000000000000000000000000000000000000016000000000000000000000000000000000000000000000000000000000000004600000000000000000000000000000000000000000000000000000000000000001000000000000000000000000000000000000000000000000006ca0c737b131f2000000000000000000000000000000000000000000000000000000000000000100000000000000000000000000000000000000000000000000000000000000200000000000000000000000000000000000000000000000000000000000000001000000000000000000000000000000000000000000000000000000000000002000000000000000000000000000000000000000000000000000000000000000a000000000000000000000000000000000000000000000000000000000000000e000000000000000000000000000000000000000000000000000000000000001200000000000000000000000000000000000000000000000000000000000000160000000000000000000000000b31f66aa3c1e785363f0875a1b74e27b85fd66c70000000000000000000000000000000000000000000000000000000000000001000000000000000000000000be882fb094143b59dc5335d32cecb711570ebdd40000000000000000000000000000000000000000000000000000000000000001000000000000000000000000be882fb094143b59dc5335d32cecb711570ebdd400000000000000000000000000000000000000000000000000000000000000010000000000000000000027100e663593657b064e1bae76d28625df5d0ebd44210000000000000000000000000000000000000000000000000000000000000001000000000000000000000000000000000000000000000000000000000000002000000000000000000000000000000000000000000000000000000000000000c0000000000000000000000000000000000000000000000000000000000000000000000000000000000000000000000000000000000000000000000000000000400000000000000000000000000000000000000000000000000000000000000060000000000000000000000000b31f66aa3c1e785363f0875a1b74e27b85fd66c7000000000000000000000000b97ef9ef8734c71904d8002f8b6bc66dd9c48a6e0000000000000000000000000000000000000000000000000000000000000bb80000000000000000000000000000000000000000000000000000000000000000",
"nonce": "4",
"to": "0x1dac23e41fc8ce857e86fd8c1ae5b6121c67d96d",
"transactionIndex": 0,
"value": "30576074978046450",
"type": 0,
"chainId": "43114",
"receiptCumulativeGasUsed": "212125",
"receiptGasUsed": "212125",
"receiptEffectiveGasPrice": "31466275484",
"receiptRoot": "0xf355b81f3e76392e1b4926429d6abf8ec24601cc3d36d0916de3113aa80dd674",
"erc20Transfers": [
{
"transactionHash": "0xf6a791920652e87ccc91d2f1b20c1505a94452b88f359acdeb5a6fa8205638c4",
"type": "ERC20",
"from": "0x1daC23e41Fc8ce857E86fD8C1AE5b6121C67D96d",
"to": "0xbe882fb094143B59Dc5335D32cEcB711570EbDD4",
"value": "30576074978046450",
"blockTimestamp": 1713884373,
"logIndex": 2,
"erc20Token": {
"address": "0xB31f66AA3C1e785363F0875A1B74E27b85FD66c7",
"name": "Wrapped AVAX",
"symbol": "WAVAX",
"decimals": 18,
"valueWithDecimals": "0.030576074978046448"
}
},
{
"transactionHash": "0xf6a791920652e87ccc91d2f1b20c1505a94452b88f359acdeb5a6fa8205638c4",
"type": "ERC20",
"from": "0x0E663593657B064e1baE76d28625Df5D0eBd4421",
"to": "0xf73166f0c75a3DF444fAbdFDC7e5EE4a73fA51C7",
"value": "1195737",
"blockTimestamp": 1713884373,
"logIndex": 3,
"erc20Token": {
"address": "0xB97EF9Ef8734C71904D8002F8b6Bc66Dd9c48a6E",
"name": "USD Coin",
"symbol": "USDC",
"decimals": 6,
"valueWithDecimals": "1.195737"
}
},
{
"transactionHash": "0xf6a791920652e87ccc91d2f1b20c1505a94452b88f359acdeb5a6fa8205638c4",
"type": "ERC20",
"from": "0xbe882fb094143B59Dc5335D32cEcB711570EbDD4",
"to": "0x0E663593657B064e1baE76d28625Df5D0eBd4421",
"value": "30576074978046450",
"blockTimestamp": 1713884373,
"logIndex": 4,
"erc20Token": {
"address": "0xB31f66AA3C1e785363F0875A1B74E27b85FD66c7",
"name": "Wrapped AVAX",
"symbol": "WAVAX",
"decimals": 18,
"valueWithDecimals": "0.030576074978046448"
}
}
],
"erc721Transfers": [],
"erc1155Transfers": [],
"internalTransactions": [
{
"from": "0xf73166f0c75a3DF444fAbdFDC7e5EE4a73fA51C7",
"to": "0x1daC23e41Fc8ce857E86fD8C1AE5b6121C67D96d",
"internalTxType": "CALL",
"value": "30576074978046450",
"gasUsed": "212125",
"gasLimit": "651108",
"transactionHash": "0xf6a791920652e87ccc91d2f1b20c1505a94452b88f359acdeb5a6fa8205638c4"
},
{
"from": "0x1daC23e41Fc8ce857E86fD8C1AE5b6121C67D96d",
"to": "0xF2781Bb34B6f6Bb9a6B5349b24de91487E653119",
"internalTxType": "DELEGATECALL",
"value": "30576074978046450",
"gasUsed": "176417",
"gasLimit": "605825",
"transactionHash": "0xf6a791920652e87ccc91d2f1b20c1505a94452b88f359acdeb5a6fa8205638c4"
},
{
"from": "0x1daC23e41Fc8ce857E86fD8C1AE5b6121C67D96d",
"to": "0xB97EF9Ef8734C71904D8002F8b6Bc66Dd9c48a6E",
"internalTxType": "STATICCALL",
"value": "0",
"gasUsed": "9750",
"gasLimit": "585767",
"transactionHash": "0xf6a791920652e87ccc91d2f1b20c1505a94452b88f359acdeb5a6fa8205638c4"
},
{
"from": "0xB97EF9Ef8734C71904D8002F8b6Bc66Dd9c48a6E",
"to": "0x30DFE0469803BcE76F8F62aC24b18d33D3d6FfE6",
"internalTxType": "DELEGATECALL",
"value": "0",
"gasUsed": "2553",
"gasLimit": "569571",
"transactionHash": "0xf6a791920652e87ccc91d2f1b20c1505a94452b88f359acdeb5a6fa8205638c4"
},
{
"from": "0x1daC23e41Fc8ce857E86fD8C1AE5b6121C67D96d",
"to": "0xB31f66AA3C1e785363F0875A1B74E27b85FD66c7",
"internalTxType": "CALL",
"value": "30576074978046450",
"gasUsed": "23878",
"gasLimit": "566542",
"transactionHash": "0xf6a791920652e87ccc91d2f1b20c1505a94452b88f359acdeb5a6fa8205638c4"
},
{
"from": "0x1daC23e41Fc8ce857E86fD8C1AE5b6121C67D96d",
"to": "0xB31f66AA3C1e785363F0875A1B74E27b85FD66c7",
"internalTxType": "CALL",
"value": "0",
"gasUsed": "25116",
"gasLimit": "540114",
"transactionHash": "0xf6a791920652e87ccc91d2f1b20c1505a94452b88f359acdeb5a6fa8205638c4"
},
{
"from": "0x1daC23e41Fc8ce857E86fD8C1AE5b6121C67D96d",
"to": "0xbe882fb094143B59Dc5335D32cEcB711570EbDD4",
"internalTxType": "CALL",
"value": "0",
"gasUsed": "81496",
"gasLimit": "511279",
"transactionHash": "0xf6a791920652e87ccc91d2f1b20c1505a94452b88f359acdeb5a6fa8205638c4"
},
{
"from": "0xbe882fb094143B59Dc5335D32cEcB711570EbDD4",
"to": "0xB31f66AA3C1e785363F0875A1B74E27b85FD66c7",
"internalTxType": "STATICCALL",
"value": "0",
"gasUsed": "491",
"gasLimit": "501085",
"transactionHash": "0xf6a791920652e87ccc91d2f1b20c1505a94452b88f359acdeb5a6fa8205638c4"
},
{
"from": "0xbe882fb094143B59Dc5335D32cEcB711570EbDD4",
"to": "0x0E663593657B064e1baE76d28625Df5D0eBd4421",
"internalTxType": "CALL",
"value": "0",
"gasUsed": "74900",
"gasLimit": "497032",
"transactionHash": "0xf6a791920652e87ccc91d2f1b20c1505a94452b88f359acdeb5a6fa8205638c4"
},
{
"from": "0x0E663593657B064e1baE76d28625Df5D0eBd4421",
"to": "0xB97EF9Ef8734C71904D8002F8b6Bc66Dd9c48a6E",
"internalTxType": "CALL",
"value": "0",
"gasUsed": "32063",
"gasLimit": "463431",
"transactionHash": "0xf6a791920652e87ccc91d2f1b20c1505a94452b88f359acdeb5a6fa8205638c4"
},
{
"from": "0xB97EF9Ef8734C71904D8002F8b6Bc66Dd9c48a6E",
"to": "0x30DFE0469803BcE76F8F62aC24b18d33D3d6FfE6",
"internalTxType": "DELEGATECALL",
"value": "0",
"gasUsed": "31363",
"gasLimit": "455542",
"transactionHash": "0xf6a791920652e87ccc91d2f1b20c1505a94452b88f359acdeb5a6fa8205638c4"
},
{
"from": "0x0E663593657B064e1baE76d28625Df5D0eBd4421",
"to": "0xB31f66AA3C1e785363F0875A1B74E27b85FD66c7",
"internalTxType": "STATICCALL",
"value": "0",
"gasUsed": "2491",
"gasLimit": "430998",
"transactionHash": "0xf6a791920652e87ccc91d2f1b20c1505a94452b88f359acdeb5a6fa8205638c4"
},
{
"from": "0x0E663593657B064e1baE76d28625Df5D0eBd4421",
"to": "0xbe882fb094143B59Dc5335D32cEcB711570EbDD4",
"internalTxType": "CALL",
"value": "0",
"gasUsed": "7591",
"gasLimit": "427775",
"transactionHash": "0xf6a791920652e87ccc91d2f1b20c1505a94452b88f359acdeb5a6fa8205638c4"
},
{
"from": "0xbe882fb094143B59Dc5335D32cEcB711570EbDD4",
"to": "0xB31f66AA3C1e785363F0875A1B74E27b85FD66c7",
"internalTxType": "CALL",
"value": "0",
"gasUsed": "6016",
"gasLimit": "419746",
"transactionHash": "0xf6a791920652e87ccc91d2f1b20c1505a94452b88f359acdeb5a6fa8205638c4"
},
{
"from": "0x0E663593657B064e1baE76d28625Df5D0eBd4421",
"to": "0xB31f66AA3C1e785363F0875A1B74E27b85FD66c7",
"internalTxType": "STATICCALL",
"value": "0",
"gasUsed": "491",
"gasLimit": "419670",
"transactionHash": "0xf6a791920652e87ccc91d2f1b20c1505a94452b88f359acdeb5a6fa8205638c4"
},
{
"from": "0x1daC23e41Fc8ce857E86fD8C1AE5b6121C67D96d",
"to": "0xB97EF9Ef8734C71904D8002F8b6Bc66Dd9c48a6E",
"internalTxType": "STATICCALL",
"value": "0",
"gasUsed": "3250",
"gasLimit": "430493",
"transactionHash": "0xf6a791920652e87ccc91d2f1b20c1505a94452b88f359acdeb5a6fa8205638c4"
},
{
"from": "0xB97EF9Ef8734C71904D8002F8b6Bc66Dd9c48a6E",
"to": "0x30DFE0469803BcE76F8F62aC24b18d33D3d6FfE6",
"internalTxType": "DELEGATECALL",
"value": "0",
"gasUsed": "2553",
"gasLimit": "423121",
"transactionHash": "0xf6a791920652e87ccc91d2f1b20c1505a94452b88f359acdeb5a6fa8205638c4"
},
{
"from": "0x1daC23e41Fc8ce857E86fD8C1AE5b6121C67D96d",
"to": "0xB97EF9Ef8734C71904D8002F8b6Bc66Dd9c48a6E",
"internalTxType": "STATICCALL",
"value": "0",
"gasUsed": "1250",
"gasLimit": "426766",
"transactionHash": "0xf6a791920652e87ccc91d2f1b20c1505a94452b88f359acdeb5a6fa8205638c4"
},
{
"from": "0xB97EF9Ef8734C71904D8002F8b6Bc66Dd9c48a6E",
"to": "0x30DFE0469803BcE76F8F62aC24b18d33D3d6FfE6",
"internalTxType": "DELEGATECALL",
"value": "0",
"gasUsed": "553",
"gasLimit": "419453",
"transactionHash": "0xf6a791920652e87ccc91d2f1b20c1505a94452b88f359acdeb5a6fa8205638c4"
}
],
"blockTimestamp": 1713884373
}
}
}
```
# Rate Limits (/docs/api-reference/webhook-api/rate-limits)
---
title: Rate Limits
description: Rate Limits for the Webhooks API
icon: Clock
---
Rate limiting is managed through a weighted scoring system, known as Compute Units (CUs). Each API request consumes a specified number of CUs, determined by the complexity of the request. This system is designed to accommodate basic requests while efficiently handling more computationally intensive operations.
## Rate Limit Tiers
The maximum CUs (rate-limiting score) for a user depends on their subscription level and is delineated in the following table:
| Subscription Level | Per Minute Limit (CUs) | Per Day Limit (CUs) |
| :----------------- | :--------------------- | :------------------ |
| Unauthenticated | 6,000 | 1,200,000 |
| Free | 8,000 | 2,000,000 |
| Base | 10,000 | 3,750,000 |
| Growth | 14,000 | 11,200,000 |
| Pro | 20,000 | 25,000,000 |
To update your subscription level use the [AvaCloud Portal](https://app.avacloud.io/)
Note: Rate limits apply collectively across both Webhooks and Data APIs, with usage from each counting toward your total CU limit.
## Rate Limit Categories
The CUs for each category are defined in the following table:
| Weight | CU Value |
| :----- | :------- |
| Free | 1 |
| Small | 10 |
| Medium | 20 |
| Large | 50 |
| XL | 100 |
| XXL | 200 |
## Rate Limits for Webhook Endpoints
The CUs for each route are defined in the table below:
| Endpoint | Method | Weight | CU Value |
| :------------------------------------------ | :----- | :----- | :------- |
| `/v1/webhooks` | POST | Medium | 20 |
| `/v1/webhooks` | GET | Small | 10 |
| `/v1/webhooks/{id}` | GET | Small | 10 |
| `/v1/webhooks/{id}` | DELETE | Medium | 20 |
| `/v1/webhooks/{id}` | PATCH | Medium | 20 |
| `/v1/webhooks:generateOrRotateSharedSecret` | POST | Medium | 20 |
| `/v1/webhooks:getSharedSecret` | GET | Small | 10 |
| `/v1/webhooks/{id}/addresses` | PATCH | Medium | 20 |
| `/v1/webhooks/{id}/addresses` | DELETE | Medium | 20 |
| `/v1/webhooks/{id}/addresses` | GET | Medium | 20 |
All rate limits, weights, and CU values are subject to change.
# Retry mechanism (/docs/api-reference/webhook-api/retries)
---
title: Retry mechanism
description: Retry mechanism for the Webhook API
icon: RotateCcw
---
Our webhook system is designed to ensure you receive all your messages, even if temporary issues prevent immediate delivery. To achieve this, we’ve implemented a retry mechanism that resends messages if they don’t get through on the first attempt. Importantly, **retries are handled on a per-message basis**, meaning each webhook message follows its own independent retry schedule. This ensures that the failure of one message doesn’t affect the delivery attempts of others.
This guide will walk you through how the retry mechanism works, the differences between free and paid tier users, and practical steps you can take to ensure your system handles webhooks effectively.
## How it works
When we send a webhook message to your server, we expect a `200` status code within 10 seconds to confirm successful receipt. Your server should return this response immediately and process the message afterward. Processing the message before sending the response can lead to timeouts and trigger unnecessary retries.
* **Attempt 1:** We send the message expecting a respose with `200` status code. If we do not receive a `200` status code within **10 seconds**, the attempt is considered failed. During this window, any non-`2xx` responses are ignored.
* **Attempt 2:** Occurs **10 seconds** after the first attempt, with another 10-second timeout and the same rule for ignoring non-`2xx` responses.
* **Retry Queue After Two Failed Attempts**
If both initial attempts fail, the message enters a **retry queue** with progressively longer intervals between attempts. Each retry attempt still has a 10-second timeout, and non-`2xx` responses are ignored during this window.
The retry schedule is as follows:
| Attempt | Interval |
| ------- | -------- |
| 3 | 1 min |
| 4 | 5 min |
| 5 | 10 min |
| 6 | 30 min |
| 7 | 2 hours |
| 8 | 6 hours |
| 9 | 12 hours |
| 10 | 24 hours |
**Total Retry Duration:** Up to approximately 44.8 hours (2,688 minutes) if all retries are exhausted.
**Interval Timing:** Each retry interval starts 10 seconds after the previous attempt is deemed failed. For example, if attempt 2 fails at t=20 seconds, attempt 3 will start at t=80 seconds (20s + 1 minute interval + 10s).
Since retries are per message, multiple messages can be in different stages of their retry schedules simultaneously without interfering with each other.
## Differences Between Free and Paid Tier Users
The behavior of the retry mechanism varies based on your subscription tier:
**Free tier users**
* **Initial attempts limit:** If six messages fail both the first and second attempts, your webhook will be automatically deactivated.
* **Retry queue limit:** Only five messages can enter the retry queue over the lifetime of the subscription. If a sixth message requires retry queuing, or if any message fails all 10 retry attempts, the subscription will be deactivated.
**Paid tier users**
* For paid users, webhooks will be deactivated if a single message, retried at the 24-hour interval, fails to process successfully.
## What you can do
**Ensure server availability:**
* Keep your server running smoothly to receive webhook messages without interruption.
* Implement logging for incoming webhook requests and your server's responses to help identify any issues quickly.
**Design for idempotency**
* Set up your webhook handler so it can safely process the same message multiple times without causing errors or unwanted effects. This way, if retries occur, they won't negatively impact your system.
* The webhook retry mechanism is designed to maximize the reliability of message delivery while minimizing the impact of temporary issues. By understanding how retries work—especially the per-message nature of the system—and following best practices like ensuring server availability and designing for idempotency, you can ensure a seamless experience with webhooks.
## Key Takeaways
* Each message has its own retry schedule, ensuring isolation and reliability.
* Free tier users have limits on failed attempts and retry queue entries, while paid users do not.
* Implement logging and idempotency to handle retries effectively and avoid disruptions.
* By following this guide, you’ll be well-equipped to manage webhooks and ensure your system remains robust, even in the face of temporary challenges.
# Webhook Signature (/docs/api-reference/webhook-api/webhooks-signature)
---
title: Webhook Signature
description: Webhook Signature for the Webhook API
icon: Signature
---
To make your webhooks extra secure, you can verify that they originated from our side by generating an HMAC SHA-256 hash code using your Authentication Token and request body. You can get the signing secret through the AvaCloud portal or Glacier API.
### Find your signing secret
**Using the portal**\
Navigate to the webhook section and click on Generate Signing Secret. Create the secret and copy it to your code.
**Using Data API**\
The following endpoint retrieves a shared secret:
```bash
curl --location 'https://glacier-api.avax.network/v1/webhooks:getSharedSecret' \
--header 'x-glacier-api-key: ' \
```
### Validate the signature received
Every outbound request will include an authentication signature in the header. This signature is generated by:
1. **Canonicalizing the JSON Payload**: This means arranging the JSON data in a standard format.
2. **Generating a Hash**: Using the HMAC SHA256 hash algorithm to create a hash of the canonicalized JSON payload.
To verify that the signature is from us, follow these steps:
1. Generate the HMAC SHA256 hash of the received JSON payload.
2. Compare this generated hash with the signature in the request header.
This process, known as verifying the digital signature, ensures the authenticity and integrity of the request.
**Example Request Header**
```
Content-Type: application/json;
x-signature: your-hashed-signature
```
### Example Signature Validation Function
This Node.js code sets up an HTTP server using the Express framework. It listens for POST requests sent to the `/callback` endpoint. Upon receiving a request, it validates the signature of the request against a predefined `signingSecret`. If the signature is valid, it logs match; otherwise, it logs no match. The server responds with a JSON object indicating that the request was received.
### Node (JavaScript)
```javascript
const express = require('express');
const crypto = require('crypto');
const { canonicalize } = require('json-canonicalize');
const app = express();
app.use(express.json({limit: '50mb'}));
const signingSecret = 'c13cc017c4ed63bcc842c8edfb49df37512280326a32826de3b885340b8a3d53';
function isValidSignature(signingSecret, signature, payload) {
const canonicalizedPayload = canonicalize(payload);
const hmac = crypto.createHmac('sha256', Buffer.from(signingSecret, 'hex'));
const digest = hmac.update(canonicalizedPayload).digest('base64');
console.log("signature: ", signature);
console.log("digest", digest);
return signature === digest;
}
app.post('/callback', express.json({ type: 'application/json' }), (request, response) => {
const { body, headers } = request;
const signature = headers['x-signature'];
// Handle the event
switch (body.evenType) {
case 'address\*activity':
console.log("\*\** Address*activity \*\*\*");
console.log(body);
if (isValidSignature(signingSecret, signature, body)) {
console.log("match");
} else {
console.log("no match");
}
break;
// ... handle other event types
default:
console.log(`Unhandled event type ${body}`);
}
// Return a response to acknowledge receipt of the event
response.json({ received: true });
});
const PORT = 8000;
app.listen(PORT, () => console.log(`Running on port ${PORT}`));
```
### Python (Flask)
```python
from flask import Flask, request, jsonify
import hmac
import hashlib
import base64
import json
app = Flask(__name__)
SIGNING_SECRET = 'c13cc017c4ed63bcc842c8edfb49df37512280326a32826de3b885340b8a3d53'
def canonicalize(payload):
"""Function to canonicalize JSON payload"""
# In Python, canonicalization can be achieved by using sort_keys=True in json.dumps
return json.dumps(payload, separators=(',', ':'), sort_keys=True)
def is_valid_signature(signing_secret, signature, payload):
canonicalized_payload = canonicalize(payload)
hmac_obj = hmac.new(bytes.fromhex(signing_secret), canonicalized_payload.encode('utf-8'), hashlib.sha256)
digest = base64.b64encode(hmac_obj.digest()).decode('utf-8')
print("signature:", signature)
print("digest:", digest)
return signature == digest
@app.route('/callback', methods=['POST'])
def callback_handler():
body = request.json
signature = request.headers.get('x-signature')
# Handle the event
if body.get('eventType') == 'address_activity':
print("*** Address_activity ***")
print(body)
if is_valid_signature(SIGNING_SECRET, signature, body):
print("match")
else:
print("no match")
else:
print(f"Unhandled event type {body}")
# Return a response to acknowledge receipt of the event
return jsonify({"received": True})
if __name__ == '__main__':
PORT = 8000
print(f"Running on port {PORT}")
app.run(port=PORT)
```
### Go (net/http)
```go
package main
import (
"crypto/hmac"
"crypto/sha256"
"encoding/base64"
"encoding/hex"
"encoding/json"
"fmt"
"net/http"
"sort"
"strings"
)
const signingSecret = "c13cc017c4ed63bcc842c8edfb49df37512280326a32826de3b885340b8a3d53"
// Canonicalize function sorts the JSON keys and produces a canonicalized string
func Canonicalize(payload map[string]interface{}) (string, error) {
var sb strings.Builder
var keys []string
for k := range payload {
keys = append(keys, k)
}
sort.Strings(keys)
sb.WriteString("{")
for i, k := range keys {
v, err := json.Marshal(payload[k])
if err != nil {
return "", err
}
sb.WriteString(fmt.Sprintf("\"%s\":%s", k, v))
if i < len(keys)-1 {
sb.WriteString(",")
}
}
sb.WriteString("}")
return sb.String(), nil
}
func isValidSignature(signingSecret, signature string, payload map[string]interface{}) bool {
canonicalizedPayload, err := Canonicalize(payload)
if err != nil {
fmt.Println("Error canonicalizing payload:", err)
return false
}
key, err := hex.DecodeString(signingSecret)
if err != nil {
fmt.Println("Error decoding signing secret:", err)
return false
}
h := hmac.New(sha256.New, key)
h.Write([]byte(canonicalizedPayload))
digest := h.Sum(nil)
encodedDigest := base64.StdEncoding.EncodeToString(digest)
fmt.Println("signature:", signature)
fmt.Println("digest:", encodedDigest)
return signature == encodedDigest
}
func callbackHandler(w http.ResponseWriter, r *http.Request) {
var body map[string]interface{}
err := json.NewDecoder(r.Body).Decode(&body)
if err != nil {
fmt.Println("Error decoding body:", err)
http.Error(w, "Invalid request body", http.StatusBadRequest)
return
}
signature := r.Header.Get("x-signature")
eventType, ok := body["eventType"].(string)
if !ok {
fmt.Println("Error parsing eventType")
http.Error(w, "Invalid event type", http.StatusBadRequest)
return
}
switch eventType {
case "address_activity":
fmt.Println("*** Address_activity ***")
fmt.Println(body)
if isValidSignature(signingSecret, signature, body) {
fmt.Println("match")
} else {
fmt.Println("no match")
}
default:
fmt.Printf("Unhandled event type %s\n", eventType)
}
w.Header().Set("Content-Type", "application/json")
json.NewEncoder(w).Encode(map[string]bool{"received": true})
}
func main() {
http.HandleFunc("/callback", callbackHandler)
fmt.Println("Running on port 8000")
http.ListenAndServe(":8000", nil)
}
```
### Rust (actix-web)
```rust
use actix_web::{web, App, HttpServer, HttpResponse, Responder, post};
use serde::Deserialize;
use hmac::{Hmac, Mac};
use sha2::Sha256;
use base64::encode;
use std::collections::BTreeMap;
type HmacSha256 = Hmac;
const SIGNING_SECRET: &str = "c13cc017c4ed63bcc842c8edfb49df37512280326a32826de3b885340b8a3d53";
#[derive(Deserialize)]
struct EventPayload {
eventType: String,
// Add other fields as necessary
}
// Canonicalize the JSON payload by sorting keys
fn canonicalize(payload: &BTreeMap) -> String {
serde_json::to_string(payload).unwrap()
}
fn is_valid_signature(signing_secret: &str, signature: &str, payload: &BTreeMap) -> bool {
let canonicalized_payload = canonicalize(payload);
let mut mac = HmacSha256::new_from_slice(signing_secret.as_bytes())
.expect("HMAC can take key of any size");
mac.update(canonicalized_payload.as_bytes());
let result = mac.finalize();
let digest = encode(result.into_bytes());
println!("signature: {}", signature);
println!("digest: {}", digest);
digest == signature
}
#[post("/callback")]
async fn callback(body: web::Json>, req: web::HttpRequest) -> impl Responder {
let signature = req.headers().get("x-signature").unwrap().to_str().unwrap();
if let Some(event_type) = body.get("eventType").and_then(|v| v.as_str()) {
match event_type {
"address_activity" => {
println!("*** Address_activity ***");
println!("{:?}", body);
if is_valid_signature(SIGNING_SECRET, signature, &body) {
println!("match");
} else {
println!("no match");
}
}
_ => {
println!("Unhandled event type: {}", event_type);
}
}
} else {
println!("Error parsing eventType");
return HttpResponse::BadRequest().finish();
}
HttpResponse::Ok().json(serde_json::json!({ "received": true }))
}
#[actix_web::main]
async fn main() -> std::io::Result<()> {
HttpServer::new(|| {
App::new()
.service(callback)
})
.bind("0.0.0.0:8000")?
.run()
.await
}
```
### TypeScript (ChainKit SDK)
```typescript
import { isValidSignature } from '@avalanche-sdk/chainkit/utils';
import express from 'express';
const app = express();
app.use(express.json());
const signingSecret = 'your-signing-secret'; // Replace with your signing secret
app.post('/webhook', (req, res) => {
const signature = req.headers['x-signature'];
const payload = req.body;
if (isValidSignature(signingSecret, signature, payload)) {
console.log('Valid signature');
// Process the request
} else {
console.log('Invalid signature');
}
res.json({ received: true });
});
app.listen(8000, () => console.log('Server running on port 8000'));
```
# WebSockets vs Webhooks (/docs/api-reference/webhook-api/wss-vs-webhooks)
---
title: WebSockets vs Webhooks
description: WebSockets vs Webhooks for the Webhook API
icon: GitCompare
---
Reacting to real-time events from Avalanche smart contracts allows for immediate responses and automation, improving user experience and streamlining application functionality. It ensures that applications stay synchronized with the blockchain state.
There are two primary methods for receiving these on-chain events:
* **WebSockets**, using libraries like Ethers.js or Viem
* **Webhooks**, which send structured event data directly to your app via HTTP POST.
Both approaches enable real-time interactions, but they differ drastically in their reliability, ease of implementation, and long-term maintainability. In this post, we break down why Webhooks are the better, more resilient choice for most Avalanche developers.
## Architecture Overview
The diagram below compares the two models side-by-side:
**WebSockets**
* The app connects to the Avalanche RPC API over WSS to receive raw log data.
* It must decode logs, manage connection state, and store data locally.
* On disconnection, it must re-sync via an external Data API or using standard `eth_*` RPC calls (e.g., `eth_getLogs`, `eth_getBlockByNumber`).
Important: WSS is a transport protocol—not real-time by itself. Real-time capabilities come from the availability of `eth_subscribe`, which requires node support.
**Webhooks**
* The app exposes a simple HTTP endpoint.
* Decoded event data is pushed directly via POST, including token metadata.
* Built-in retries ensure reliable delivery, even during downtime.
Important: Webhooks have a 48-hour retry window. If your app is down for longer, you still need a re-sync strategy using `eth_*` calls to recover older missed events.
***
## Using WebSockets: Real-time but high maintenance
WebSockets allow you to subscribe to events using methods like eth\_subscribe. These subscriptions notify your app in real-time whenever new logs, blocks, or pending transactions meet your criteria.
```javascript
import { createPublicClient, webSocket, formatUnits } from 'viem';
import { avalancheFuji } from 'viem/chains';
import { usdcAbi } from './usdc-abi.mjs'; // Ensure this includes the Transfer event
// Your wallet address (case-insensitive comparison)
const MY_WALLET = '0x8ae323046633A07FB162043f28Cea39FFc23B50A'.toLowerCase(); //Chrome
async function monitorTransfers() {
try {
// USDC.e contract address on Avalanche Fuji
const usdcAddress = '0x5425890298aed601595a70AB815c96711a31Bc65';
// Set up the WebSocket client for Avalanche Fuji
const client = createPublicClient({
chain: avalancheFuji,
transport: webSocket('wss://api.avax-test.network/ext/bc/C/ws'),
});
// Watch for Transfer events on the USDC contract
client.watchContractEvent({
address: usdcAddress,
abi: usdcAbi,
eventName: 'Transfer',
onLogs: (logs) => {
logs.forEach((log) => {
const { from, to, value } = log.args;
const fromLower = from.toLowerCase();
// Filter for transactions where 'from' matches your wallet
if (fromLower === MY_WALLET) {
console.log('*******');
console.log('Transfer from my wallet:');
console.log(`From: ${from}`);
console.log(`To: ${to}`);
console.log(`Value: ${formatUnits(value, 6)} USDC`); // USDC has 6 decimals
console.log(`Transaction Hash: ${log.transactionHash}`);
}
});
},
onError: (error) => {
console.error('Event watching error:', error.message);
},
});
console.log('Monitoring USDC Transfer events on Fuji...');
} catch (error) {
console.error('Error setting up transfer monitoring:', error.message);
}
}
// Start monitoring
monitorTransfers();
```
The downside? If your connection drops, you lose everything in between. You’ll need to:
* Set up a database to track the latest processed block and log index.
* Correctly handling dropped connections and reconnection by hand can be challenging to get right.
* Use `eth_getLogs` to re-fetch missed logs.
* Decode and process raw logs yourself to rebuild app state.
This requires extra infrastructure, custom recovery logic, and significant maintenance overhead.
***
## Webhooks: Resilient and developer-friendly
Webhooks eliminate the complexity of managing live connections. Instead, you register an HTTP endpoint to receive blockchain event payloads when they occur.
Webhook payload example:
```json
{
"eventType": "address_activity",
"event": {
"transaction": {
"txHash": "0x1d8f...",
"from": "0x3D3B...",
"to": "0x9702...",
"erc20Transfers": [
{
"valueWithDecimals": "110.56",
"erc20Token": {
"symbol": "USDt",
"decimals": 6
}
}
]
}
}
}
```
You get everything you need:
* Decoded event data
* Token metadata (name, symbol, decimals)
* Full transaction context
* No extra calls. No parsing. No manual re-sync logic.
***
## Key Advantages of Webhooks
* **Reliable delivery with zero effort:** Built-in retries ensure no missed events during downtime
* **Instant enrichment:** Payloads contain decoded logs, token metadata, and transaction context
* **No extra infrastructure:** No WebSocket connections, no DB, no external APIs
* **Faster development:** Go from idea to production with fewer moving parts
* **Lower operational cost:** Less compute, fewer network calls, smaller surface area to manage
If we compare using a table:
| Feature | WebSockets (Ethers.js/Viem) | Webhooks | | |
| :----------------------------- | :------------------------------------------------- | :--------------------------------------------------- | - | - |
| **Interruption Handling** | Manual; Requires complex custom logic | Automatic; Built-in queues & retries | | |
| **Data Recovery** | Requires DB + External API for re-sync | Handled by provider; No re-sync logic needed | | |
| **Dev Complexity** | High; Error-prone custom resilience code | Low; Focus on processing incoming POST data | | |
| **Infrastructure** | WSS connection + DB + Potential Data API cost | Application API endpoint | | |
| **Data Integrity** | Risk of gaps if recovery logic fails | High; Ensures eventual delivery | | |
| **Payload** | Often raw; Requires extra calls for context | Typically enriched and ready-to-use | | |
| **Multiple addresses** | Manual filtering or separate listeners per address | Supports direct configuration for multiple addresses | | |
| **Listen to wallet addresses** | Requires manual block/transaction filtering | Can monitor wallet addresses and smart contracts | | |
## Summary
* WebSockets offer real-time access to Avalanche data, but come with complexity: raw logs, reconnect logic, re-sync handling, and decoding responsibilities.
* Webhooks flip the model: the data comes to you, pre-processed and reliable. You focus on your product logic instead of infrastructure.
* If you want to ship faster, operate more reliably, and reduce overhead, Webhooks are the better path forward for Avalanche event monitoring.
# Chain Components (/docs/builderkit/components/chains)
---
title: Chain Components
description: "Components for displaying and selecting blockchain networks."
---
# Chain Components
Chain components help you manage network selection and display chain information.
## ChainIcon
The ChainIcon component displays chain logos.
```tsx
import { ChainIcon } from '@avalabs/builderkit';
// Basic usage
```
### Props
| Prop | Type | Default | Description |
|------|------|---------|-------------|
| `chain_id` | `number` | - | Chain ID to display |
| `className` | `string` | - | Additional CSS classes |
## ChainDropdown
The ChainDropdown component provides network selection functionality.
```tsx
import { ChainDropdown } from '@avalabs/builderkit';
// Basic usage
{
console.log('Selected chain:', chainId);
}}
/>
```
### Props
| Prop | Type | Default | Description |
|------|------|---------|-------------|
| `selected` | `number` | - | Currently selected chain ID |
| `list` | `number[]` | - | List of available chain IDs |
| `onSelectionChanged` | `(chain_id: number) => void` | - | Selection change callback |
| `className` | `string` | - | Additional CSS classes |
## ChainRow
The ChainRow component displays detailed chain information.
```tsx
import { ChainRow } from '@avalabs/builderkit';
// Basic usage
```
### Props
| Prop | Type | Default | Description |
|------|------|---------|-------------|
| `chain_id` | `number` | - | Chain ID |
| `name` | `string` | - | Chain name |
| `className` | `string` | - | Additional CSS classes |
# Control Components (/docs/builderkit/components/control)
---
title: Control Components
description: "Interactive control components like buttons and wallet connection interfaces."
---
# Control Components
Control components provide interactive elements for your Web3 application.
## Button
The Button component is a versatile control that supports multiple states and actions.
```tsx
import { Button } from '@avalabs/builderkit';
// Basic usage
 Developers generally have two options to fetch this data:
1. **Using RPC methods to index blockchain data on their own**
2. **Leveraging an indexer provider like the Data API**
While both methods aim to achieve the same goal, the Data API offers a more efficient, scalable, and developer-friendly solution. This article delves into why using the Data API is better than relying on traditional RPC (Remote Procedure Call) methods.
### What Are RPC methods and their challenges?
Remote Procedure Call (RPC) methods allow developers to interact directly with blockchain nodes. One of their key advantages is that they are standardized and universally understood by blockchain developers across different platforms. With RPC, you can perform tasks such as querying data, submitting transactions, and interacting with smart contracts. These methods are typically low-level and synchronous, meaning they require a deep understanding of the blockchain’s architecture and specific command structures.
You can refer to the [official documentation](https://ethereum.org/en/developers/docs/apis/json-rpc/) to gain a more comprehensive understanding of the JSON-RPC API.
Here’s an example using the `eth_getBalance` method to retrieve the native balance of a wallet:
```bash
curl --location 'https://api.avax.network/ext/bc/C/rpc' \
--header 'Content-Type: application/json' \
--data '{"method":"eth_getBalance","params":["0x8ae323046633A07FB162043f28Cea39FFc23B50A", "latest"],"id":1,"jsonrpc":"2.0"}'
```
This call returns the following response:
```json
{
"jsonrpc": "2.0",
"id": 1,
"result": "0x284476254bc5d594"
}
```
The balance in this wallet is 2.9016 AVAX. However, despite the wallet holding multiple tokens such as USDC, the `eth_getBalance` method only returns the AVAX amount and it does so in Wei and in hexadecimal format. This is not particularly human-readable, adding to the challenge for developers who need to manually convert the balance to a more understandable format.
#### No direct RPC methods to retrieve token balances
Despite their utility, RPC methods come with significant limitations when it comes to retrieving detailed token and transaction data. Currently, RPC methods do not provide direct solutions for the following:
* **Listing all tokens held by a wallet**: There is no RPC method that provides a complete list of ERC-20 tokens owned by a wallet.
* **Retrieving all transactions for a wallet**: : There is no direct method for fetching all transactions associated with a wallet.
* **Getting ERC-20/721/1155 token balances**: The `eth_getBalance` method only returns the balance of the wallet’s native token (such as AVAX on Avalanche) and cannot be used to retrieve ERC-20/721/1155 token balances.
To achieve these tasks using RPC methods alone, you would need to:
* **Query every block for transaction logs**: Scan the entire blockchain, which is resource-intensive and impractical.
* **Parse transaction logs**: Identify and extract ERC-20 token transfer events from each transaction.
* **Aggregate data**: Collect and process this data to compute balances and transaction histories.
#### Manual blockchain indexing is difficult and costly
Using RPC methods to fetch token balances involves an arduous process:
1. You must connect to a node and subscribe to new block events.
2. For each block, parse every transaction to identify ERC-20 token transfers involving the user's address.
3. Extract contract addresses and other relevant data from the parsed transactions.
4. Compute balances by processing transfer events.
5. Store the processed data in a database for quick retrieval and aggregation.
#### Why this is difficult:
* **Resource-Intensive**: Requires significant computational power and storage to process and store blockchain data.
* **Time-consuming**: Processing millions of blocks and transactions can take an enormous amount of time.
* **Complexity**: Handling edge cases like contract upgrades, proxy contracts, and non-standard implementations adds layers of complexity.
* **Maintenance**: Keeping the indexed data up-to-date necessitates continuous synchronization with new blocks being added to the blockchain.
* **High Costs**: Associated with servers, databases, and network bandwidth.
### The Data API Advantage
The Data API provides a streamlined, efficient, and scalable solution for fetching token balances. Here's why it's the best choice:
With a single API call, you can retrieve all ERC-20 token balances for a user's address:
```javascript
avalancheSDK.data.evm.balances.listErc20Balances({
address: "0xYourAddress",
});
```
Sample Response:
```json
{
"erc20TokenBalances": [
{
"ercType": "ERC-20",
"chainId": "43114",
"address": "0xB97EF9Ef8734C71904D8002F8b6Bc66Dd9c48a6E",
"name": "USD Coin",
"symbol": "USDC",
"decimals": 6,
"price": {
"value": 1.0,
"currencyCode": "usd"
},
"balance": "15000000",
"balanceValue": {
"currencyCode": "usd",
"value": 9.6
},
"logoUri": "https://images.ctfassets.net/gcj8jwzm6086/e50058c1-2296-4e7e-91ea-83eb03db95ee/8db2a492ce64564c96de87c05a3756fd/43114-0xB97EF9Ef8734C71904D8002F8b6Bc66Dd9c48a6E.png"
}
// Additional tokens...
]
}
```
As you can see with a single call the API returns an array of token balances for all the wallet tokens, including:
* **Token metadata**: Contract address, name, symbol, decimals.
* **Balance information**: Token balance in both hexadecimal and decimal formats, Also retrieves balances of native assets like ETH or AVAX.
* **Price data**: Current value in USD or other supported currencies, saving you the effort of integrating another API.
* **Visual assets**: Token logo URI for better user interface integration.
If you’re building a wallet, DeFi app, or any application that requires displaying balances, transaction history, or smart contract interactions, relying solely on RPC methods can be challenging. Just as there’s no direct RPC method to retrieve token balances, there’s also no simple way to fetch all transactions associated with a wallet, especially for ERC-20, ERC-721, or ERC-1155 token transfers.
However, by using the Data API, you can retrieve all token transfers for a given wallet **with a single API call**, making the process much more efficient. This approach simplifies tracking and displaying wallet activity without the need to manually scan the entire blockchain.
Below are two examples that demonstrate the power of the Data API: in the first, it returns all ERC transfers, including ERC-20, ERC-721, and ERC-1155 tokens, and in the second, it shows all internal transactions, such as when one contract interacts with another.
Developers generally have two options to fetch this data:
1. **Using RPC methods to index blockchain data on their own**
2. **Leveraging an indexer provider like the Data API**
While both methods aim to achieve the same goal, the Data API offers a more efficient, scalable, and developer-friendly solution. This article delves into why using the Data API is better than relying on traditional RPC (Remote Procedure Call) methods.
### What Are RPC methods and their challenges?
Remote Procedure Call (RPC) methods allow developers to interact directly with blockchain nodes. One of their key advantages is that they are standardized and universally understood by blockchain developers across different platforms. With RPC, you can perform tasks such as querying data, submitting transactions, and interacting with smart contracts. These methods are typically low-level and synchronous, meaning they require a deep understanding of the blockchain’s architecture and specific command structures.
You can refer to the [official documentation](https://ethereum.org/en/developers/docs/apis/json-rpc/) to gain a more comprehensive understanding of the JSON-RPC API.
Here’s an example using the `eth_getBalance` method to retrieve the native balance of a wallet:
```bash
curl --location 'https://api.avax.network/ext/bc/C/rpc' \
--header 'Content-Type: application/json' \
--data '{"method":"eth_getBalance","params":["0x8ae323046633A07FB162043f28Cea39FFc23B50A", "latest"],"id":1,"jsonrpc":"2.0"}'
```
This call returns the following response:
```json
{
"jsonrpc": "2.0",
"id": 1,
"result": "0x284476254bc5d594"
}
```
The balance in this wallet is 2.9016 AVAX. However, despite the wallet holding multiple tokens such as USDC, the `eth_getBalance` method only returns the AVAX amount and it does so in Wei and in hexadecimal format. This is not particularly human-readable, adding to the challenge for developers who need to manually convert the balance to a more understandable format.
#### No direct RPC methods to retrieve token balances
Despite their utility, RPC methods come with significant limitations when it comes to retrieving detailed token and transaction data. Currently, RPC methods do not provide direct solutions for the following:
* **Listing all tokens held by a wallet**: There is no RPC method that provides a complete list of ERC-20 tokens owned by a wallet.
* **Retrieving all transactions for a wallet**: : There is no direct method for fetching all transactions associated with a wallet.
* **Getting ERC-20/721/1155 token balances**: The `eth_getBalance` method only returns the balance of the wallet’s native token (such as AVAX on Avalanche) and cannot be used to retrieve ERC-20/721/1155 token balances.
To achieve these tasks using RPC methods alone, you would need to:
* **Query every block for transaction logs**: Scan the entire blockchain, which is resource-intensive and impractical.
* **Parse transaction logs**: Identify and extract ERC-20 token transfer events from each transaction.
* **Aggregate data**: Collect and process this data to compute balances and transaction histories.
#### Manual blockchain indexing is difficult and costly
Using RPC methods to fetch token balances involves an arduous process:
1. You must connect to a node and subscribe to new block events.
2. For each block, parse every transaction to identify ERC-20 token transfers involving the user's address.
3. Extract contract addresses and other relevant data from the parsed transactions.
4. Compute balances by processing transfer events.
5. Store the processed data in a database for quick retrieval and aggregation.
#### Why this is difficult:
* **Resource-Intensive**: Requires significant computational power and storage to process and store blockchain data.
* **Time-consuming**: Processing millions of blocks and transactions can take an enormous amount of time.
* **Complexity**: Handling edge cases like contract upgrades, proxy contracts, and non-standard implementations adds layers of complexity.
* **Maintenance**: Keeping the indexed data up-to-date necessitates continuous synchronization with new blocks being added to the blockchain.
* **High Costs**: Associated with servers, databases, and network bandwidth.
### The Data API Advantage
The Data API provides a streamlined, efficient, and scalable solution for fetching token balances. Here's why it's the best choice:
With a single API call, you can retrieve all ERC-20 token balances for a user's address:
```javascript
avalancheSDK.data.evm.balances.listErc20Balances({
address: "0xYourAddress",
});
```
Sample Response:
```json
{
"erc20TokenBalances": [
{
"ercType": "ERC-20",
"chainId": "43114",
"address": "0xB97EF9Ef8734C71904D8002F8b6Bc66Dd9c48a6E",
"name": "USD Coin",
"symbol": "USDC",
"decimals": 6,
"price": {
"value": 1.0,
"currencyCode": "usd"
},
"balance": "15000000",
"balanceValue": {
"currencyCode": "usd",
"value": 9.6
},
"logoUri": "https://images.ctfassets.net/gcj8jwzm6086/e50058c1-2296-4e7e-91ea-83eb03db95ee/8db2a492ce64564c96de87c05a3756fd/43114-0xB97EF9Ef8734C71904D8002F8b6Bc66Dd9c48a6E.png"
}
// Additional tokens...
]
}
```
As you can see with a single call the API returns an array of token balances for all the wallet tokens, including:
* **Token metadata**: Contract address, name, symbol, decimals.
* **Balance information**: Token balance in both hexadecimal and decimal formats, Also retrieves balances of native assets like ETH or AVAX.
* **Price data**: Current value in USD or other supported currencies, saving you the effort of integrating another API.
* **Visual assets**: Token logo URI for better user interface integration.
If you’re building a wallet, DeFi app, or any application that requires displaying balances, transaction history, or smart contract interactions, relying solely on RPC methods can be challenging. Just as there’s no direct RPC method to retrieve token balances, there’s also no simple way to fetch all transactions associated with a wallet, especially for ERC-20, ERC-721, or ERC-1155 token transfers.
However, by using the Data API, you can retrieve all token transfers for a given wallet **with a single API call**, making the process much more efficient. This approach simplifies tracking and displaying wallet activity without the need to manually scan the entire blockchain.
Below are two examples that demonstrate the power of the Data API: in the first, it returns all ERC transfers, including ERC-20, ERC-721, and ERC-1155 tokens, and in the second, it shows all internal transactions, such as when one contract interacts with another.
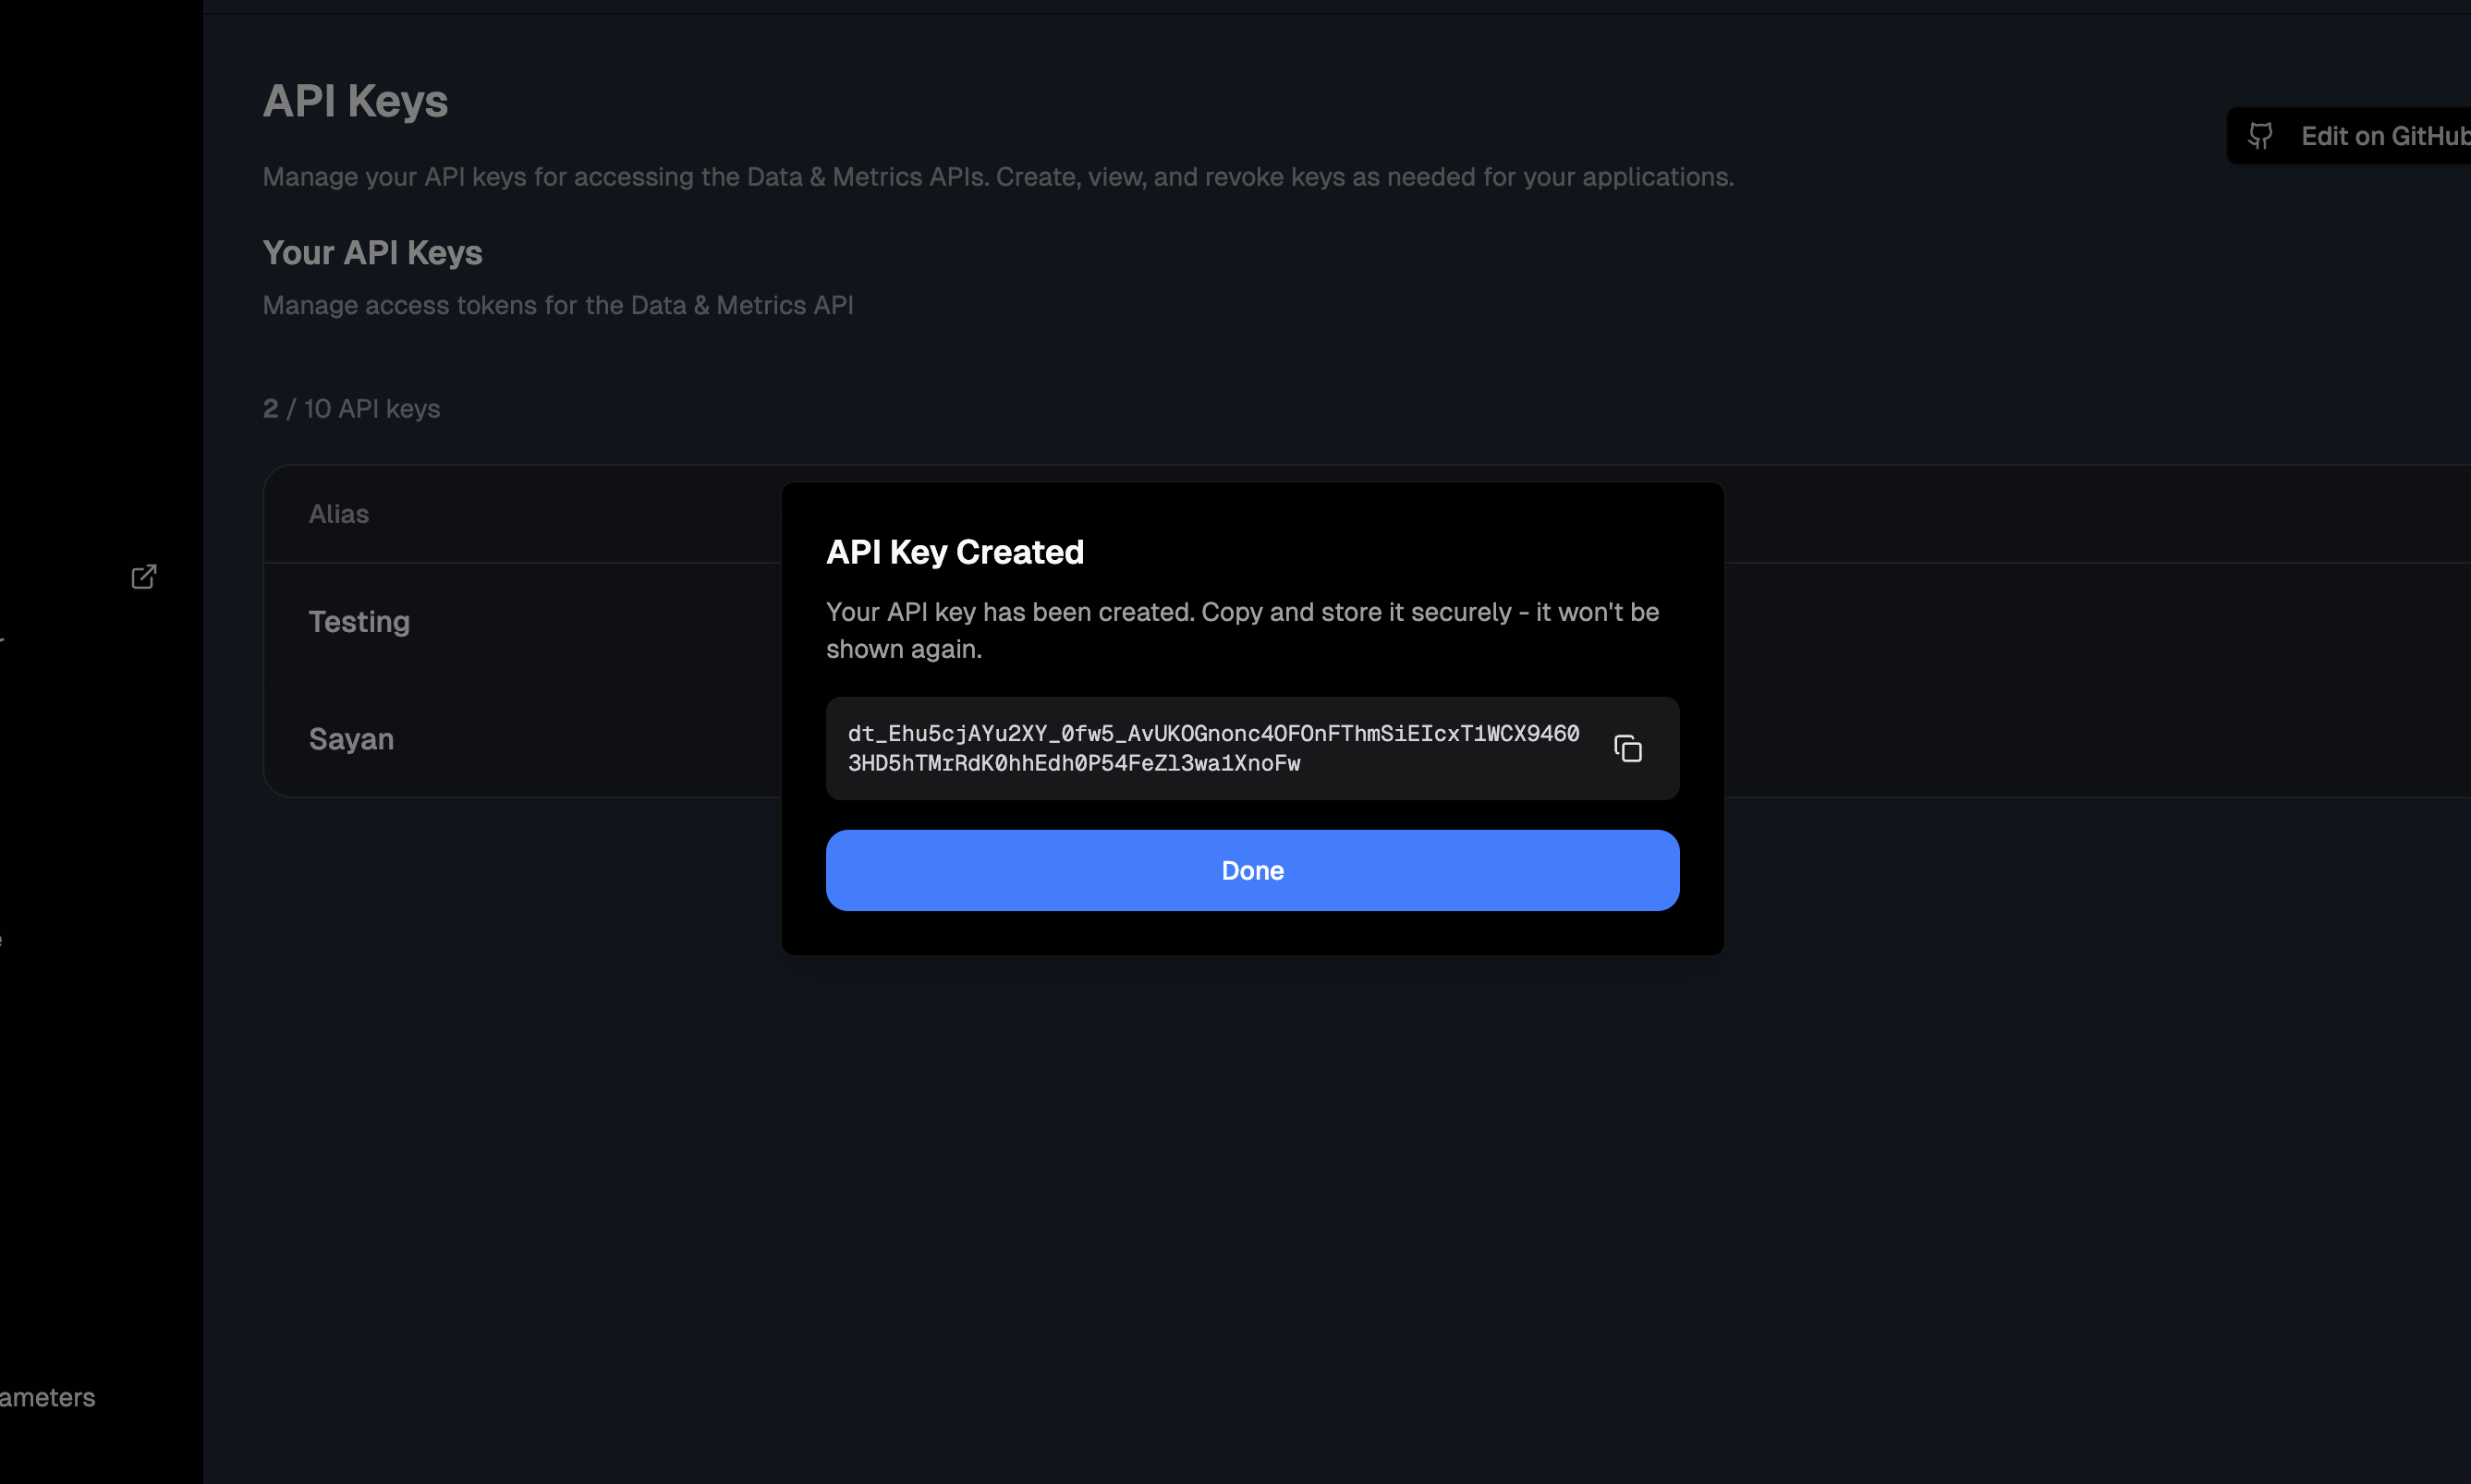
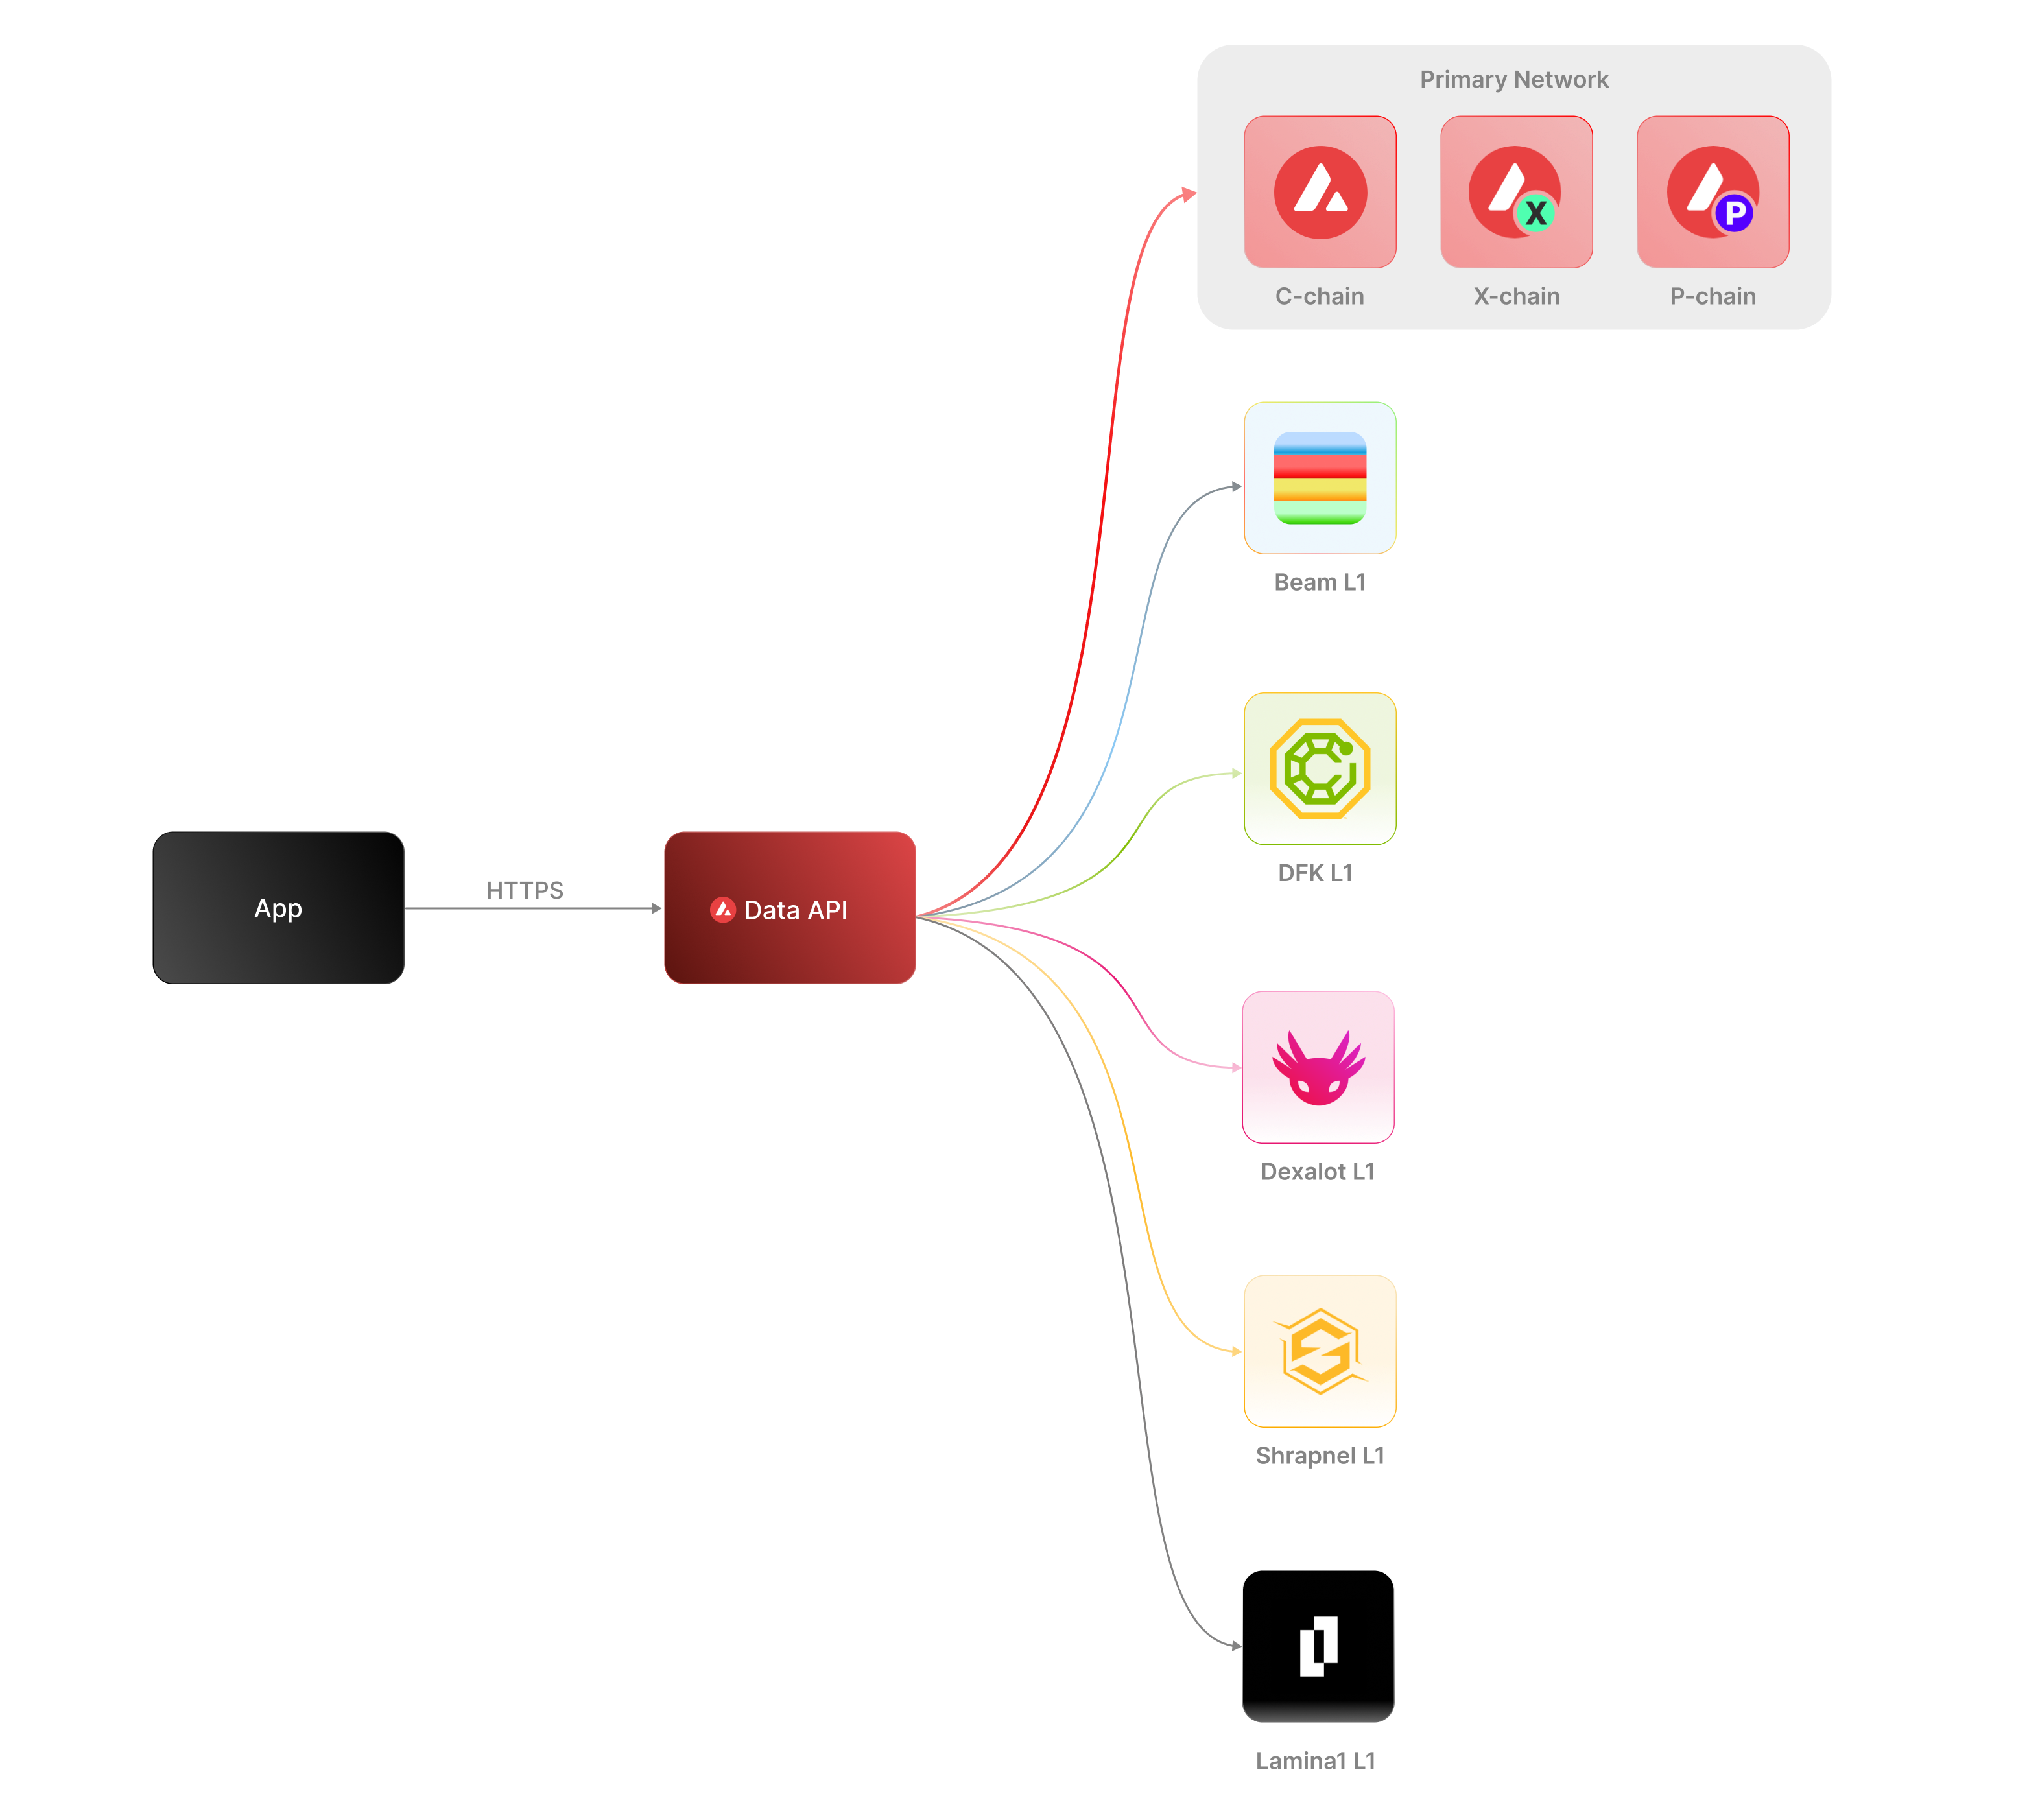 The [Data API](/docs/api-reference/data-api), along with the [Metrics API](/docs/api-reference/metrics-api), are the engines behind the [Avalanche Explorer](https://subnets.avax.network/stats/) and the [Core wallet](https://core.app/en/). They are used to display transactions, logs, balances, NFTs, and more. The data and visualizations presented are all powered by these APIs, offering real-time and historical insights that are essential for building sophisticated, data-driven blockchain products.
### Features
* **Extensive L1 Support**: Gain access to data from over 100+ L1s across both mainnet and testnet. If an L1 is listed on the [Avalanche Explorer](https://subnets.avax.network/), you can query its data using the Data API.
* **Transactions and UTXOs**: easily retrieve details related to transactions, UTXOs, and token transfers from Avalanche EVMs, Ethereum, and Avalanche's Primary Network - the P-Chain, X-Chain and C-Chain.
* **Blocks**: retrieve latest blocks and block details
* **Balances**: fetch balances of native, ERC-20, ERC-721, and ERC-1155 tokens along with relevant metadata.
* **Tokens**: augment your user experience with asset details.
* **Staking**: get staking related data for active and historical validations.
### Supported Chains
Avalanche’s architecture supports a diverse ecosystem of interconnected L1 blockchains, each operating independently while retaining the ability to seamlessly communicate with other L1s within the network. Central to this architecture is the Primary Network—Avalanche’s foundational network layer, which all validators are required to validate prior to [ACP-77](/docs/acps/77-reinventing-subnets). The Primary Network runs three essential blockchains:
* The Contract Chain (C-Chain)
* The Platform Chain (P-Chain)
* The Exchange Chain (X-Chain)
However, with the implementation of [ACP-77](/docs/acps/77-reinventing-subnets), this requirement will change. Subnet Validators will be able to operate independently of the Primary Network, allowing for more flexible and affordable Subnet creation and management.
The **Data API** supports a wide range of L1 blockchains (**over 100**) across both **mainnet** and **testnet**, including popular ones like Beam, DFK, Lamina1, Dexalot, Shrapnel, and Pulsar. In fact, every L1 you see on the [Avalanche Explorer](https://explorer.avax.network/) can be queried through the Data API. This list is continually expanding as we keep adding more L1s. For a full list of supported chains, visit [List chains](/docs/api-reference/data-api/evm-chains/supportedChains).
#### The Contract Chain (C-Chain)
The C-Chain is an implementation of the Ethereum Virtual Machine (EVM). The primary network endpoints only provide information related to C-Chain atomic memory balances and import/export transactions. For additional data, please reference the [EVM APIs](/docs/rpcs/c-chain/rpc).
#### The Platform Chain (P-Chain)
The P-Chain is responsible for all validator and L1-level operations. The P-Chain supports the creation of new blockchains and L1s, the addition of validators to L1s, staking operations, and other platform-level operations.
#### The Exchange Chain (X-Chain)
The X-Chain is responsible for operations on digital smart assets known as Avalanche Native Tokens. A smart asset is a representation of a real-world resource (for example, equity, or a bond) with sets of rules that govern its behavior, like "can’t be traded until tomorrow." The X-Chain supports the creation and trade of Avalanche Native Tokens.
| Feature | Description |
| :--------------- | :--------------------------------------------------------------------------------------------------------------------------------------------------------------------------------------------------------------------------------------------------------------------------------------------------------------------------------------------------------------------------------------- |
| **Chains** | Utilize this endpoint to retrieve the Primary Network chains that an address has transaction history associated with. |
| **Blocks** | Blocks are the container for transactions executed on the Primary Network. Retrieve the latest blocks, a specific block by height or hash, or a list of blocks proposed by a specified NodeID on Primary Network chains. |
| **Vertices** | Prior to Avalanche Cortina (v1.10.0), the X-Chain functioned as a DAG with vertices rather than blocks. These endpoints allow developers to retrieve historical data related to that period of chain history. Retrieve the latest vertices, a specific vertex, or a list of vertices at a specific height from the X-Chain. |
| **Transactions** | Transactions are a user's primary form of interaction with a chain and provide details around their on-chain activity, including staking-related behavior. Retrieve a list of the latest transactions, a specific transaction, a list of active staking transactions for a specified address, or a list of transactions associated with a provided asset id from Primary Network chains. |
| **UTXOs** | UTXOs are fundamental elements that denote the funds a user has available. Get a list of UTXOs for provided addresses from the Primary Network chains. |
| **Balances** | User balances are an essential function of the blockchain. Retrieve balances related to the X and P-Chains, as well as atomic memory balances for the C-Chain. |
| **Rewards** | Staking is the process where users lock up their tokens to support a blockchain network and, in return, receive rewards. It is an essential part of proof-of-stake (PoS) consensus mechanisms used by many blockchain networks, including Avalanche. Using the Data API, you can easily access pending and historical rewards associated with a set of addresses. |
| **Assets** | Get asset details corresponding to the given asset id on the X-Chain. |
#### EVM
The C-Chain is an instance of the Coreth Virtual Machine, and many Avalanche L1s are instances of the *Subnet-EVM*, which is a Virtual Machine (VM) that defines the L1 Contract Chains. *Subnet-EVM* is a simplified version of *Coreth VM* (C-Chain).
| Feature | Description |
| :--------------- | :------------------------------------------------------------------------------------------------------------------------------------------------------------------------------------------------------------------------------------------------------------------------------------------------------------ |
| **Chains** | There are a number of chains supported by the Data API. These endpoints can be used to understand which chains are included/indexed as part of the API and retrieve information related to a specific chain. |
| **Blocks** | Blocks are the container for transactions executed within the EVM. Retrieve the latest blocks or a specific block by height or hash. |
| **Transactions** | Transactions are a user's primary form of interaction with a chain and provide details around their on-chain activity. These endpoints can be used to retrieve information related to specific transaction details, internal transactions, contract deployments, specific token standard transfers, and more! |
| **Balances** | User balances are an essential function of the blockchain. Easily retrieve native token, collectible, and fungible token balances related to an EVM chain with these endpoints. |
#### Operations
The Operations API allows users to easily access their on-chain history by creating transaction exports returned in a CSV format. This API supports EVMs as well as non-EVM Primary Network chains.
# Rate Limits (/docs/api-reference/data-api/rate-limits)
---
title: Rate Limits
description: Rate Limits for the Data API
icon: Clock
---
Rate limiting is managed through a weighted scoring system, known as Compute Units (CUs). Each API request consumes a specified number of CUs, determined by the complexity of the request. This system is designed to accommodate basic requests while efficiently handling more computationally intensive operations.
## Rate Limit Tiers
The maximum CUs (rate-limiting score) for a user depends on their subscription level and is delineated in the following table:
| Subscription Level | Per Minute Limit (CUs) | Per Day Limit (CUs) |
| :----------------- | :--------------------- | :------------------ |
| Unauthenticated | 6,000 | 1,200,000 |
| Free | 8,000 | 2,000,000 |
| Base | 10,000 | 3,750,000 |
| Growth | 14,000 | 11,200,000 |
| Pro | 20,000 | 25,000,000 |
To update your subscription level use the [AvaCloud Portal](https://app.avacloud.io/)
The [Data API](/docs/api-reference/data-api), along with the [Metrics API](/docs/api-reference/metrics-api), are the engines behind the [Avalanche Explorer](https://subnets.avax.network/stats/) and the [Core wallet](https://core.app/en/). They are used to display transactions, logs, balances, NFTs, and more. The data and visualizations presented are all powered by these APIs, offering real-time and historical insights that are essential for building sophisticated, data-driven blockchain products.
### Features
* **Extensive L1 Support**: Gain access to data from over 100+ L1s across both mainnet and testnet. If an L1 is listed on the [Avalanche Explorer](https://subnets.avax.network/), you can query its data using the Data API.
* **Transactions and UTXOs**: easily retrieve details related to transactions, UTXOs, and token transfers from Avalanche EVMs, Ethereum, and Avalanche's Primary Network - the P-Chain, X-Chain and C-Chain.
* **Blocks**: retrieve latest blocks and block details
* **Balances**: fetch balances of native, ERC-20, ERC-721, and ERC-1155 tokens along with relevant metadata.
* **Tokens**: augment your user experience with asset details.
* **Staking**: get staking related data for active and historical validations.
### Supported Chains
Avalanche’s architecture supports a diverse ecosystem of interconnected L1 blockchains, each operating independently while retaining the ability to seamlessly communicate with other L1s within the network. Central to this architecture is the Primary Network—Avalanche’s foundational network layer, which all validators are required to validate prior to [ACP-77](/docs/acps/77-reinventing-subnets). The Primary Network runs three essential blockchains:
* The Contract Chain (C-Chain)
* The Platform Chain (P-Chain)
* The Exchange Chain (X-Chain)
However, with the implementation of [ACP-77](/docs/acps/77-reinventing-subnets), this requirement will change. Subnet Validators will be able to operate independently of the Primary Network, allowing for more flexible and affordable Subnet creation and management.
The **Data API** supports a wide range of L1 blockchains (**over 100**) across both **mainnet** and **testnet**, including popular ones like Beam, DFK, Lamina1, Dexalot, Shrapnel, and Pulsar. In fact, every L1 you see on the [Avalanche Explorer](https://explorer.avax.network/) can be queried through the Data API. This list is continually expanding as we keep adding more L1s. For a full list of supported chains, visit [List chains](/docs/api-reference/data-api/evm-chains/supportedChains).
#### The Contract Chain (C-Chain)
The C-Chain is an implementation of the Ethereum Virtual Machine (EVM). The primary network endpoints only provide information related to C-Chain atomic memory balances and import/export transactions. For additional data, please reference the [EVM APIs](/docs/rpcs/c-chain/rpc).
#### The Platform Chain (P-Chain)
The P-Chain is responsible for all validator and L1-level operations. The P-Chain supports the creation of new blockchains and L1s, the addition of validators to L1s, staking operations, and other platform-level operations.
#### The Exchange Chain (X-Chain)
The X-Chain is responsible for operations on digital smart assets known as Avalanche Native Tokens. A smart asset is a representation of a real-world resource (for example, equity, or a bond) with sets of rules that govern its behavior, like "can’t be traded until tomorrow." The X-Chain supports the creation and trade of Avalanche Native Tokens.
| Feature | Description |
| :--------------- | :--------------------------------------------------------------------------------------------------------------------------------------------------------------------------------------------------------------------------------------------------------------------------------------------------------------------------------------------------------------------------------------- |
| **Chains** | Utilize this endpoint to retrieve the Primary Network chains that an address has transaction history associated with. |
| **Blocks** | Blocks are the container for transactions executed on the Primary Network. Retrieve the latest blocks, a specific block by height or hash, or a list of blocks proposed by a specified NodeID on Primary Network chains. |
| **Vertices** | Prior to Avalanche Cortina (v1.10.0), the X-Chain functioned as a DAG with vertices rather than blocks. These endpoints allow developers to retrieve historical data related to that period of chain history. Retrieve the latest vertices, a specific vertex, or a list of vertices at a specific height from the X-Chain. |
| **Transactions** | Transactions are a user's primary form of interaction with a chain and provide details around their on-chain activity, including staking-related behavior. Retrieve a list of the latest transactions, a specific transaction, a list of active staking transactions for a specified address, or a list of transactions associated with a provided asset id from Primary Network chains. |
| **UTXOs** | UTXOs are fundamental elements that denote the funds a user has available. Get a list of UTXOs for provided addresses from the Primary Network chains. |
| **Balances** | User balances are an essential function of the blockchain. Retrieve balances related to the X and P-Chains, as well as atomic memory balances for the C-Chain. |
| **Rewards** | Staking is the process where users lock up their tokens to support a blockchain network and, in return, receive rewards. It is an essential part of proof-of-stake (PoS) consensus mechanisms used by many blockchain networks, including Avalanche. Using the Data API, you can easily access pending and historical rewards associated with a set of addresses. |
| **Assets** | Get asset details corresponding to the given asset id on the X-Chain. |
#### EVM
The C-Chain is an instance of the Coreth Virtual Machine, and many Avalanche L1s are instances of the *Subnet-EVM*, which is a Virtual Machine (VM) that defines the L1 Contract Chains. *Subnet-EVM* is a simplified version of *Coreth VM* (C-Chain).
| Feature | Description |
| :--------------- | :------------------------------------------------------------------------------------------------------------------------------------------------------------------------------------------------------------------------------------------------------------------------------------------------------------ |
| **Chains** | There are a number of chains supported by the Data API. These endpoints can be used to understand which chains are included/indexed as part of the API and retrieve information related to a specific chain. |
| **Blocks** | Blocks are the container for transactions executed within the EVM. Retrieve the latest blocks or a specific block by height or hash. |
| **Transactions** | Transactions are a user's primary form of interaction with a chain and provide details around their on-chain activity. These endpoints can be used to retrieve information related to specific transaction details, internal transactions, contract deployments, specific token standard transfers, and more! |
| **Balances** | User balances are an essential function of the blockchain. Easily retrieve native token, collectible, and fungible token balances related to an EVM chain with these endpoints. |
#### Operations
The Operations API allows users to easily access their on-chain history by creating transaction exports returned in a CSV format. This API supports EVMs as well as non-EVM Primary Network chains.
# Rate Limits (/docs/api-reference/data-api/rate-limits)
---
title: Rate Limits
description: Rate Limits for the Data API
icon: Clock
---
Rate limiting is managed through a weighted scoring system, known as Compute Units (CUs). Each API request consumes a specified number of CUs, determined by the complexity of the request. This system is designed to accommodate basic requests while efficiently handling more computationally intensive operations.
## Rate Limit Tiers
The maximum CUs (rate-limiting score) for a user depends on their subscription level and is delineated in the following table:
| Subscription Level | Per Minute Limit (CUs) | Per Day Limit (CUs) |
| :----------------- | :--------------------- | :------------------ |
| Unauthenticated | 6,000 | 1,200,000 |
| Free | 8,000 | 2,000,000 |
| Base | 10,000 | 3,750,000 |
| Growth | 14,000 | 11,200,000 |
| Pro | 20,000 | 25,000,000 |
To update your subscription level use the [AvaCloud Portal](https://app.avacloud.io/)
 ### Features
* **Chain Throughput:** Retrieve detailed metrics on gas consumption, Transactions Per Second (TPS), and gas prices, including rolling windows of data for granular analysis.
* **Cumulative Metrics:** Access cumulative data on addresses, contracts, deployers, and transaction counts, providing insights into network growth over time.
* **Staking Information:** Obtain staking-related data, including the number of validators and delegators, along with their respective weights, across different subnets.
* **Blockchains and Subnets:** Get information about supported blockchains, including EVM Chain IDs, blockchain IDs, and subnet associations, facilitating multi-chain analytics.
* **Composite Queries:** Perform advanced queries by combining different metric types and conditions, enabling detailed and customizable data retrieval.
The Metrics API is designed to provide developers with powerful tools to analyze and monitor on-chain activity across Avalanche’s primary network, Avalanche L1s, and other supported EVM chains. Below is an overview of the key features available:
### Chain Throughput Metrics
* **Gas Consumption**
### Features
* **Chain Throughput:** Retrieve detailed metrics on gas consumption, Transactions Per Second (TPS), and gas prices, including rolling windows of data for granular analysis.
* **Cumulative Metrics:** Access cumulative data on addresses, contracts, deployers, and transaction counts, providing insights into network growth over time.
* **Staking Information:** Obtain staking-related data, including the number of validators and delegators, along with their respective weights, across different subnets.
* **Blockchains and Subnets:** Get information about supported blockchains, including EVM Chain IDs, blockchain IDs, and subnet associations, facilitating multi-chain analytics.
* **Composite Queries:** Perform advanced queries by combining different metric types and conditions, enabling detailed and customizable data retrieval.
The Metrics API is designed to provide developers with powerful tools to analyze and monitor on-chain activity across Avalanche’s primary network, Avalanche L1s, and other supported EVM chains. Below is an overview of the key features available:
### Chain Throughput Metrics
* **Gas Consumption** 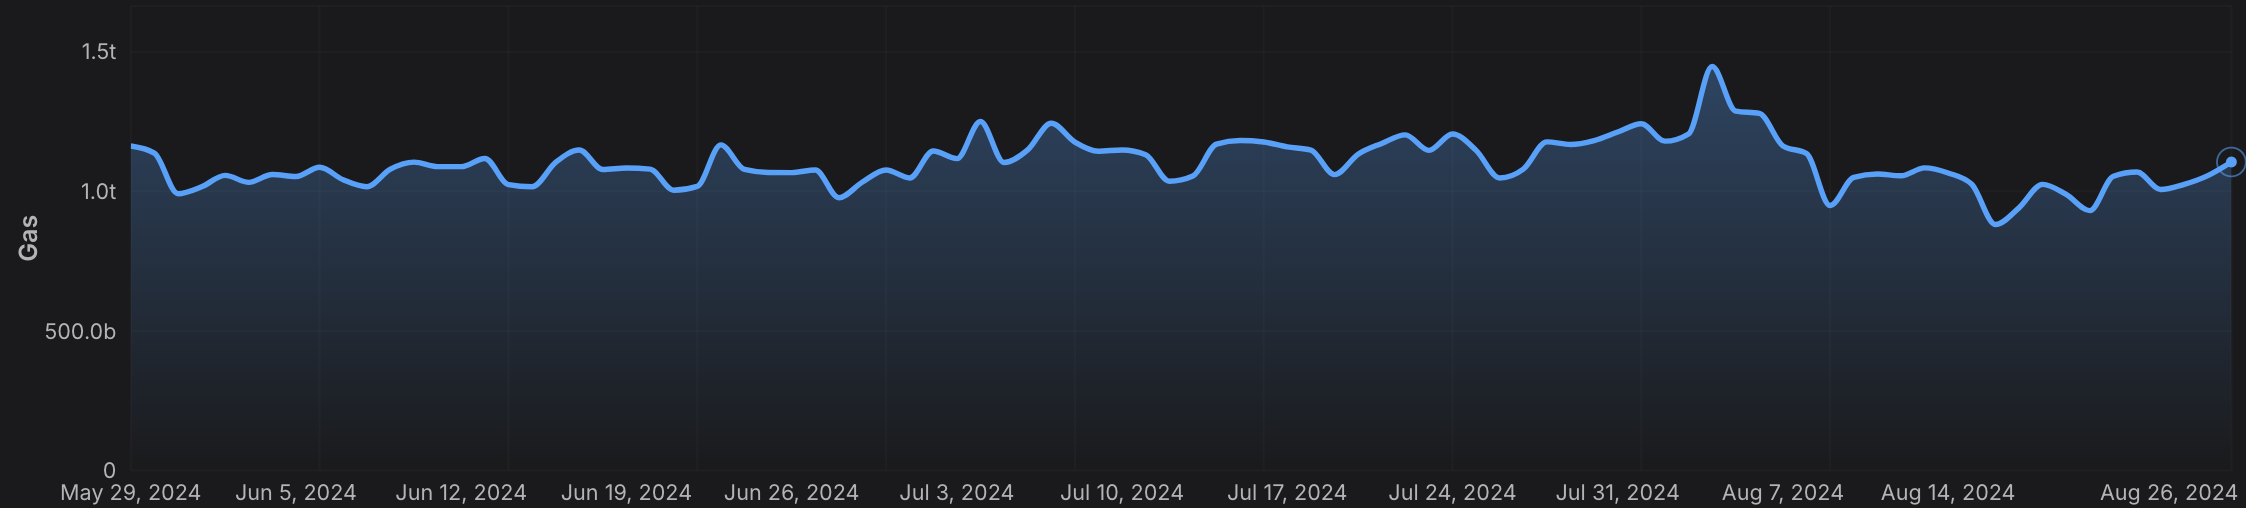 * **Transactions Per Second (TPS)**
 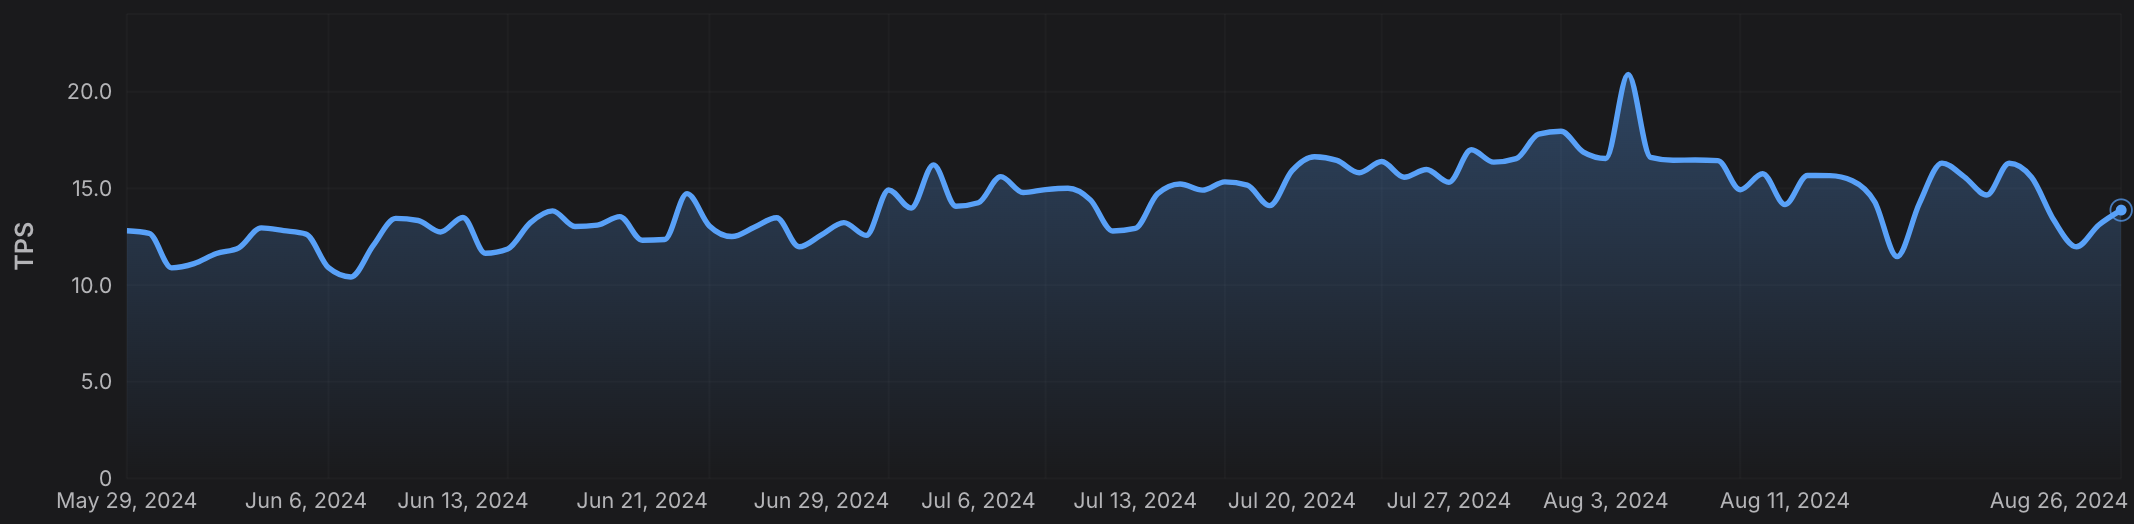 * **Gas Prices**
 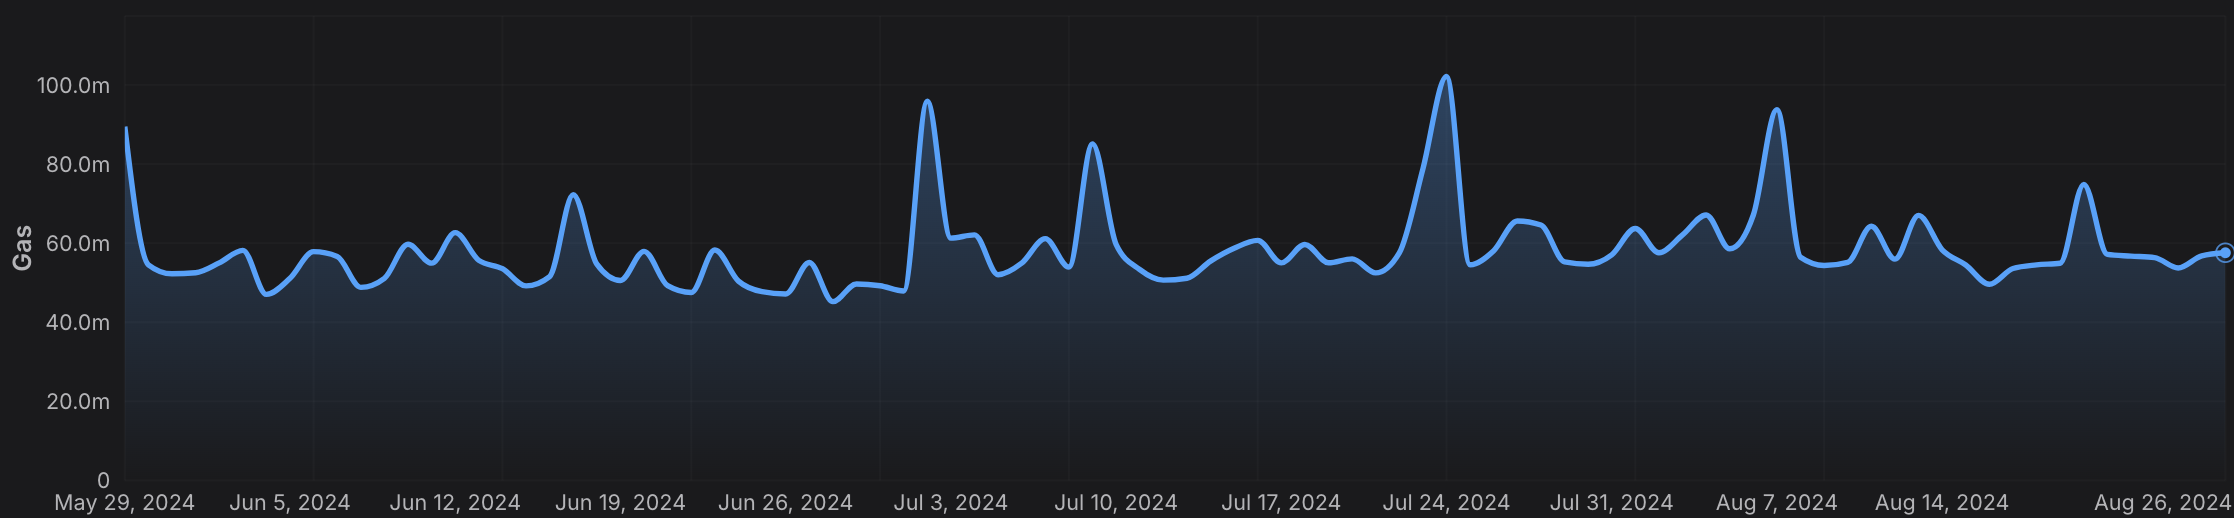 ### Cumulative Metrics
* **Address Growth**
### Cumulative Metrics
* **Address Growth** 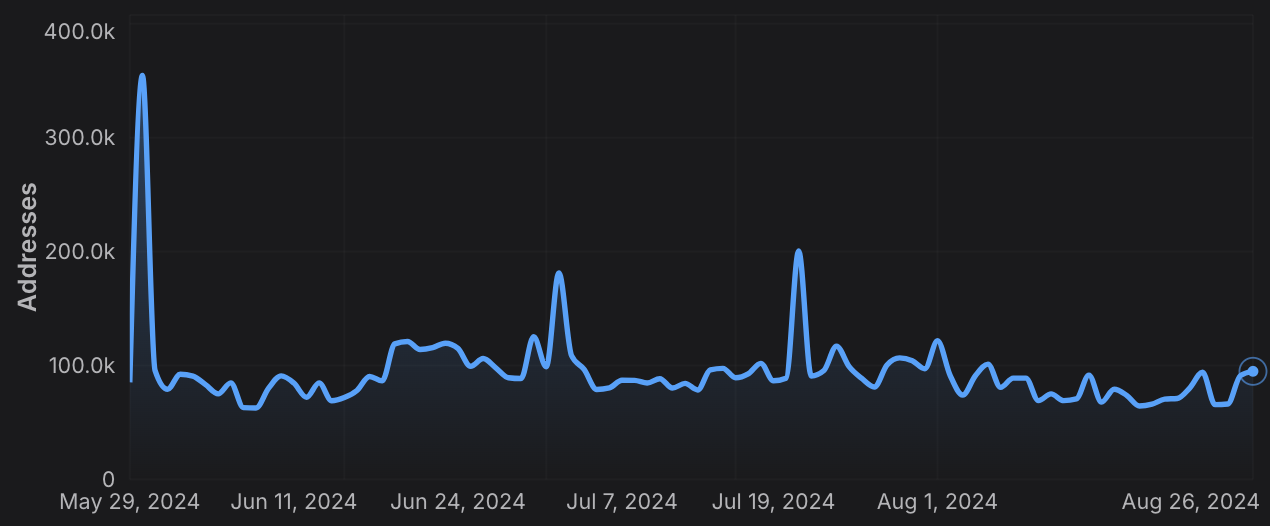 * **Contract Deployment**
 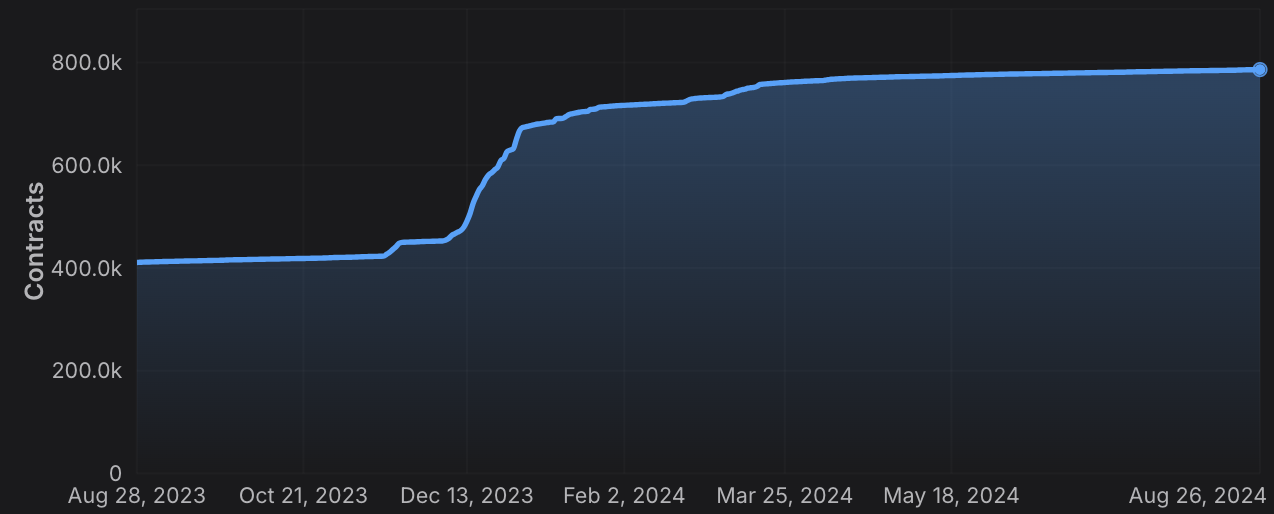 * **Transaction Count**
 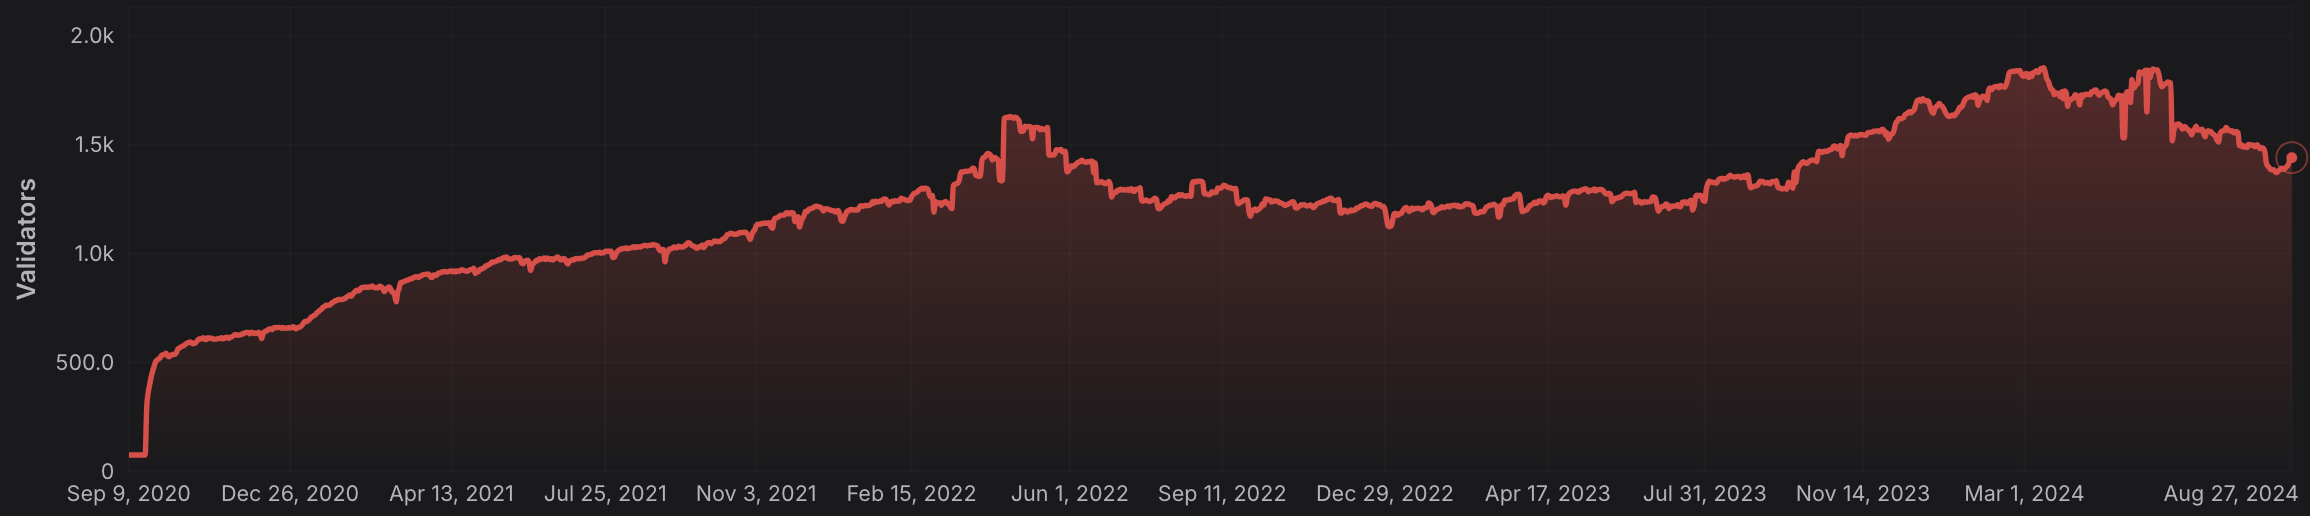 * **Staking Weights**
 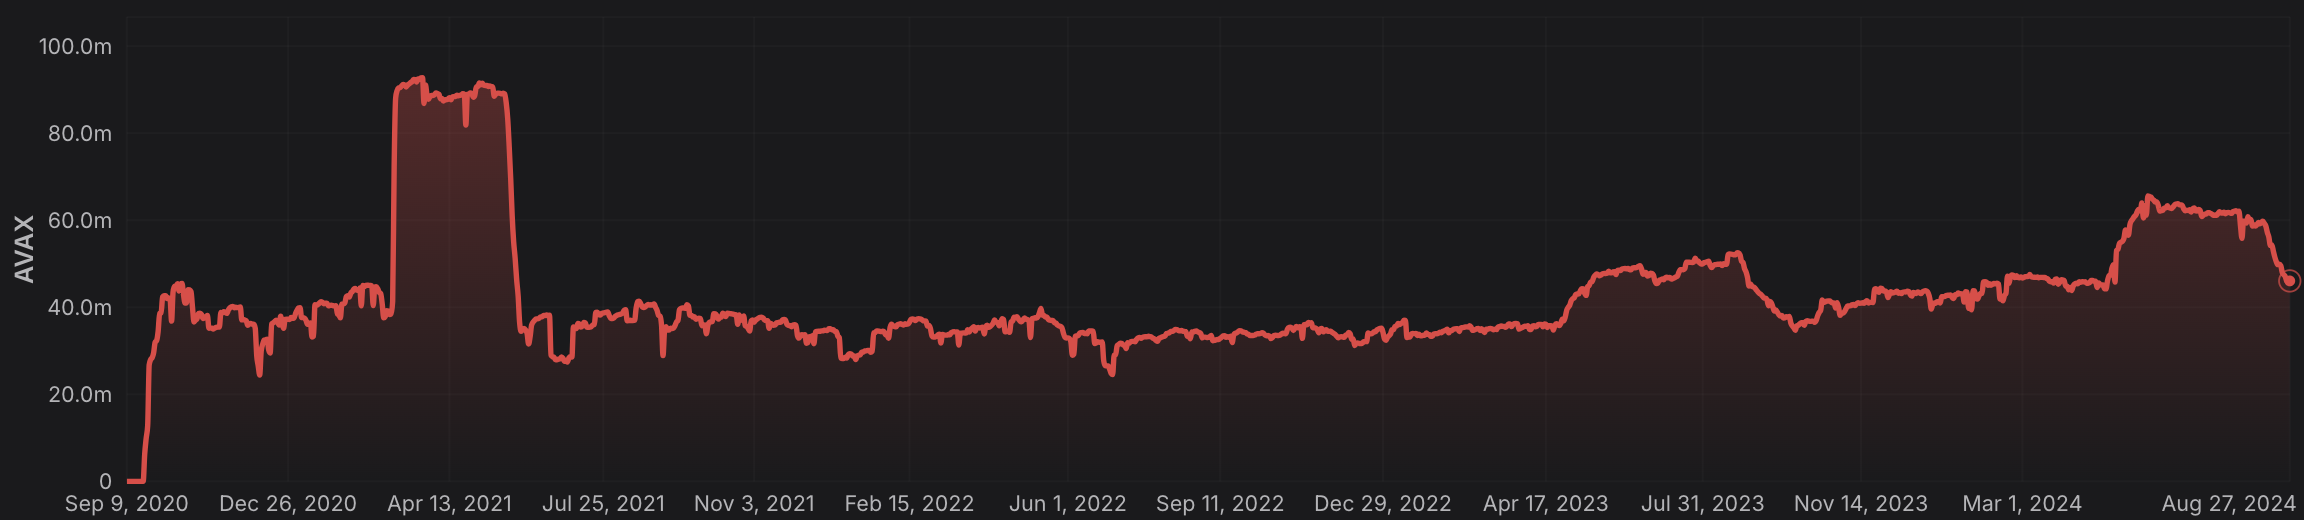 ### Rolling Window Analytics
* **Short-Term and Long-Term Metrics:** Perform rolling window analysis on various metrics like gas used, TPS, and gas prices, allowing for both short-term and long-term trend analysis.
* **Customizable Time Frames:** Choose from different time intervals (hourly, daily, monthly) to suit your specific analytical needs.
### Blockchain and L1 Information
* **Chain and L1 Mapping:** Get detailed information about EVM chains and their associated L1s, including chain IDs, blockchain IDs, and subnet IDs, facilitating cross-chain analytics.
### Advanced Composite Queries
* **Custom Metrics Combinations**: Combine multiple metrics and apply logical operators to perform sophisticated queries, enabling deep insights and tailored analytics.
* **Paginated Results:** Handle large datasets efficiently with paginated responses, ensuring seamless data retrieval in your applications.
The Metrics API equips developers with the tools needed to build robust analytics, monitoring, and reporting solutions, leveraging the full power of multi-chain data across the Avalanche ecosystem and beyond.
# Rate Limits (/docs/api-reference/metrics-api/rate-limits)
---
title: Rate Limits
description: Rate Limits for the Metrics API
icon: Clock
---
# Rate Limits
Rate limiting is managed through a weighted scoring system, known as Compute Units (CUs). Each API request consumes a specified number of CUs, determined by the complexity of the request. This system is designed to accommodate basic requests while efficiently handling more computationally intensive operations.
## Rate Limit Tiers
The maximum CUs (rate-limiting score) for a user depends on their subscription level and is delineated in the following table:
| Subscription Level | Per Minute Limit (CUs) | Per Day Limit (CUs) |
| :----------------- | :--------------------- | :------------------ |
| Free | 8,000 | 1,200,000 |
> We are working on new subscription tiers with higher rate limits to support even greater request volumes.
## Rate Limit Categories
The CUs for each category are defined in the following table:
| Weight | CU Value |
| :----- | :------- |
| Free | 1 |
| Small | 20 |
| Medium | 100 |
| Large | 500 |
| XL | 1000 |
| XXL | 3000 |
## Rate Limits for Metrics Endpoints
The CUs for each route are defined in the table below:
| Endpoint | Method | Weight | CU Value |
| :---------------------------------------------------------- | :----- | :----- | :------- |
| `/v2/health-check` | GET | Free | 1 |
| `/v2/chains` | GET | Free | 1 |
| `/v2/chains/{chainId}` | GET | Free | 1 |
| `/v2/chains/{chainId}/metrics/{metric}` | GET | Medium | 100 |
| `/v2/chains/{chainId}/teleporterMetrics/{metric}` | GET | Medium | 100 |
| `/v2/chains/{chainId}/rollingWindowMetrics/{metric}` | GET | Medium | 100 |
| `/v2/networks/{network}/metrics/{metric}` | GET | Medium | 100 |
| `/v2/chains/{chainId}/contracts/{address}/nfts:listHolders` | GET | Large | 500 |
| `/v2/chains/{chainId}/contracts/{address}/balances` | GET | XL | 1000 |
| `/v2/chains/43114/btcb/bridged:getAddresses` | GET | Large | 500 |
| `/v2/subnets/{subnetId}/validators:getAddresses` | GET | Large | 500 |
| `/v2/lookingGlass/compositeQuery` | POST | XXL | 3000 |
### Rolling Window Analytics
* **Short-Term and Long-Term Metrics:** Perform rolling window analysis on various metrics like gas used, TPS, and gas prices, allowing for both short-term and long-term trend analysis.
* **Customizable Time Frames:** Choose from different time intervals (hourly, daily, monthly) to suit your specific analytical needs.
### Blockchain and L1 Information
* **Chain and L1 Mapping:** Get detailed information about EVM chains and their associated L1s, including chain IDs, blockchain IDs, and subnet IDs, facilitating cross-chain analytics.
### Advanced Composite Queries
* **Custom Metrics Combinations**: Combine multiple metrics and apply logical operators to perform sophisticated queries, enabling deep insights and tailored analytics.
* **Paginated Results:** Handle large datasets efficiently with paginated responses, ensuring seamless data retrieval in your applications.
The Metrics API equips developers with the tools needed to build robust analytics, monitoring, and reporting solutions, leveraging the full power of multi-chain data across the Avalanche ecosystem and beyond.
# Rate Limits (/docs/api-reference/metrics-api/rate-limits)
---
title: Rate Limits
description: Rate Limits for the Metrics API
icon: Clock
---
# Rate Limits
Rate limiting is managed through a weighted scoring system, known as Compute Units (CUs). Each API request consumes a specified number of CUs, determined by the complexity of the request. This system is designed to accommodate basic requests while efficiently handling more computationally intensive operations.
## Rate Limit Tiers
The maximum CUs (rate-limiting score) for a user depends on their subscription level and is delineated in the following table:
| Subscription Level | Per Minute Limit (CUs) | Per Day Limit (CUs) |
| :----------------- | :--------------------- | :------------------ |
| Free | 8,000 | 1,200,000 |
> We are working on new subscription tiers with higher rate limits to support even greater request volumes.
## Rate Limit Categories
The CUs for each category are defined in the following table:
| Weight | CU Value |
| :----- | :------- |
| Free | 1 |
| Small | 20 |
| Medium | 100 |
| Large | 500 |
| XL | 1000 |
| XXL | 3000 |
## Rate Limits for Metrics Endpoints
The CUs for each route are defined in the table below:
| Endpoint | Method | Weight | CU Value |
| :---------------------------------------------------------- | :----- | :----- | :------- |
| `/v2/health-check` | GET | Free | 1 |
| `/v2/chains` | GET | Free | 1 |
| `/v2/chains/{chainId}` | GET | Free | 1 |
| `/v2/chains/{chainId}/metrics/{metric}` | GET | Medium | 100 |
| `/v2/chains/{chainId}/teleporterMetrics/{metric}` | GET | Medium | 100 |
| `/v2/chains/{chainId}/rollingWindowMetrics/{metric}` | GET | Medium | 100 |
| `/v2/networks/{network}/metrics/{metric}` | GET | Medium | 100 |
| `/v2/chains/{chainId}/contracts/{address}/nfts:listHolders` | GET | Large | 500 |
| `/v2/chains/{chainId}/contracts/{address}/balances` | GET | XL | 1000 |
| `/v2/chains/43114/btcb/bridged:getAddresses` | GET | Large | 500 |
| `/v2/subnets/{subnetId}/validators:getAddresses` | GET | Large | 500 |
| `/v2/lookingGlass/compositeQuery` | POST | XXL | 3000 |
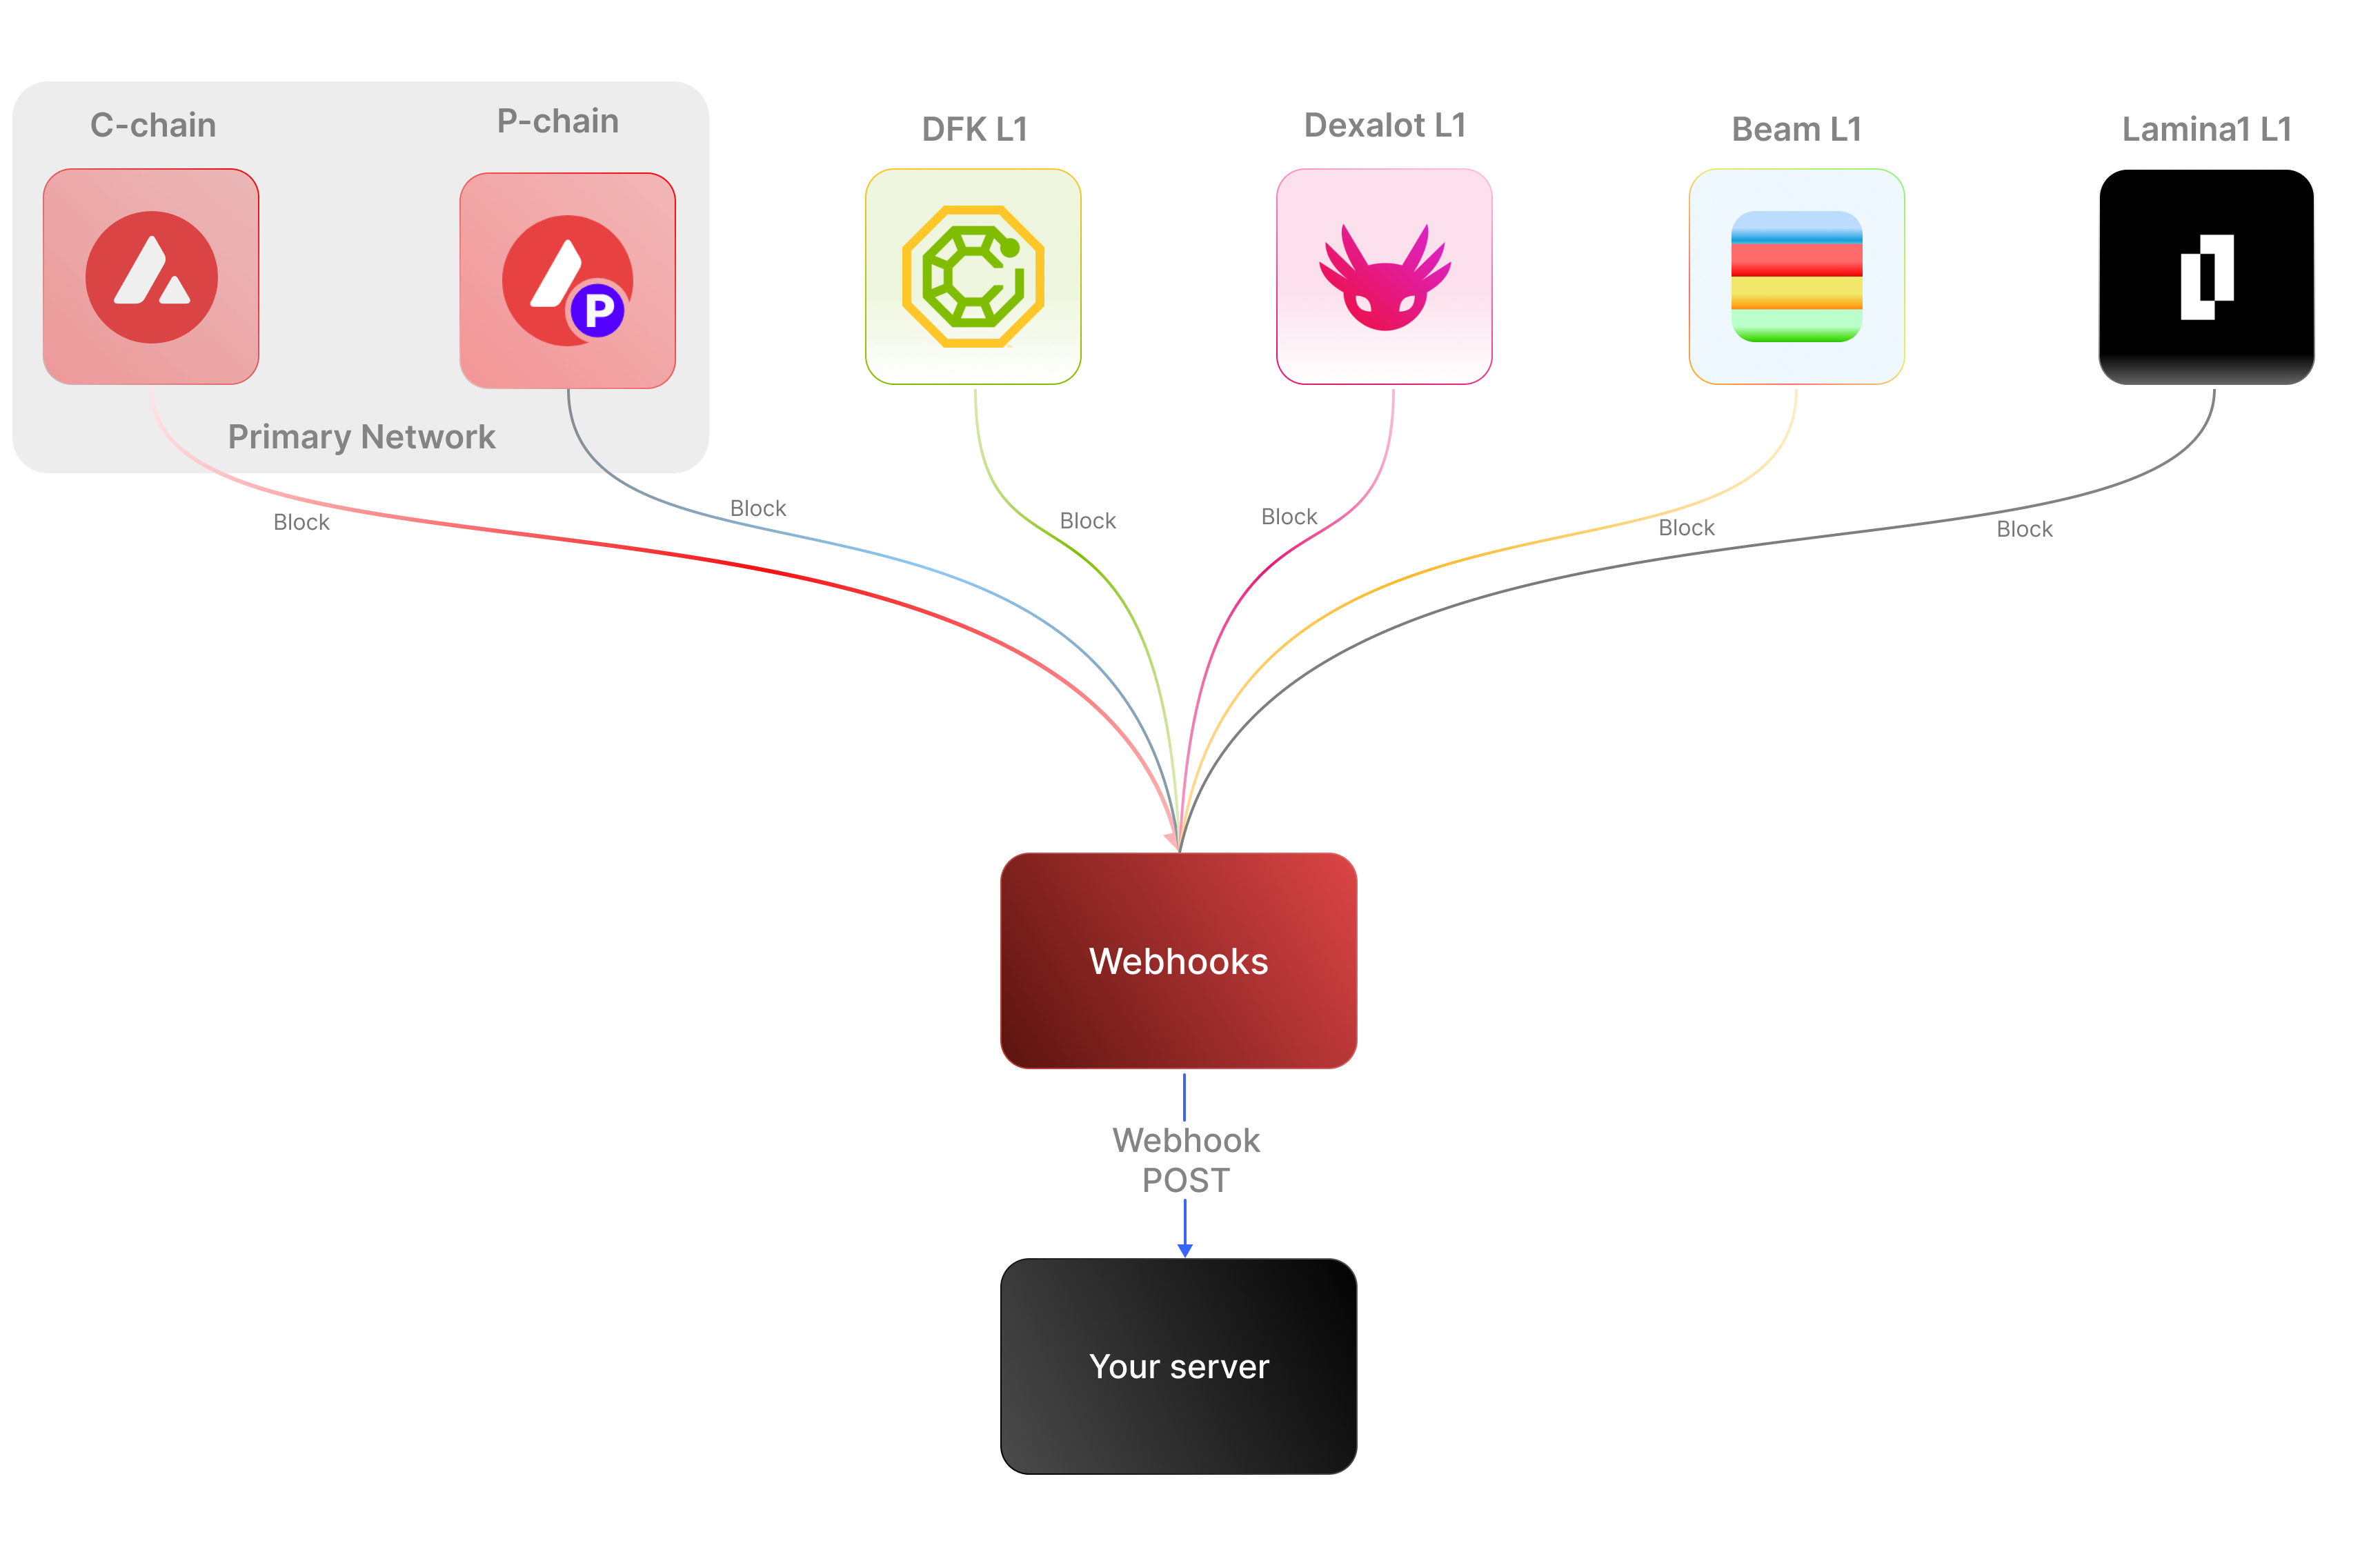 ### Key Features:
* **Real-time notifications:** Receive immediate updates on specified on-chain activities without polling.
* **Customizable:** Specify the desired event type to listen for, customizing notifications based on your individual requirements.
* **Secure:** Employ shared secrets and signature-based verification to ensure that notifications originate from a trusted source.
* **Broad Coverage:**
* **C-chain:** Mainnet and testnet, covering smart contract events, NFT transfers, and wallet-to-wallet transactions.
* **Platform Chain (P and X chains):** Address and validator events, staking activities, and other platform-level transactions.
By supporting both the C-chain and the Platform Chain, you can monitor an even wider range of Avalanche activities.
### Use cases
* **NFT marketplace transactions**: Get alerts for NFT minting, transfers, auctions, bids, sales, and other interactions within NFT marketplaces.
* **Wallet notifications**: Receive alerts when an address performs actions such as sending, receiving, swapping, or burning assets.
* **DeFi activities**: Receive notifications for various DeFi activities such as liquidity provisioning, yield farming, borrowing, lending, and liquidations.
* **Staking rewards:** Get real-time notifications when a validator stakes, receives delegation, or earns staking rewards on the P-Chain, enabling seamless monitoring of validator earnings and participation.
## APIs for continuous polling vs. Webhooks for events data
The following example uses the address activity webhook topic to illustrate the difference between polling an API for wallet event data versus subscribing to a webhook topic to receive wallet events.
### Key Features:
* **Real-time notifications:** Receive immediate updates on specified on-chain activities without polling.
* **Customizable:** Specify the desired event type to listen for, customizing notifications based on your individual requirements.
* **Secure:** Employ shared secrets and signature-based verification to ensure that notifications originate from a trusted source.
* **Broad Coverage:**
* **C-chain:** Mainnet and testnet, covering smart contract events, NFT transfers, and wallet-to-wallet transactions.
* **Platform Chain (P and X chains):** Address and validator events, staking activities, and other platform-level transactions.
By supporting both the C-chain and the Platform Chain, you can monitor an even wider range of Avalanche activities.
### Use cases
* **NFT marketplace transactions**: Get alerts for NFT minting, transfers, auctions, bids, sales, and other interactions within NFT marketplaces.
* **Wallet notifications**: Receive alerts when an address performs actions such as sending, receiving, swapping, or burning assets.
* **DeFi activities**: Receive notifications for various DeFi activities such as liquidity provisioning, yield farming, borrowing, lending, and liquidations.
* **Staking rewards:** Get real-time notifications when a validator stakes, receives delegation, or earns staking rewards on the P-Chain, enabling seamless monitoring of validator earnings and participation.
## APIs for continuous polling vs. Webhooks for events data
The following example uses the address activity webhook topic to illustrate the difference between polling an API for wallet event data versus subscribing to a webhook topic to receive wallet events.
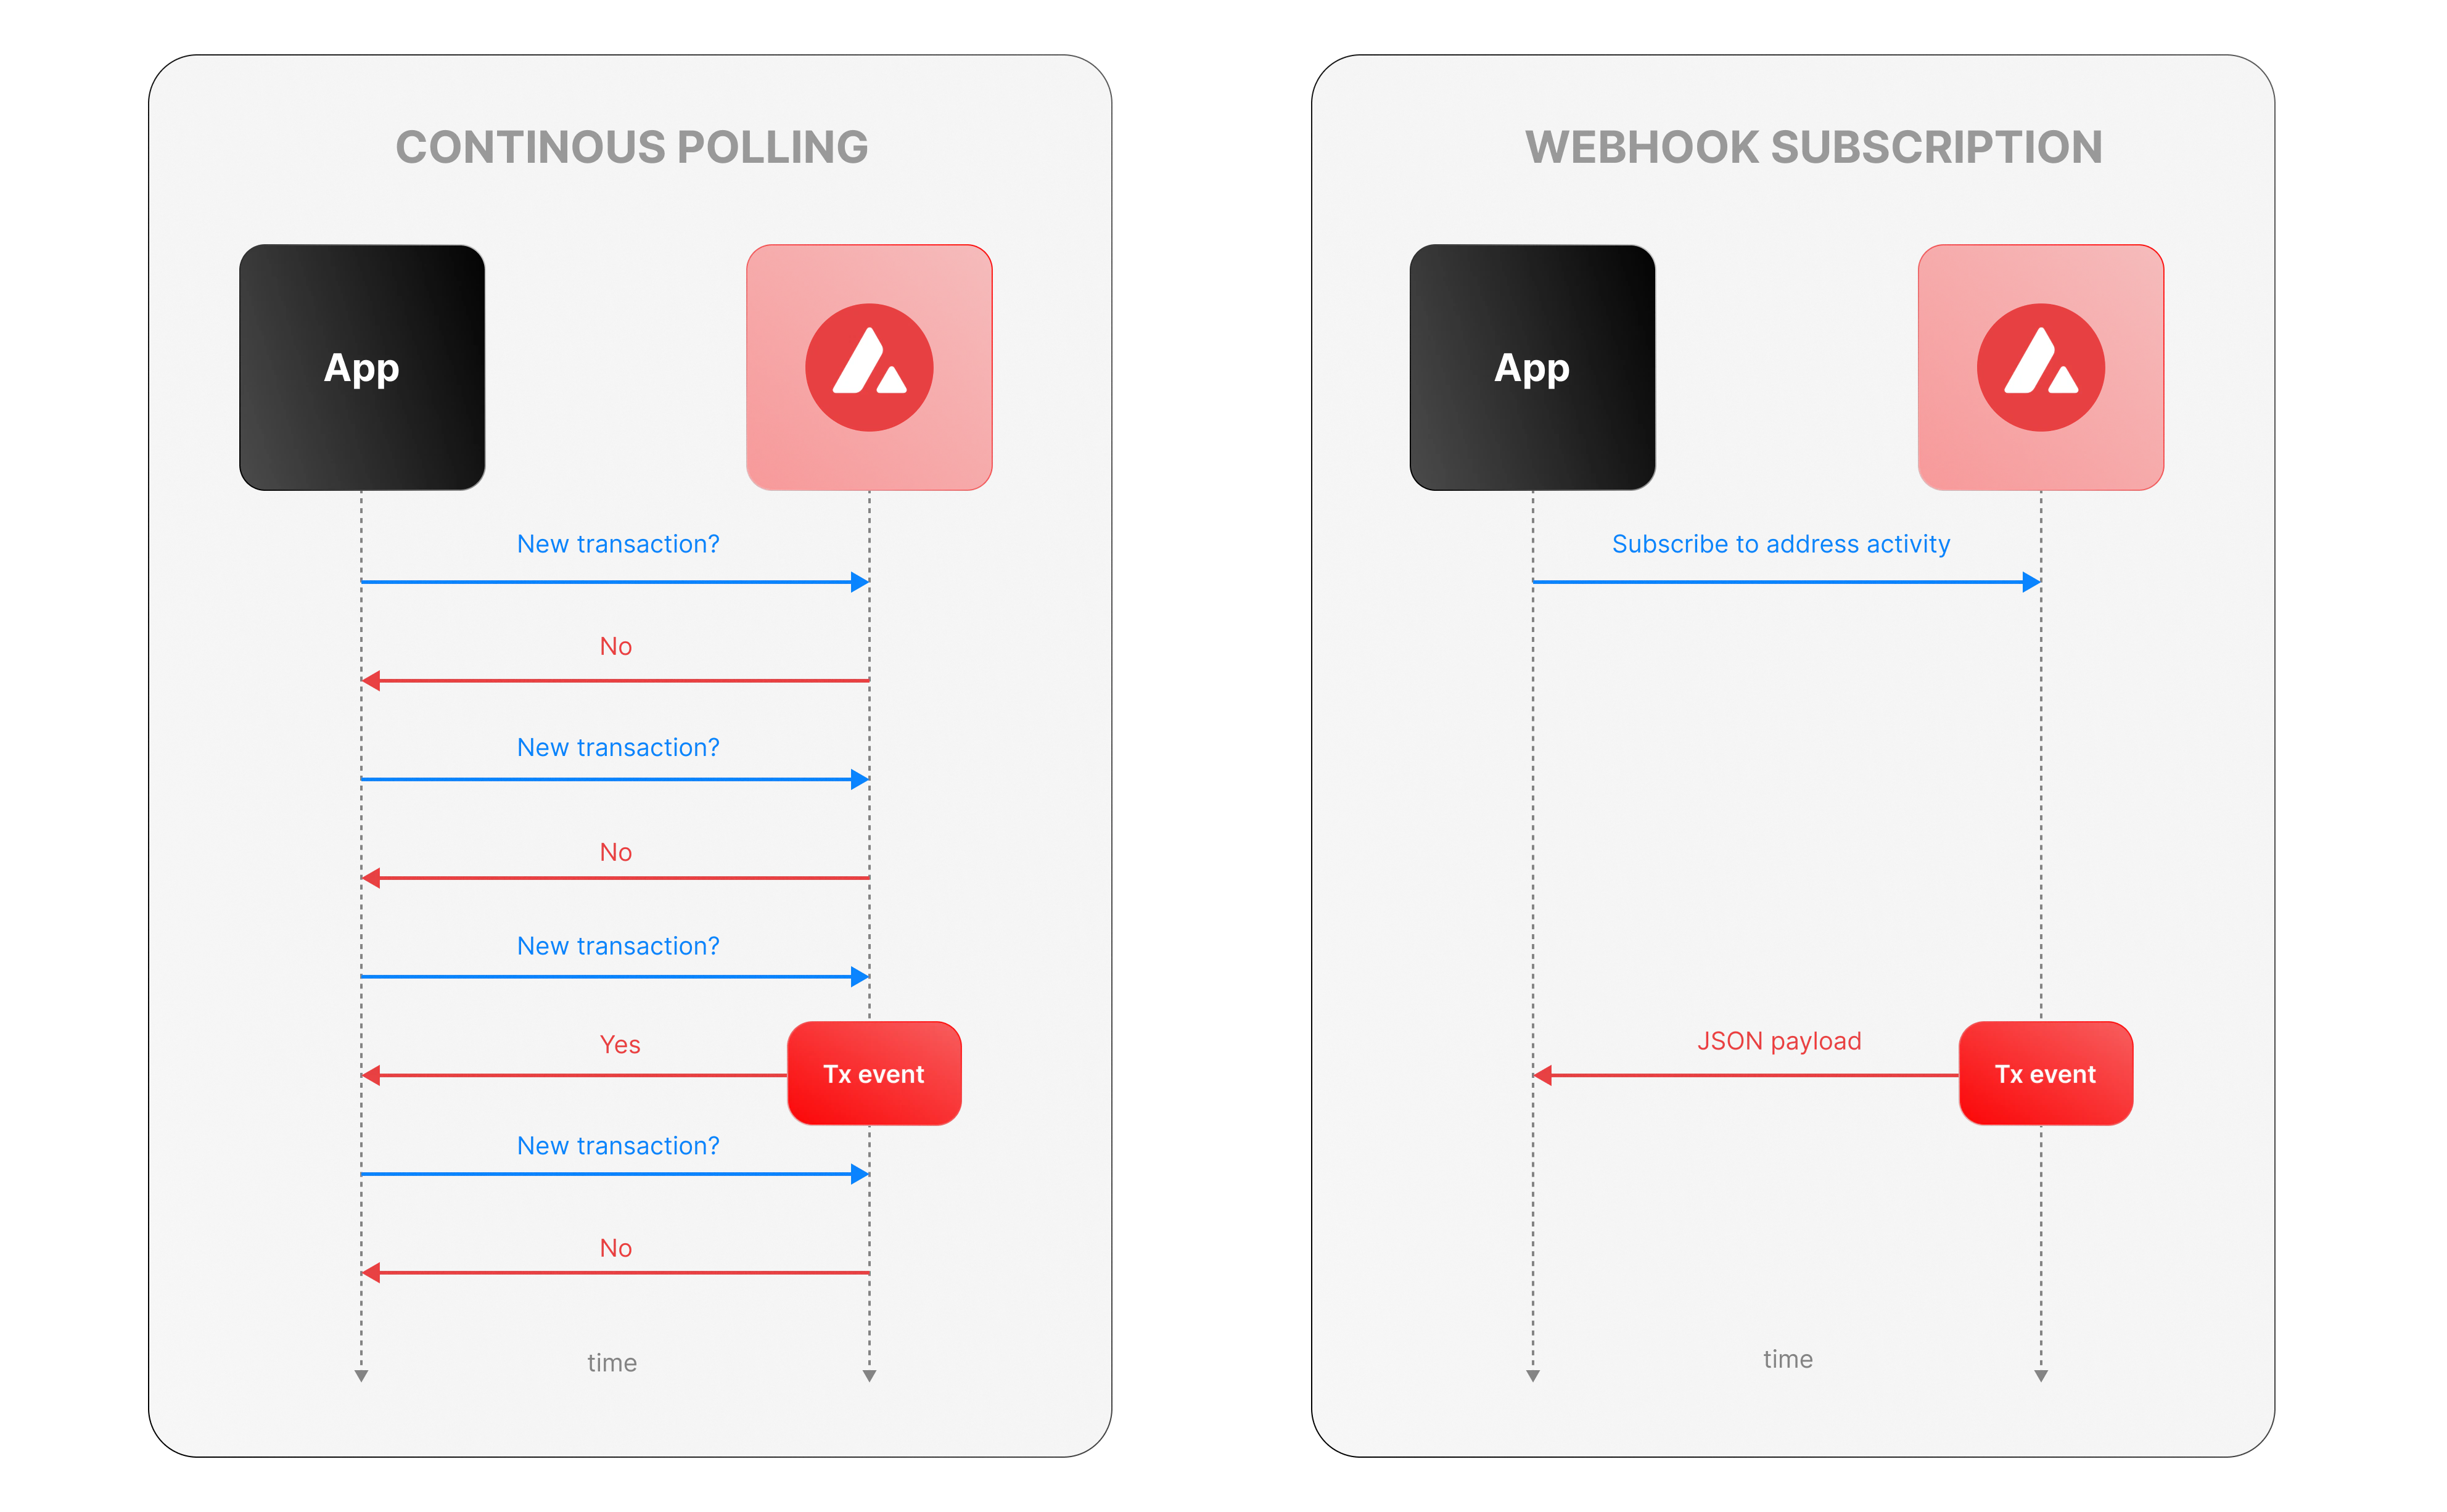 ### Continous polling
Continuous polling is a method where your application repeatedly sends requests to an API at fixed intervals to check for new data or events. Think of it like checking your mailbox every five minutes to see if new mail has arrived, whether or not anything is there.
* You want to track new transactions for a specific wallet.
* Your application calls an API every few seconds (e.g., every 5 seconds) with a query like, “Are there any new transactions for this wallet since my last check?”
* The API responds with either new transaction data or a confirmation that nothing has changed.
**Downsides of continuous polling**
* **Inefficiency:** Your app makes requests even when no new transactions occur, wasting computational resources, bandwidth, and potentially incurring higher API costs.
For example, if no transactions happen for an hour, your app still sends hundreds of unnecessary requests.
* **Delayed updates:**
Since polling happens at set intervals, there’s a potential delay in detecting events. If a transaction occurs just after a poll, your app won’t know until the next check—up to 5 seconds later in our example.
This lag can be critical for time-sensitive applications, like trading or notifications.
* **Scalability challenges:** Monitoring one wallet might be manageable, but if you’re tracking dozens or hundreds of wallets, the number of requests multiplies quickly.
### Webhook subscription
Webhooks are an event-driven alternative where your application subscribes to specific events, and the Avalanche service notifies you instantly when those events occur. It’s like signing up for a delivery alert—when the package (event) arrives, you get a text message right away, instead of checking the tracking site repeatedly.
* Your app registers a webhook specifying an endpoint (e.g., `https://your-app.com/webhooks/transactions`) and the event type (e.g., `address_activity`).
* When a new transaction occurs we send a POST request to your endpoint with the transaction details.
* Your app receives the data only when something happens, with no need to ask repeatedly.
**Benefits of Avalanche webhooks**
* **Real-Time updates:** Notifications arrive the moment a transaction is processed, eliminating delays inherent in polling. This is ideal for applications needing immediate responses, like alerting users or triggering automated actions.
* **Efficiency:** Your app doesn’t waste resources making requests when there’s no new data. Data flows only when events occur. This reduces server load, bandwidth usage, and API call quotas.
* **Scalability:** You can subscribe to events for multiple wallets or event types (e.g., transactions, smart contract calls) without increasing the number of requests your app makes. We handle the event detection and delivery, so your app scales effortlessly as monitoring needs grow.
## Event payload structure
The Event structure always begins with the following parameters:
```json theme={null}
{
"webhookId": "6d1bd383-aa8d-47b5-b793-da6d8a115fde",
"eventType": "address_activity",
"messageId": "8e4e7284-852a-478b-b425-27631c8d22d2",
"event": {
}
}
```
**Parameters:**
* `webhookId`: Unique identifier for the webhook in your account.
* `eventType`: The event that caused the webhook to be triggered. In the future, there will be multiple types of events, for the time being only the address\_activity event is supported. The address\_activity event gets triggered whenever the specified addresses participate in a token or AVAX transaction.
* `messageId`: Unique identifier per event sent.
* `event`: Event payload. It contains details about the transaction, logs, and traces. By default logs and internal transactions are not included, if you want to include them use `"includeLogs": true`, and `"includeInternalTxs": true`.
### Address Activity webhook
The address activity webhook allows you to track any interaction with an address (any address). Here is an example of this type of event:
```json theme={null}
{
"webhookId": "263942d1-74a4-4416-aeb4-948b9b9bb7cc",
"eventType": "address_activity",
"messageId": "94df1881-5d93-49d1-a1bd-607830608de2",
"event": {
"transaction": {
"blockHash": "0xbd093536009f7dd785e9a5151d80069a93cc322f8b2df63d373865af4f6ee5be",
"blockNumber": "44568834",
"from": "0xf73166f0c75a3DF444fAbdFDC7e5EE4a73fA51C7",
"gas": "651108",
"gasPrice": "31466275484",
"maxFeePerGas": "31466275484",
"maxPriorityFeePerGas": "31466275484",
"txHash": "0xf6a791920652e87ccc91d2f1b20c1505a94452b88f359acdeb5a6fa8205638c4",
"txStatus": "1",
"input": "0xb80c2f090000000000000000000000000000000000000000000000000000000000000000000000000000000000000000eeeeeeeeeeeeeeeeeeeeeeeeeeeeeeeeeeeeeeee000000000000000000000000b97ef9ef8734c71904d8002f8b6bc66dd9c48a6e000000000000000000000000000000000000000000000000006ca0c737b131f2000000000000000000000000000000000000000000000000000000000011554e000000000000000000000000000000000000000000000000000000006627dadc0000000000000000000000000000000000000000000000000000000000000120000000000000000000000000000000000000000000000000000000000000016000000000000000000000000000000000000000000000000000000000000004600000000000000000000000000000000000000000000000000000000000000001000000000000000000000000000000000000000000000000006ca0c737b131f2000000000000000000000000000000000000000000000000000000000000000100000000000000000000000000000000000000000000000000000000000000200000000000000000000000000000000000000000000000000000000000000001000000000000000000000000000000000000000000000000000000000000002000000000000000000000000000000000000000000000000000000000000000a000000000000000000000000000000000000000000000000000000000000000e000000000000000000000000000000000000000000000000000000000000001200000000000000000000000000000000000000000000000000000000000000160000000000000000000000000b31f66aa3c1e785363f0875a1b74e27b85fd66c70000000000000000000000000000000000000000000000000000000000000001000000000000000000000000be882fb094143b59dc5335d32cecb711570ebdd40000000000000000000000000000000000000000000000000000000000000001000000000000000000000000be882fb094143b59dc5335d32cecb711570ebdd400000000000000000000000000000000000000000000000000000000000000010000000000000000000027100e663593657b064e1bae76d28625df5d0ebd44210000000000000000000000000000000000000000000000000000000000000001000000000000000000000000000000000000000000000000000000000000002000000000000000000000000000000000000000000000000000000000000000c0000000000000000000000000000000000000000000000000000000000000000000000000000000000000000000000000000000000000000000000000000000400000000000000000000000000000000000000000000000000000000000000060000000000000000000000000b31f66aa3c1e785363f0875a1b74e27b85fd66c7000000000000000000000000b97ef9ef8734c71904d8002f8b6bc66dd9c48a6e0000000000000000000000000000000000000000000000000000000000000bb80000000000000000000000000000000000000000000000000000000000000000",
"nonce": "4",
"to": "0x1dac23e41fc8ce857e86fd8c1ae5b6121c67d96d",
"transactionIndex": 0,
"value": "30576074978046450",
"type": 0,
"chainId": "43114",
"receiptCumulativeGasUsed": "212125",
"receiptGasUsed": "212125",
"receiptEffectiveGasPrice": "31466275484",
"receiptRoot": "0xf355b81f3e76392e1b4926429d6abf8ec24601cc3d36d0916de3113aa80dd674",
"erc20Transfers": [
{
"transactionHash": "0xf6a791920652e87ccc91d2f1b20c1505a94452b88f359acdeb5a6fa8205638c4",
"type": "ERC20",
"from": "0x1daC23e41Fc8ce857E86fD8C1AE5b6121C67D96d",
"to": "0xbe882fb094143B59Dc5335D32cEcB711570EbDD4",
"value": "30576074978046450",
"blockTimestamp": 1713884373,
"logIndex": 2,
"erc20Token": {
"address": "0xB31f66AA3C1e785363F0875A1B74E27b85FD66c7",
"name": "Wrapped AVAX",
"symbol": "WAVAX",
"decimals": 18,
"valueWithDecimals": "0.030576074978046448"
}
},
{
"transactionHash": "0xf6a791920652e87ccc91d2f1b20c1505a94452b88f359acdeb5a6fa8205638c4",
"type": "ERC20",
"from": "0x0E663593657B064e1baE76d28625Df5D0eBd4421",
"to": "0xf73166f0c75a3DF444fAbdFDC7e5EE4a73fA51C7",
"value": "1195737",
"blockTimestamp": 1713884373,
"logIndex": 3,
"erc20Token": {
"address": "0xB97EF9Ef8734C71904D8002F8b6Bc66Dd9c48a6E",
"name": "USD Coin",
"symbol": "USDC",
"decimals": 6,
"valueWithDecimals": "1.195737"
}
},
{
"transactionHash": "0xf6a791920652e87ccc91d2f1b20c1505a94452b88f359acdeb5a6fa8205638c4",
"type": "ERC20",
"from": "0xbe882fb094143B59Dc5335D32cEcB711570EbDD4",
"to": "0x0E663593657B064e1baE76d28625Df5D0eBd4421",
"value": "30576074978046450",
"blockTimestamp": 1713884373,
"logIndex": 4,
"erc20Token": {
"address": "0xB31f66AA3C1e785363F0875A1B74E27b85FD66c7",
"name": "Wrapped AVAX",
"symbol": "WAVAX",
"decimals": 18,
"valueWithDecimals": "0.030576074978046448"
}
}
],
"erc721Transfers": [],
"erc1155Transfers": [],
"internalTransactions": [
{
"from": "0xf73166f0c75a3DF444fAbdFDC7e5EE4a73fA51C7",
"to": "0x1daC23e41Fc8ce857E86fD8C1AE5b6121C67D96d",
"internalTxType": "CALL",
"value": "30576074978046450",
"gasUsed": "212125",
"gasLimit": "651108",
"transactionHash": "0xf6a791920652e87ccc91d2f1b20c1505a94452b88f359acdeb5a6fa8205638c4"
},
{
"from": "0x1daC23e41Fc8ce857E86fD8C1AE5b6121C67D96d",
"to": "0xF2781Bb34B6f6Bb9a6B5349b24de91487E653119",
"internalTxType": "DELEGATECALL",
"value": "30576074978046450",
"gasUsed": "176417",
"gasLimit": "605825",
"transactionHash": "0xf6a791920652e87ccc91d2f1b20c1505a94452b88f359acdeb5a6fa8205638c4"
},
{
"from": "0x1daC23e41Fc8ce857E86fD8C1AE5b6121C67D96d",
"to": "0xB97EF9Ef8734C71904D8002F8b6Bc66Dd9c48a6E",
"internalTxType": "STATICCALL",
"value": "0",
"gasUsed": "9750",
"gasLimit": "585767",
"transactionHash": "0xf6a791920652e87ccc91d2f1b20c1505a94452b88f359acdeb5a6fa8205638c4"
},
{
"from": "0xB97EF9Ef8734C71904D8002F8b6Bc66Dd9c48a6E",
"to": "0x30DFE0469803BcE76F8F62aC24b18d33D3d6FfE6",
"internalTxType": "DELEGATECALL",
"value": "0",
"gasUsed": "2553",
"gasLimit": "569571",
"transactionHash": "0xf6a791920652e87ccc91d2f1b20c1505a94452b88f359acdeb5a6fa8205638c4"
},
{
"from": "0x1daC23e41Fc8ce857E86fD8C1AE5b6121C67D96d",
"to": "0xB31f66AA3C1e785363F0875A1B74E27b85FD66c7",
"internalTxType": "CALL",
"value": "30576074978046450",
"gasUsed": "23878",
"gasLimit": "566542",
"transactionHash": "0xf6a791920652e87ccc91d2f1b20c1505a94452b88f359acdeb5a6fa8205638c4"
},
{
"from": "0x1daC23e41Fc8ce857E86fD8C1AE5b6121C67D96d",
"to": "0xB31f66AA3C1e785363F0875A1B74E27b85FD66c7",
"internalTxType": "CALL",
"value": "0",
"gasUsed": "25116",
"gasLimit": "540114",
"transactionHash": "0xf6a791920652e87ccc91d2f1b20c1505a94452b88f359acdeb5a6fa8205638c4"
},
{
"from": "0x1daC23e41Fc8ce857E86fD8C1AE5b6121C67D96d",
"to": "0xbe882fb094143B59Dc5335D32cEcB711570EbDD4",
"internalTxType": "CALL",
"value": "0",
"gasUsed": "81496",
"gasLimit": "511279",
"transactionHash": "0xf6a791920652e87ccc91d2f1b20c1505a94452b88f359acdeb5a6fa8205638c4"
},
{
"from": "0xbe882fb094143B59Dc5335D32cEcB711570EbDD4",
"to": "0xB31f66AA3C1e785363F0875A1B74E27b85FD66c7",
"internalTxType": "STATICCALL",
"value": "0",
"gasUsed": "491",
"gasLimit": "501085",
"transactionHash": "0xf6a791920652e87ccc91d2f1b20c1505a94452b88f359acdeb5a6fa8205638c4"
},
{
"from": "0xbe882fb094143B59Dc5335D32cEcB711570EbDD4",
"to": "0x0E663593657B064e1baE76d28625Df5D0eBd4421",
"internalTxType": "CALL",
"value": "0",
"gasUsed": "74900",
"gasLimit": "497032",
"transactionHash": "0xf6a791920652e87ccc91d2f1b20c1505a94452b88f359acdeb5a6fa8205638c4"
},
{
"from": "0x0E663593657B064e1baE76d28625Df5D0eBd4421",
"to": "0xB97EF9Ef8734C71904D8002F8b6Bc66Dd9c48a6E",
"internalTxType": "CALL",
"value": "0",
"gasUsed": "32063",
"gasLimit": "463431",
"transactionHash": "0xf6a791920652e87ccc91d2f1b20c1505a94452b88f359acdeb5a6fa8205638c4"
},
{
"from": "0xB97EF9Ef8734C71904D8002F8b6Bc66Dd9c48a6E",
"to": "0x30DFE0469803BcE76F8F62aC24b18d33D3d6FfE6",
"internalTxType": "DELEGATECALL",
"value": "0",
"gasUsed": "31363",
"gasLimit": "455542",
"transactionHash": "0xf6a791920652e87ccc91d2f1b20c1505a94452b88f359acdeb5a6fa8205638c4"
},
{
"from": "0x0E663593657B064e1baE76d28625Df5D0eBd4421",
"to": "0xB31f66AA3C1e785363F0875A1B74E27b85FD66c7",
"internalTxType": "STATICCALL",
"value": "0",
"gasUsed": "2491",
"gasLimit": "430998",
"transactionHash": "0xf6a791920652e87ccc91d2f1b20c1505a94452b88f359acdeb5a6fa8205638c4"
},
{
"from": "0x0E663593657B064e1baE76d28625Df5D0eBd4421",
"to": "0xbe882fb094143B59Dc5335D32cEcB711570EbDD4",
"internalTxType": "CALL",
"value": "0",
"gasUsed": "7591",
"gasLimit": "427775",
"transactionHash": "0xf6a791920652e87ccc91d2f1b20c1505a94452b88f359acdeb5a6fa8205638c4"
},
{
"from": "0xbe882fb094143B59Dc5335D32cEcB711570EbDD4",
"to": "0xB31f66AA3C1e785363F0875A1B74E27b85FD66c7",
"internalTxType": "CALL",
"value": "0",
"gasUsed": "6016",
"gasLimit": "419746",
"transactionHash": "0xf6a791920652e87ccc91d2f1b20c1505a94452b88f359acdeb5a6fa8205638c4"
},
{
"from": "0x0E663593657B064e1baE76d28625Df5D0eBd4421",
"to": "0xB31f66AA3C1e785363F0875A1B74E27b85FD66c7",
"internalTxType": "STATICCALL",
"value": "0",
"gasUsed": "491",
"gasLimit": "419670",
"transactionHash": "0xf6a791920652e87ccc91d2f1b20c1505a94452b88f359acdeb5a6fa8205638c4"
},
{
"from": "0x1daC23e41Fc8ce857E86fD8C1AE5b6121C67D96d",
"to": "0xB97EF9Ef8734C71904D8002F8b6Bc66Dd9c48a6E",
"internalTxType": "STATICCALL",
"value": "0",
"gasUsed": "3250",
"gasLimit": "430493",
"transactionHash": "0xf6a791920652e87ccc91d2f1b20c1505a94452b88f359acdeb5a6fa8205638c4"
},
{
"from": "0xB97EF9Ef8734C71904D8002F8b6Bc66Dd9c48a6E",
"to": "0x30DFE0469803BcE76F8F62aC24b18d33D3d6FfE6",
"internalTxType": "DELEGATECALL",
"value": "0",
"gasUsed": "2553",
"gasLimit": "423121",
"transactionHash": "0xf6a791920652e87ccc91d2f1b20c1505a94452b88f359acdeb5a6fa8205638c4"
},
{
"from": "0x1daC23e41Fc8ce857E86fD8C1AE5b6121C67D96d",
"to": "0xB97EF9Ef8734C71904D8002F8b6Bc66Dd9c48a6E",
"internalTxType": "STATICCALL",
"value": "0",
"gasUsed": "1250",
"gasLimit": "426766",
"transactionHash": "0xf6a791920652e87ccc91d2f1b20c1505a94452b88f359acdeb5a6fa8205638c4"
},
{
"from": "0xB97EF9Ef8734C71904D8002F8b6Bc66Dd9c48a6E",
"to": "0x30DFE0469803BcE76F8F62aC24b18d33D3d6FfE6",
"internalTxType": "DELEGATECALL",
"value": "0",
"gasUsed": "553",
"gasLimit": "419453",
"transactionHash": "0xf6a791920652e87ccc91d2f1b20c1505a94452b88f359acdeb5a6fa8205638c4"
}
],
"blockTimestamp": 1713884373
}
}
}
```
# Rate Limits (/docs/api-reference/webhook-api/rate-limits)
---
title: Rate Limits
description: Rate Limits for the Webhooks API
icon: Clock
---
Rate limiting is managed through a weighted scoring system, known as Compute Units (CUs). Each API request consumes a specified number of CUs, determined by the complexity of the request. This system is designed to accommodate basic requests while efficiently handling more computationally intensive operations.
## Rate Limit Tiers
The maximum CUs (rate-limiting score) for a user depends on their subscription level and is delineated in the following table:
| Subscription Level | Per Minute Limit (CUs) | Per Day Limit (CUs) |
| :----------------- | :--------------------- | :------------------ |
| Unauthenticated | 6,000 | 1,200,000 |
| Free | 8,000 | 2,000,000 |
| Base | 10,000 | 3,750,000 |
| Growth | 14,000 | 11,200,000 |
| Pro | 20,000 | 25,000,000 |
To update your subscription level use the [AvaCloud Portal](https://app.avacloud.io/)
### Continous polling
Continuous polling is a method where your application repeatedly sends requests to an API at fixed intervals to check for new data or events. Think of it like checking your mailbox every five minutes to see if new mail has arrived, whether or not anything is there.
* You want to track new transactions for a specific wallet.
* Your application calls an API every few seconds (e.g., every 5 seconds) with a query like, “Are there any new transactions for this wallet since my last check?”
* The API responds with either new transaction data or a confirmation that nothing has changed.
**Downsides of continuous polling**
* **Inefficiency:** Your app makes requests even when no new transactions occur, wasting computational resources, bandwidth, and potentially incurring higher API costs.
For example, if no transactions happen for an hour, your app still sends hundreds of unnecessary requests.
* **Delayed updates:**
Since polling happens at set intervals, there’s a potential delay in detecting events. If a transaction occurs just after a poll, your app won’t know until the next check—up to 5 seconds later in our example.
This lag can be critical for time-sensitive applications, like trading or notifications.
* **Scalability challenges:** Monitoring one wallet might be manageable, but if you’re tracking dozens or hundreds of wallets, the number of requests multiplies quickly.
### Webhook subscription
Webhooks are an event-driven alternative where your application subscribes to specific events, and the Avalanche service notifies you instantly when those events occur. It’s like signing up for a delivery alert—when the package (event) arrives, you get a text message right away, instead of checking the tracking site repeatedly.
* Your app registers a webhook specifying an endpoint (e.g., `https://your-app.com/webhooks/transactions`) and the event type (e.g., `address_activity`).
* When a new transaction occurs we send a POST request to your endpoint with the transaction details.
* Your app receives the data only when something happens, with no need to ask repeatedly.
**Benefits of Avalanche webhooks**
* **Real-Time updates:** Notifications arrive the moment a transaction is processed, eliminating delays inherent in polling. This is ideal for applications needing immediate responses, like alerting users or triggering automated actions.
* **Efficiency:** Your app doesn’t waste resources making requests when there’s no new data. Data flows only when events occur. This reduces server load, bandwidth usage, and API call quotas.
* **Scalability:** You can subscribe to events for multiple wallets or event types (e.g., transactions, smart contract calls) without increasing the number of requests your app makes. We handle the event detection and delivery, so your app scales effortlessly as monitoring needs grow.
## Event payload structure
The Event structure always begins with the following parameters:
```json theme={null}
{
"webhookId": "6d1bd383-aa8d-47b5-b793-da6d8a115fde",
"eventType": "address_activity",
"messageId": "8e4e7284-852a-478b-b425-27631c8d22d2",
"event": {
}
}
```
**Parameters:**
* `webhookId`: Unique identifier for the webhook in your account.
* `eventType`: The event that caused the webhook to be triggered. In the future, there will be multiple types of events, for the time being only the address\_activity event is supported. The address\_activity event gets triggered whenever the specified addresses participate in a token or AVAX transaction.
* `messageId`: Unique identifier per event sent.
* `event`: Event payload. It contains details about the transaction, logs, and traces. By default logs and internal transactions are not included, if you want to include them use `"includeLogs": true`, and `"includeInternalTxs": true`.
### Address Activity webhook
The address activity webhook allows you to track any interaction with an address (any address). Here is an example of this type of event:
```json theme={null}
{
"webhookId": "263942d1-74a4-4416-aeb4-948b9b9bb7cc",
"eventType": "address_activity",
"messageId": "94df1881-5d93-49d1-a1bd-607830608de2",
"event": {
"transaction": {
"blockHash": "0xbd093536009f7dd785e9a5151d80069a93cc322f8b2df63d373865af4f6ee5be",
"blockNumber": "44568834",
"from": "0xf73166f0c75a3DF444fAbdFDC7e5EE4a73fA51C7",
"gas": "651108",
"gasPrice": "31466275484",
"maxFeePerGas": "31466275484",
"maxPriorityFeePerGas": "31466275484",
"txHash": "0xf6a791920652e87ccc91d2f1b20c1505a94452b88f359acdeb5a6fa8205638c4",
"txStatus": "1",
"input": "0xb80c2f090000000000000000000000000000000000000000000000000000000000000000000000000000000000000000eeeeeeeeeeeeeeeeeeeeeeeeeeeeeeeeeeeeeeee000000000000000000000000b97ef9ef8734c71904d8002f8b6bc66dd9c48a6e000000000000000000000000000000000000000000000000006ca0c737b131f2000000000000000000000000000000000000000000000000000000000011554e000000000000000000000000000000000000000000000000000000006627dadc0000000000000000000000000000000000000000000000000000000000000120000000000000000000000000000000000000000000000000000000000000016000000000000000000000000000000000000000000000000000000000000004600000000000000000000000000000000000000000000000000000000000000001000000000000000000000000000000000000000000000000006ca0c737b131f2000000000000000000000000000000000000000000000000000000000000000100000000000000000000000000000000000000000000000000000000000000200000000000000000000000000000000000000000000000000000000000000001000000000000000000000000000000000000000000000000000000000000002000000000000000000000000000000000000000000000000000000000000000a000000000000000000000000000000000000000000000000000000000000000e000000000000000000000000000000000000000000000000000000000000001200000000000000000000000000000000000000000000000000000000000000160000000000000000000000000b31f66aa3c1e785363f0875a1b74e27b85fd66c70000000000000000000000000000000000000000000000000000000000000001000000000000000000000000be882fb094143b59dc5335d32cecb711570ebdd40000000000000000000000000000000000000000000000000000000000000001000000000000000000000000be882fb094143b59dc5335d32cecb711570ebdd400000000000000000000000000000000000000000000000000000000000000010000000000000000000027100e663593657b064e1bae76d28625df5d0ebd44210000000000000000000000000000000000000000000000000000000000000001000000000000000000000000000000000000000000000000000000000000002000000000000000000000000000000000000000000000000000000000000000c0000000000000000000000000000000000000000000000000000000000000000000000000000000000000000000000000000000000000000000000000000000400000000000000000000000000000000000000000000000000000000000000060000000000000000000000000b31f66aa3c1e785363f0875a1b74e27b85fd66c7000000000000000000000000b97ef9ef8734c71904d8002f8b6bc66dd9c48a6e0000000000000000000000000000000000000000000000000000000000000bb80000000000000000000000000000000000000000000000000000000000000000",
"nonce": "4",
"to": "0x1dac23e41fc8ce857e86fd8c1ae5b6121c67d96d",
"transactionIndex": 0,
"value": "30576074978046450",
"type": 0,
"chainId": "43114",
"receiptCumulativeGasUsed": "212125",
"receiptGasUsed": "212125",
"receiptEffectiveGasPrice": "31466275484",
"receiptRoot": "0xf355b81f3e76392e1b4926429d6abf8ec24601cc3d36d0916de3113aa80dd674",
"erc20Transfers": [
{
"transactionHash": "0xf6a791920652e87ccc91d2f1b20c1505a94452b88f359acdeb5a6fa8205638c4",
"type": "ERC20",
"from": "0x1daC23e41Fc8ce857E86fD8C1AE5b6121C67D96d",
"to": "0xbe882fb094143B59Dc5335D32cEcB711570EbDD4",
"value": "30576074978046450",
"blockTimestamp": 1713884373,
"logIndex": 2,
"erc20Token": {
"address": "0xB31f66AA3C1e785363F0875A1B74E27b85FD66c7",
"name": "Wrapped AVAX",
"symbol": "WAVAX",
"decimals": 18,
"valueWithDecimals": "0.030576074978046448"
}
},
{
"transactionHash": "0xf6a791920652e87ccc91d2f1b20c1505a94452b88f359acdeb5a6fa8205638c4",
"type": "ERC20",
"from": "0x0E663593657B064e1baE76d28625Df5D0eBd4421",
"to": "0xf73166f0c75a3DF444fAbdFDC7e5EE4a73fA51C7",
"value": "1195737",
"blockTimestamp": 1713884373,
"logIndex": 3,
"erc20Token": {
"address": "0xB97EF9Ef8734C71904D8002F8b6Bc66Dd9c48a6E",
"name": "USD Coin",
"symbol": "USDC",
"decimals": 6,
"valueWithDecimals": "1.195737"
}
},
{
"transactionHash": "0xf6a791920652e87ccc91d2f1b20c1505a94452b88f359acdeb5a6fa8205638c4",
"type": "ERC20",
"from": "0xbe882fb094143B59Dc5335D32cEcB711570EbDD4",
"to": "0x0E663593657B064e1baE76d28625Df5D0eBd4421",
"value": "30576074978046450",
"blockTimestamp": 1713884373,
"logIndex": 4,
"erc20Token": {
"address": "0xB31f66AA3C1e785363F0875A1B74E27b85FD66c7",
"name": "Wrapped AVAX",
"symbol": "WAVAX",
"decimals": 18,
"valueWithDecimals": "0.030576074978046448"
}
}
],
"erc721Transfers": [],
"erc1155Transfers": [],
"internalTransactions": [
{
"from": "0xf73166f0c75a3DF444fAbdFDC7e5EE4a73fA51C7",
"to": "0x1daC23e41Fc8ce857E86fD8C1AE5b6121C67D96d",
"internalTxType": "CALL",
"value": "30576074978046450",
"gasUsed": "212125",
"gasLimit": "651108",
"transactionHash": "0xf6a791920652e87ccc91d2f1b20c1505a94452b88f359acdeb5a6fa8205638c4"
},
{
"from": "0x1daC23e41Fc8ce857E86fD8C1AE5b6121C67D96d",
"to": "0xF2781Bb34B6f6Bb9a6B5349b24de91487E653119",
"internalTxType": "DELEGATECALL",
"value": "30576074978046450",
"gasUsed": "176417",
"gasLimit": "605825",
"transactionHash": "0xf6a791920652e87ccc91d2f1b20c1505a94452b88f359acdeb5a6fa8205638c4"
},
{
"from": "0x1daC23e41Fc8ce857E86fD8C1AE5b6121C67D96d",
"to": "0xB97EF9Ef8734C71904D8002F8b6Bc66Dd9c48a6E",
"internalTxType": "STATICCALL",
"value": "0",
"gasUsed": "9750",
"gasLimit": "585767",
"transactionHash": "0xf6a791920652e87ccc91d2f1b20c1505a94452b88f359acdeb5a6fa8205638c4"
},
{
"from": "0xB97EF9Ef8734C71904D8002F8b6Bc66Dd9c48a6E",
"to": "0x30DFE0469803BcE76F8F62aC24b18d33D3d6FfE6",
"internalTxType": "DELEGATECALL",
"value": "0",
"gasUsed": "2553",
"gasLimit": "569571",
"transactionHash": "0xf6a791920652e87ccc91d2f1b20c1505a94452b88f359acdeb5a6fa8205638c4"
},
{
"from": "0x1daC23e41Fc8ce857E86fD8C1AE5b6121C67D96d",
"to": "0xB31f66AA3C1e785363F0875A1B74E27b85FD66c7",
"internalTxType": "CALL",
"value": "30576074978046450",
"gasUsed": "23878",
"gasLimit": "566542",
"transactionHash": "0xf6a791920652e87ccc91d2f1b20c1505a94452b88f359acdeb5a6fa8205638c4"
},
{
"from": "0x1daC23e41Fc8ce857E86fD8C1AE5b6121C67D96d",
"to": "0xB31f66AA3C1e785363F0875A1B74E27b85FD66c7",
"internalTxType": "CALL",
"value": "0",
"gasUsed": "25116",
"gasLimit": "540114",
"transactionHash": "0xf6a791920652e87ccc91d2f1b20c1505a94452b88f359acdeb5a6fa8205638c4"
},
{
"from": "0x1daC23e41Fc8ce857E86fD8C1AE5b6121C67D96d",
"to": "0xbe882fb094143B59Dc5335D32cEcB711570EbDD4",
"internalTxType": "CALL",
"value": "0",
"gasUsed": "81496",
"gasLimit": "511279",
"transactionHash": "0xf6a791920652e87ccc91d2f1b20c1505a94452b88f359acdeb5a6fa8205638c4"
},
{
"from": "0xbe882fb094143B59Dc5335D32cEcB711570EbDD4",
"to": "0xB31f66AA3C1e785363F0875A1B74E27b85FD66c7",
"internalTxType": "STATICCALL",
"value": "0",
"gasUsed": "491",
"gasLimit": "501085",
"transactionHash": "0xf6a791920652e87ccc91d2f1b20c1505a94452b88f359acdeb5a6fa8205638c4"
},
{
"from": "0xbe882fb094143B59Dc5335D32cEcB711570EbDD4",
"to": "0x0E663593657B064e1baE76d28625Df5D0eBd4421",
"internalTxType": "CALL",
"value": "0",
"gasUsed": "74900",
"gasLimit": "497032",
"transactionHash": "0xf6a791920652e87ccc91d2f1b20c1505a94452b88f359acdeb5a6fa8205638c4"
},
{
"from": "0x0E663593657B064e1baE76d28625Df5D0eBd4421",
"to": "0xB97EF9Ef8734C71904D8002F8b6Bc66Dd9c48a6E",
"internalTxType": "CALL",
"value": "0",
"gasUsed": "32063",
"gasLimit": "463431",
"transactionHash": "0xf6a791920652e87ccc91d2f1b20c1505a94452b88f359acdeb5a6fa8205638c4"
},
{
"from": "0xB97EF9Ef8734C71904D8002F8b6Bc66Dd9c48a6E",
"to": "0x30DFE0469803BcE76F8F62aC24b18d33D3d6FfE6",
"internalTxType": "DELEGATECALL",
"value": "0",
"gasUsed": "31363",
"gasLimit": "455542",
"transactionHash": "0xf6a791920652e87ccc91d2f1b20c1505a94452b88f359acdeb5a6fa8205638c4"
},
{
"from": "0x0E663593657B064e1baE76d28625Df5D0eBd4421",
"to": "0xB31f66AA3C1e785363F0875A1B74E27b85FD66c7",
"internalTxType": "STATICCALL",
"value": "0",
"gasUsed": "2491",
"gasLimit": "430998",
"transactionHash": "0xf6a791920652e87ccc91d2f1b20c1505a94452b88f359acdeb5a6fa8205638c4"
},
{
"from": "0x0E663593657B064e1baE76d28625Df5D0eBd4421",
"to": "0xbe882fb094143B59Dc5335D32cEcB711570EbDD4",
"internalTxType": "CALL",
"value": "0",
"gasUsed": "7591",
"gasLimit": "427775",
"transactionHash": "0xf6a791920652e87ccc91d2f1b20c1505a94452b88f359acdeb5a6fa8205638c4"
},
{
"from": "0xbe882fb094143B59Dc5335D32cEcB711570EbDD4",
"to": "0xB31f66AA3C1e785363F0875A1B74E27b85FD66c7",
"internalTxType": "CALL",
"value": "0",
"gasUsed": "6016",
"gasLimit": "419746",
"transactionHash": "0xf6a791920652e87ccc91d2f1b20c1505a94452b88f359acdeb5a6fa8205638c4"
},
{
"from": "0x0E663593657B064e1baE76d28625Df5D0eBd4421",
"to": "0xB31f66AA3C1e785363F0875A1B74E27b85FD66c7",
"internalTxType": "STATICCALL",
"value": "0",
"gasUsed": "491",
"gasLimit": "419670",
"transactionHash": "0xf6a791920652e87ccc91d2f1b20c1505a94452b88f359acdeb5a6fa8205638c4"
},
{
"from": "0x1daC23e41Fc8ce857E86fD8C1AE5b6121C67D96d",
"to": "0xB97EF9Ef8734C71904D8002F8b6Bc66Dd9c48a6E",
"internalTxType": "STATICCALL",
"value": "0",
"gasUsed": "3250",
"gasLimit": "430493",
"transactionHash": "0xf6a791920652e87ccc91d2f1b20c1505a94452b88f359acdeb5a6fa8205638c4"
},
{
"from": "0xB97EF9Ef8734C71904D8002F8b6Bc66Dd9c48a6E",
"to": "0x30DFE0469803BcE76F8F62aC24b18d33D3d6FfE6",
"internalTxType": "DELEGATECALL",
"value": "0",
"gasUsed": "2553",
"gasLimit": "423121",
"transactionHash": "0xf6a791920652e87ccc91d2f1b20c1505a94452b88f359acdeb5a6fa8205638c4"
},
{
"from": "0x1daC23e41Fc8ce857E86fD8C1AE5b6121C67D96d",
"to": "0xB97EF9Ef8734C71904D8002F8b6Bc66Dd9c48a6E",
"internalTxType": "STATICCALL",
"value": "0",
"gasUsed": "1250",
"gasLimit": "426766",
"transactionHash": "0xf6a791920652e87ccc91d2f1b20c1505a94452b88f359acdeb5a6fa8205638c4"
},
{
"from": "0xB97EF9Ef8734C71904D8002F8b6Bc66Dd9c48a6E",
"to": "0x30DFE0469803BcE76F8F62aC24b18d33D3d6FfE6",
"internalTxType": "DELEGATECALL",
"value": "0",
"gasUsed": "553",
"gasLimit": "419453",
"transactionHash": "0xf6a791920652e87ccc91d2f1b20c1505a94452b88f359acdeb5a6fa8205638c4"
}
],
"blockTimestamp": 1713884373
}
}
}
```
# Rate Limits (/docs/api-reference/webhook-api/rate-limits)
---
title: Rate Limits
description: Rate Limits for the Webhooks API
icon: Clock
---
Rate limiting is managed through a weighted scoring system, known as Compute Units (CUs). Each API request consumes a specified number of CUs, determined by the complexity of the request. This system is designed to accommodate basic requests while efficiently handling more computationally intensive operations.
## Rate Limit Tiers
The maximum CUs (rate-limiting score) for a user depends on their subscription level and is delineated in the following table:
| Subscription Level | Per Minute Limit (CUs) | Per Day Limit (CUs) |
| :----------------- | :--------------------- | :------------------ |
| Unauthenticated | 6,000 | 1,200,000 |
| Free | 8,000 | 2,000,000 |
| Base | 10,000 | 3,750,000 |
| Growth | 14,000 | 11,200,000 |
| Pro | 20,000 | 25,000,000 |
To update your subscription level use the [AvaCloud Portal](https://app.avacloud.io/)
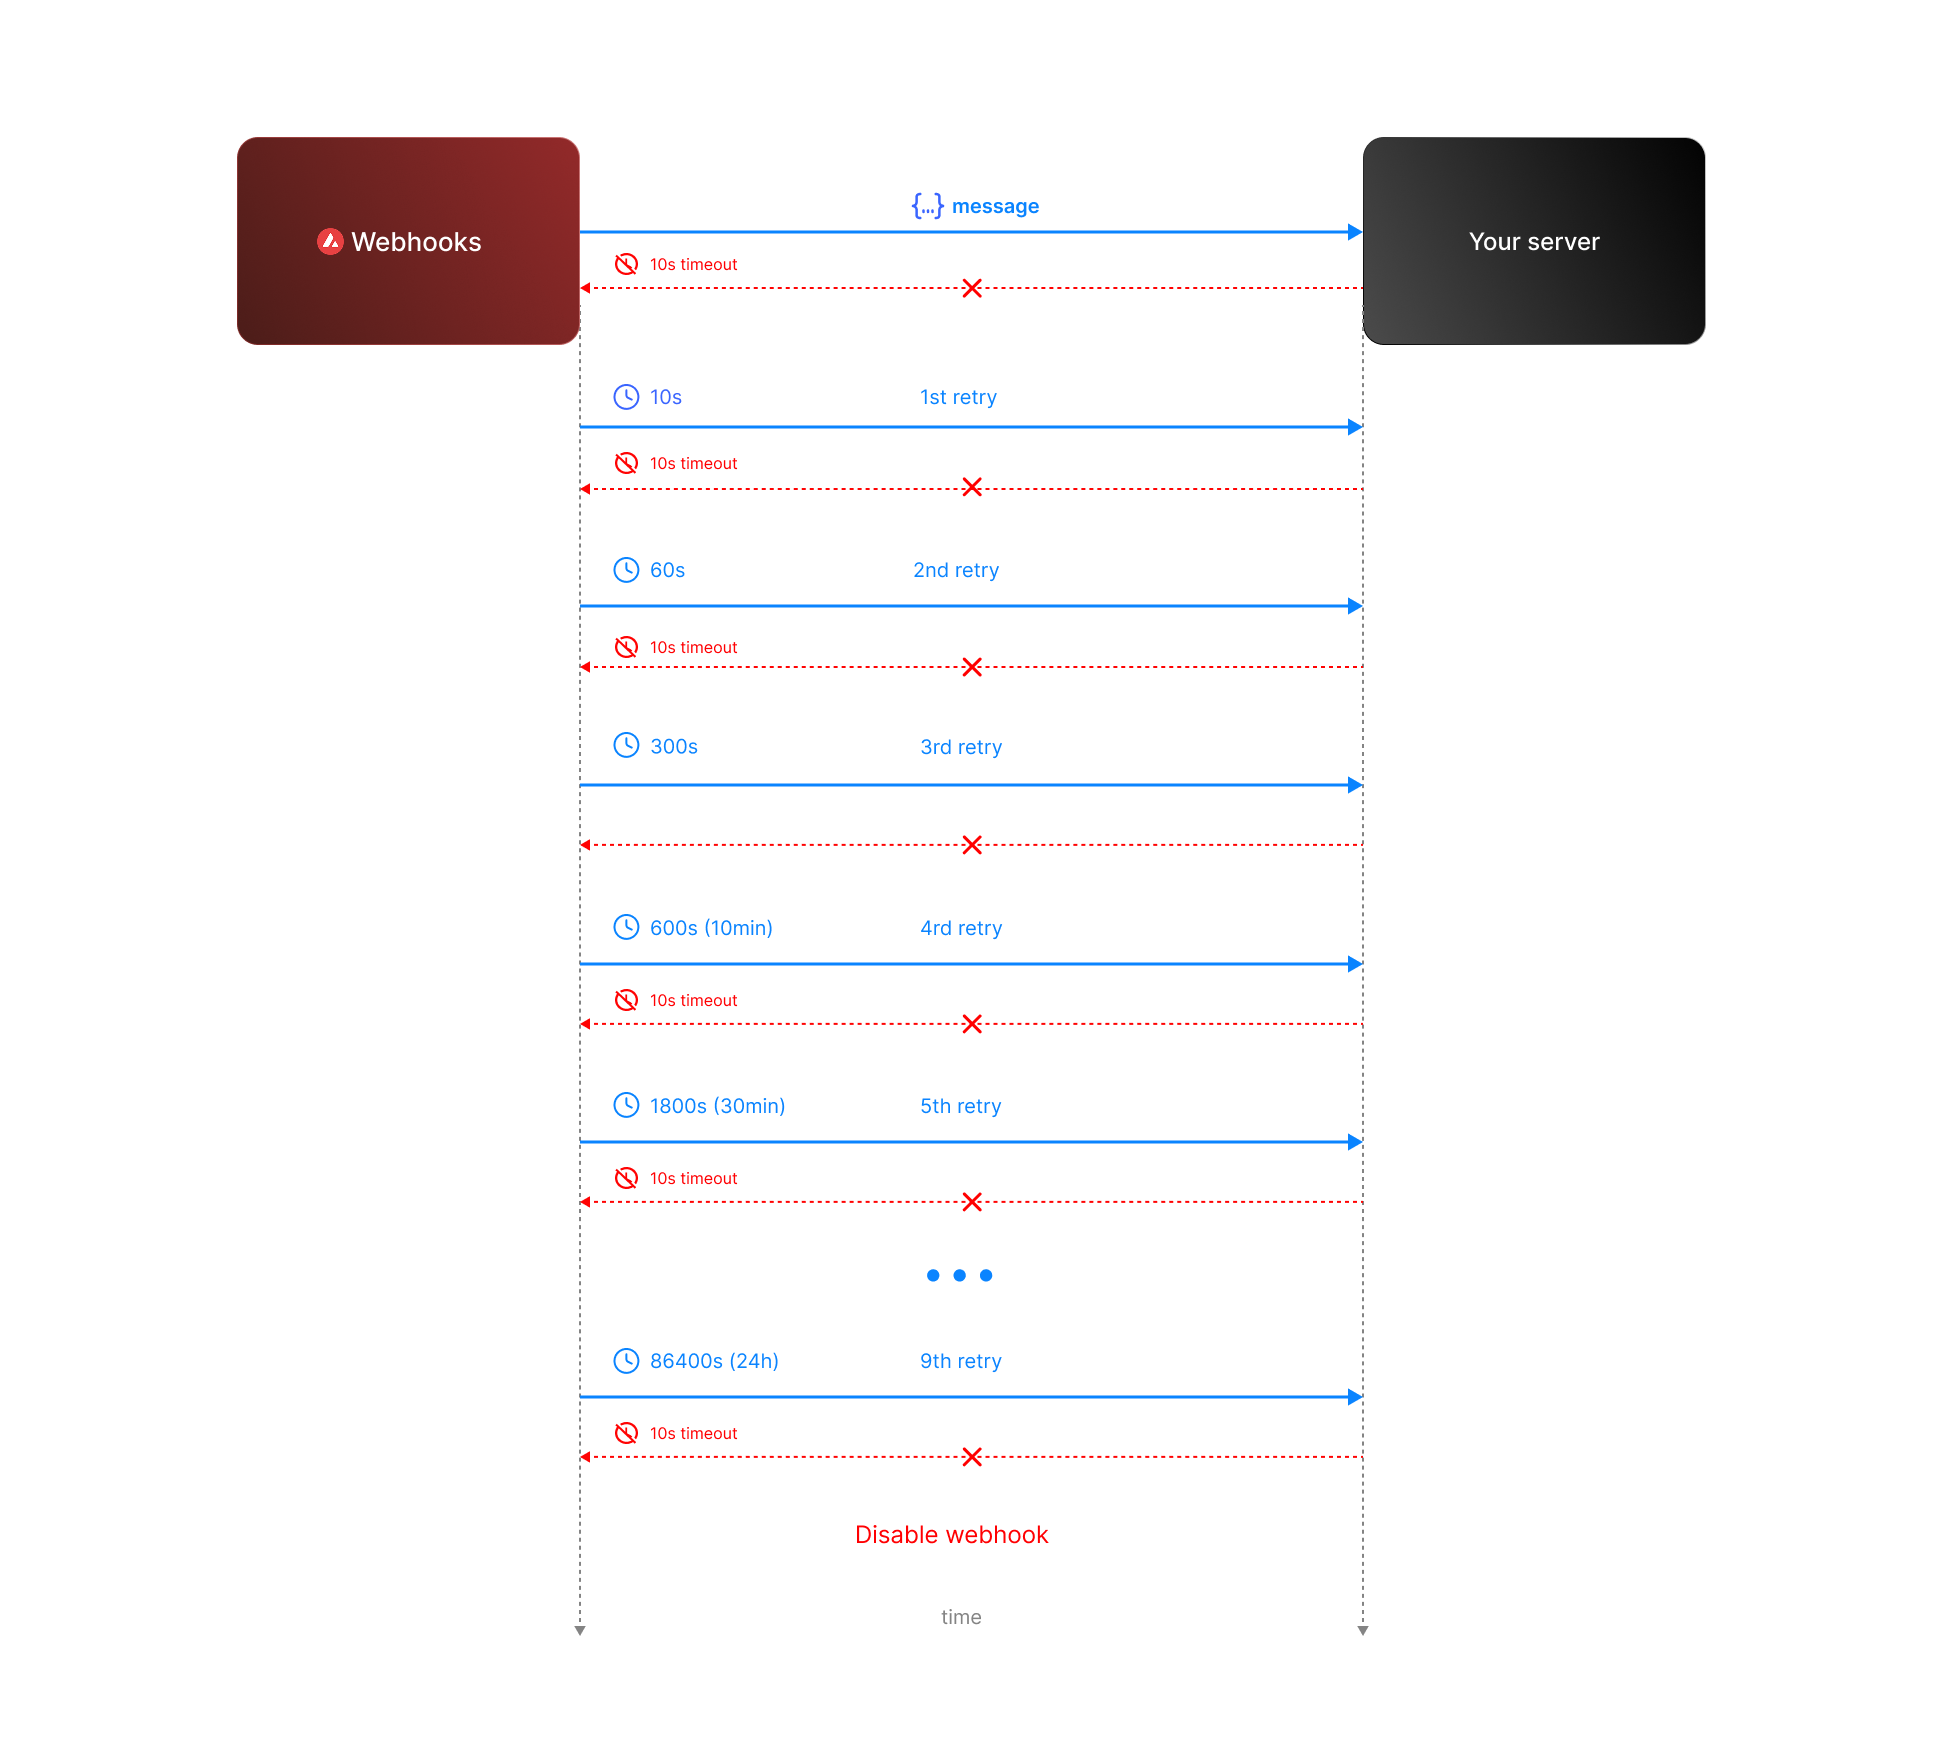 * **Attempt 1:** We send the message expecting a respose with `200` status code. If we do not receive a `200` status code within **10 seconds**, the attempt is considered failed. During this window, any non-`2xx` responses are ignored.
* **Attempt 2:** Occurs **10 seconds** after the first attempt, with another 10-second timeout and the same rule for ignoring non-`2xx` responses.
* **Retry Queue After Two Failed Attempts**
If both initial attempts fail, the message enters a **retry queue** with progressively longer intervals between attempts. Each retry attempt still has a 10-second timeout, and non-`2xx` responses are ignored during this window.
The retry schedule is as follows:
| Attempt | Interval |
| ------- | -------- |
| 3 | 1 min |
| 4 | 5 min |
| 5 | 10 min |
| 6 | 30 min |
| 7 | 2 hours |
| 8 | 6 hours |
| 9 | 12 hours |
| 10 | 24 hours |
**Total Retry Duration:** Up to approximately 44.8 hours (2,688 minutes) if all retries are exhausted.
**Interval Timing:** Each retry interval starts 10 seconds after the previous attempt is deemed failed. For example, if attempt 2 fails at t=20 seconds, attempt 3 will start at t=80 seconds (20s + 1 minute interval + 10s).
* **Attempt 1:** We send the message expecting a respose with `200` status code. If we do not receive a `200` status code within **10 seconds**, the attempt is considered failed. During this window, any non-`2xx` responses are ignored.
* **Attempt 2:** Occurs **10 seconds** after the first attempt, with another 10-second timeout and the same rule for ignoring non-`2xx` responses.
* **Retry Queue After Two Failed Attempts**
If both initial attempts fail, the message enters a **retry queue** with progressively longer intervals between attempts. Each retry attempt still has a 10-second timeout, and non-`2xx` responses are ignored during this window.
The retry schedule is as follows:
| Attempt | Interval |
| ------- | -------- |
| 3 | 1 min |
| 4 | 5 min |
| 5 | 10 min |
| 6 | 30 min |
| 7 | 2 hours |
| 8 | 6 hours |
| 9 | 12 hours |
| 10 | 24 hours |
**Total Retry Duration:** Up to approximately 44.8 hours (2,688 minutes) if all retries are exhausted.
**Interval Timing:** Each retry interval starts 10 seconds after the previous attempt is deemed failed. For example, if attempt 2 fails at t=20 seconds, attempt 3 will start at t=80 seconds (20s + 1 minute interval + 10s).
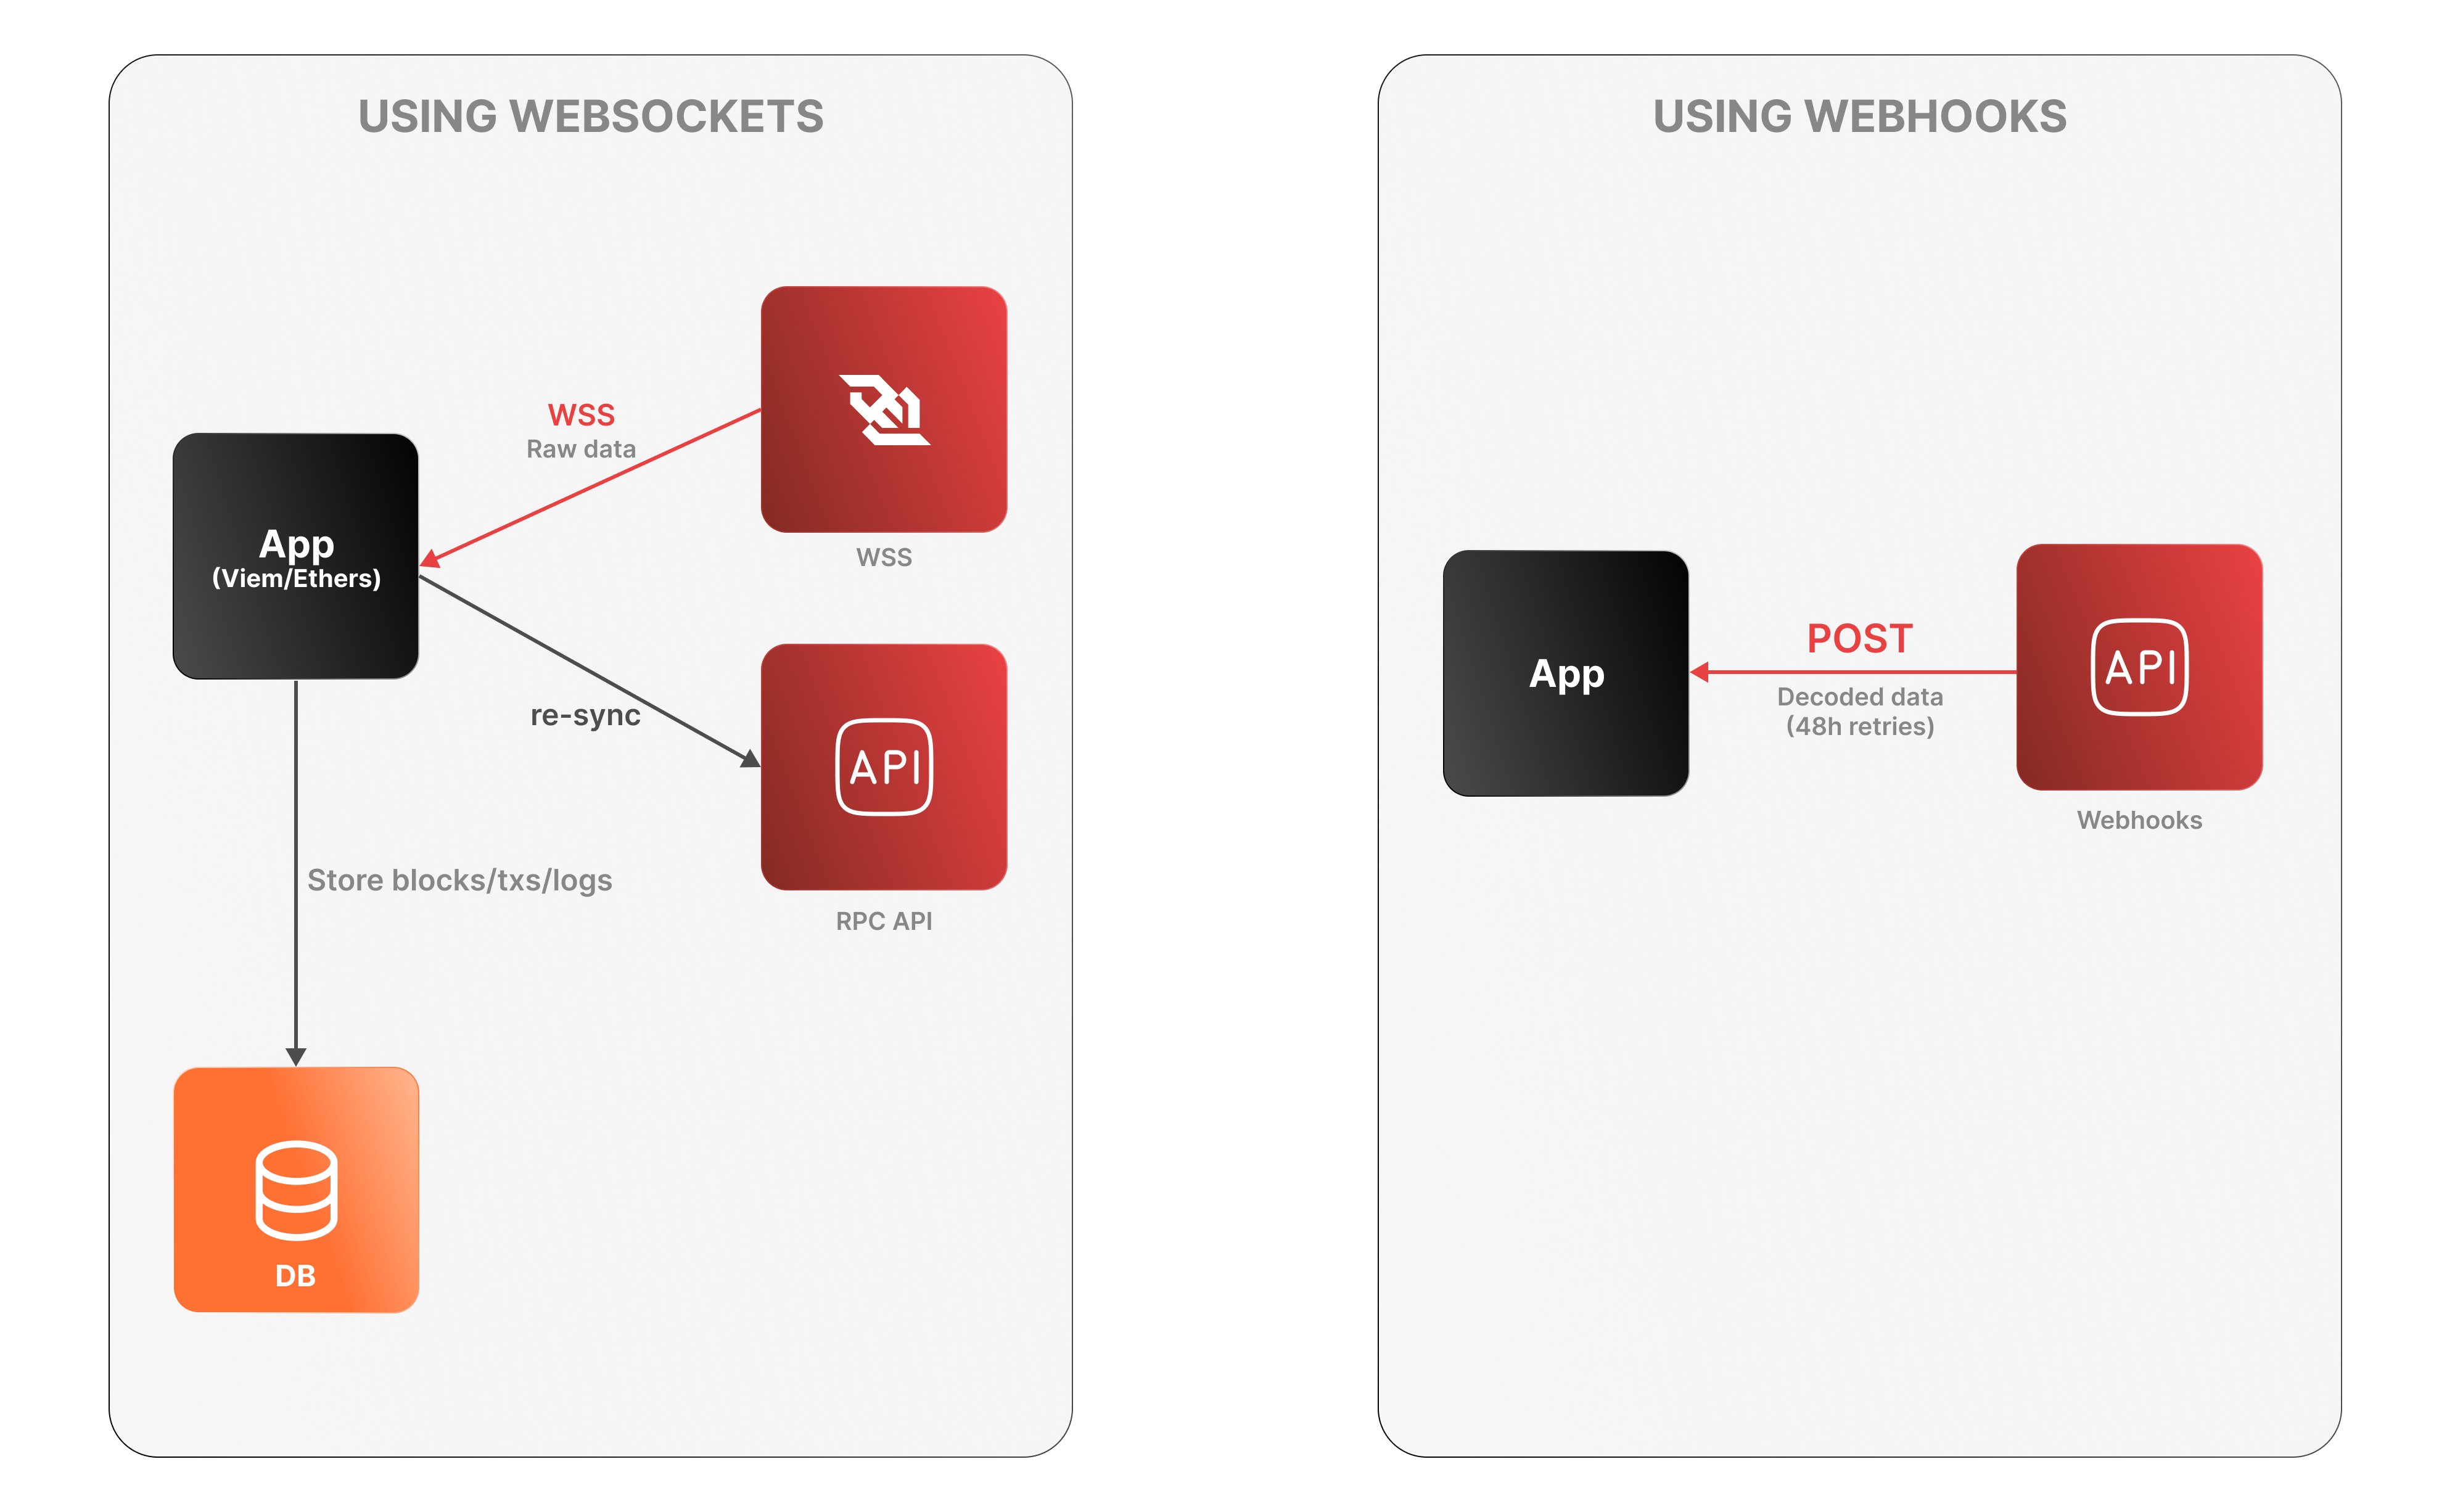 **WebSockets**
* The app connects to the Avalanche RPC API over WSS to receive raw log data.
* It must decode logs, manage connection state, and store data locally.
* On disconnection, it must re-sync via an external Data API or using standard `eth_*` RPC calls (e.g., `eth_getLogs`, `eth_getBlockByNumber`).
**WebSockets**
* The app connects to the Avalanche RPC API over WSS to receive raw log data.
* It must decode logs, manage connection state, and store data locally.
* On disconnection, it must re-sync via an external Data API or using standard `eth_*` RPC calls (e.g., `eth_getLogs`, `eth_getBlockByNumber`).